Why, When & How to Use the Walking Foot for Perfect Stitches
Are you ready to take your sewing projects to a whole new level of precision and professionalism?
Look no further than the walking foot a versatile sewing machine attachment that can revolutionize your stitching experience.
Whether you’re a seasoned seamstress or just starting your creative journey, understanding how to use the walking foot effectively is a game-changer.
In this comprehensive guide, we’ll walk you through everything you need to know about this remarkable tool, from its purpose and benefits to step-by-step instructions on how to attach and utilize it.
Say goodbye to fabric slippage, uneven seams, and frustrating bunching, as we delve into the world of the walking foot and unlock its potential for flawless sewing.
Get ready to elevate your craftsmanship and create impeccable projects that will leave everyone in awe. Let’s dive in and discover the magic of walking foot together!
What is a Walking Foot?
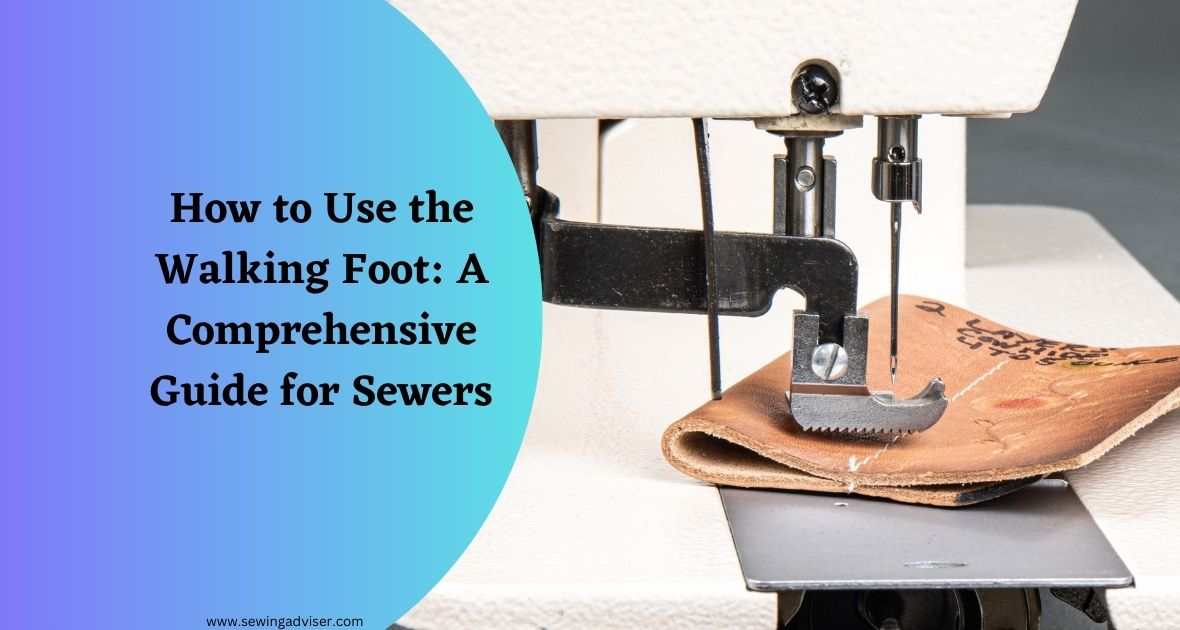
A walking foot is a type of sewing foot that helps to feed fabric evenly through the sewing machine. It gets its name from the way it moves the fabric while sewing, which is similar to the way we walk.
A walking foot has a set of feed dogs (the teeth that grip the fabric and move it through the machine) on the bottom, as well as on the top. This helps to grip the fabric and move it through the machine more evenly, which is especially helpful when sewing multiple layers of fabric.
How to Use the Walking Foot for Sewing
The walking foot is an essential tool for sewing, especially when working with thicker fabrics. Here are a few tips on how to use the walking foot for sewing:
- When sewing with the walking foot, it is important to use a straight stitch. This will ensure that the fabric feeds evenly through the machine.
- If you are working with a thick fabric, you may need to use a longer stitch length. This will prevent the fabric from bunching up under the presser foot.
- It is also important to use a smaller needle when sewing with the walking foot. This will prevent the needle from breaking and will also make it easier to sew through thicker fabrics.
- When sewing a curved seam, it is best to start and stop with a straight stitch. Then, sew the curve with a zigzag stitch. This will help to keep the fabric from bunching up.
- Always test your stitches on a scrap piece of fabric before sewing on your project. This will help you to get the perfect stitch every time.
How to Attach the Walking Foot to Your Sewing Machine
In this tutorial, we’ll show you how to attach the walking foot to your sewing machine.
First, remove the regular presser foot from your machine. Next, locate the shank, which is the metal rod that connects the presser foot to the machine. On most machines, the shank is located at the back of the presser foot holder.
To attach the walking foot, simply slide the shank into the slot on the back of the foot. Make sure that the foot is facing the correct direction before inserting it. Once the shank is in place, tighten the screw to secure the foot.
Now you’re ready to start sewing with your walking foot! Just be sure to read the instructions that come with your foot, as some models may have slightly different attachment methods.
What are the Benefits of Using the Walking Foot for Sewing?
Some benefits to keep in mind are:
- The walking foot helps to feed the fabric through the machine evenly. This is especially helpful when sewing multiple layers of fabric, or fabric with a nap (like velvet or corduroy).
- It can also be helpful when sewing difficult-to-feed fabrics like leather.
- The walking foot is great for quilting projects! It helps to keep the fabric from shifting or stretching as you sew.
- The walking foot can also be used for applique projects. It’s helpful in keeping the fabric from stretching or shifting as you sew around the applique.
- The walking foot is a great tool for any sewist, whether you’re a beginner or a pro. It can help you achieve professional-looking results on a variety of different projects.
So, what are you waiting for? Give the walking foot a try on your next sewing project!
How can the Walking Foot be Used for Quilting?
Here’s how you can use a walking foot for quilting:
- Attach the walking foot: Start by removing the regular presser foot from your sewing machine and replacing it with the walking foot. Consult your sewing machine’s manual for specific instructions on attaching the walking foot, as the process may vary depending on the machine model.
- Prepare the quilt sandwich: Layer your quilt sandwich, which includes the quilt top, batting, and backing fabric. Ensure that the layers are smooth and flat, with no wrinkles or puckering.
- Adjust the stitch settings: Set your sewing machine to a straight stitch or a stitch pattern appropriate for quilting. Choose a stitch length that suits your project, usually between 2.5 to 3.5 mm. Test the stitching on a scrap piece of fabric to ensure it produces the desired result.
- Start quilting: Begin stitching from the center of the quilt and work your way outward. Guide the quilt sandwich under the needle, allowing the walking foot to evenly feed the layers through the machine. The walking foot’s upper feed dogs will grip the quilt top, while the lower feed dogs move the fabric under the needle. This helps prevent the layers from shifting, resulting in neat and even stitches.
- Take it slowly: Quilting with a walking foot may require you to sew at a slower speed than usual. This allows you to maintain control and accuracy while preventing any fabric bunching or stretching.
- Pivot and turn: When you need to change direction while quilting, stop with the needle down in the fabric, lift the presser foot, pivot the quilt sandwich, and then lower the presser foot again before continuing. This technique helps maintain consistent stitch lines and prevents pulling or distorting the fabric.
- Quilt the entire project: Continue quilting in straight lines or follow your desired quilting design until you have completed the entire quilt. Take breaks as needed to rest your hands and avoid fatigue.
What are the Benefits of Using the Walking Foot for Quilting?
Here are 5 benefits of using the walking foot for quilting:
- The walking foot helps to evenly feed the fabric through the machine, which is essential for quilting. If the fabric is not fed evenly, the quilt will be uneven and will not lie flat.
- The walking foot is also great for preventing the fabric from bunching up. This is a common problem when quilting, but it can be easily avoided by using a walking foot.
- The walking foot is ideal for sewing straight lines. This is essential for quilting, as you want the quilt to have straight, consistent stitches.
- The walking foot is also great for sewing curves. This is often difficult to do without a walking foot, as the fabric can bunch up and the stitches can be uneven.
- Overall, the walking foot makes quilting much easier and produces much better results. If you are serious about quilting, then a walking foot is an essential tool.
How can the Walking Foot be Used for Applique?
To use a walking foot for appliqué, follow these steps:
- To attach the walking foot to your sewing machine, follow the manufacturer’s instructions. The walking foot has a set of feed dogs on the top that work in conjunction with the machine’s lower feed dogs, ensuring that the layers of fabric move smoothly and evenly through the machine.
- Prepare your fabric pieces for appliqué by cutting them into the desired shapes. You can use templates or draw directly on the fabric. Make sure to leave a seam allowance around the edges.
- Place the background fabric, where you want the appliqué design to be, on the sewing machine. Ensure it is secure and flat.
- Position the appliqué fabric on top of the background fabric, aligning the edges. You can use pins or temporary fabric adhesive to hold it in place.
- Select a suitable thread color and insert it into the sewing machine. Thread the machine and bobbin according to your machine’s instructions.
- Lower the presser foot and start sewing. The walking foot will evenly feed both layers of fabric through the machine, preventing shifting or puckering. Stitch along the edges of the appliqué fabric, either with a straight stitch or a decorative stitch, depending on your preference.
- Take your time while sewing, guiding the fabric layers gently but firmly. Pivot at corners or curves as necessary, ensuring smooth stitching.
- Once you’ve finished sewing around the appliqué shape, secure the thread by backstitching or creating a small knot.
- Repeat the process for additional appliqué shapes, if desired.
What are the Benefits of Using the Walking Foot for Applique?
There are several benefits to using a walking foot for appliqué:
- A walking foot helps to prevent the fabric from bunching up or becoming distorted.
- A walking foot helps to evenly feed the fabric through the machine.
- A walking foot can be used with a variety of fabrics, including difficult-to-sew fabrics such as faux fur.
- Using a walking foot can help to produce professional-looking results.
- A walking foot is relatively inexpensive and can be easily attached to most sewing machines.
If you’re looking to achieve professional-looking results when sewing appliqués, a walking foot is a great option to consider.
Types of Sewing Projects that Benefit from a Walking Foot
Sewing with a walking foot is a great way to get even stitches and professional-looking results, especially on thicker fabrics. Here are 8 types of sewing projects that benefit from using a walking foot:
- Quilting
Quilting is one of the most popular uses for a walking foot. It helps to evenly feed the fabric through the machine, which is essential for getting clean, straight lines on your quilt top.
- Sewing Curtains
Sewing curtains is another great use for a walking foot. It helps to ensure that the fabric is fed evenly through the machine, which is essential for getting straight, clean seams.
- Sewing Pillows
Sewing pillows is another great use for a walking foot. It helps to ensure that the fabric is fed evenly through the machine, which is essential for getting straight, clean seams.
- Sewing Slipcovers
Sewing slipcovers is another great use for a walking foot. It helps to ensure that the fabric is fed evenly through the machine, which is essential for getting straight, clean seams.
- Sewing Cushions
Sewing cushions is another great use for a walking foot. It helps to ensure that the fabric is fed evenly through the machine, which is essential for getting straight, clean seams.
- Sewing Tablecloths
Sewing tablecloths is another great use for a walking foot. It helps to ensure that the fabric is fed evenly through the machine, which is essential for getting straight, clean seams.
- Sewing Duvet Covers
Sewing duvet covers are another great use for a walking foot. It helps to ensure that the fabric is fed evenly through the machine, which is essential for getting straight, clean seams.
- Sewing Skirts
Sewing skirts is another great use for a walking foot. It helps to ensure that the fabric is fed evenly through the machine, which is essential for getting straight, clean seams.
How Does a Walking Foot Work?
A walking foot operates by using an additional set of feed dogs on the top of the fabric, working in tandem with the feed dogs underneath the fabric.
As the machine’s needle stitches, the walking foot’s feed dogs grip the top layer of fabric and move it forward simultaneously with the lower layer, preventing any shifting or stretching.
The walking foot’s feed dogs are designed to accommodate various fabric thicknesses and textures, ensuring smooth and consistent feeding for different sewing projects.
How to Install the Walking Foot on Your Sewing Machine
Here’s a step-by-step guide to help you install the walking foot:
- Make sure your sewing machine is turned off and unplugged from the power source before you start working on it.
- Remove any existing presser foot or attachment from the machine. Most sewing machines have a lever or button that allows you to release the presser foot. Consult your sewing machine’s manual if you’re unsure about how to do this.
- Take the walking foot and examine it. You will notice a fork-like attachment at the top of the walking foot.
- Position the walking foot onto the machine, aligning the fork-like attachment with the needle bar of the sewing machine. The walking foot should be facing the same direction as your fabric will move.
- Lower the walking foot onto the machine’s presser foot holder. Make sure it fits snugly and securely.
- Depending on your sewing machine model, you may need to attach a screw or lever to hold the walking foot in place. Consult your sewing machine’s manual to determine the specific attachment mechanism.
- Once the walking foot is securely attached, raise the needle of your sewing machine to its highest position. This will allow you to easily place the fabric under the walking foot.
- After you have plugged in your sewing machine, you will need to turn it on.
- Test the walking foot by running a piece of fabric through the machine. The walking foot should evenly feed the fabric through the machine, preventing any shifting or puckering.
- Adjust the presser foot pressure and stitch length as needed for your specific sewing project.
That’s it! You have successfully installed the walking foot on your sewing machine.
Adjusting the Walking Foot Tension
To adjust the tension on a walking foot sewing machine, follow these steps:
- Start by turning off the sewing machine and unplugging it for safety.
- Locate the tension adjustment dial on your sewing machine. It is usually located on the front or top of the machine near the thread tension discs.
- Look for a numbered scale or markings on the dial. These numbers or markings indicate the tension level. Higher numbers usually indicate higher tension.
- Turn the dial to adjust the tension. If you want to increase the tension, turn the dial towards a higher number. If you want to decrease the tension, turn the dial towards a lower number.
- Make small adjustments at a time. Test the tension by sewing on a scrap piece of fabric after each adjustment to see if it produces the desired results.
- Continue adjusting the tension until you achieve the desired stitch quality. Ideally, the top and bottom threads should meet in the middle of the fabric without any loops or puckering.
- Once you are satisfied with the tension, plug in the sewing machine and resume your sewing project.
Tips and Techniques for Using the Walking Foot
To maximize your experience with the walking foot, here are some helpful tips and techniques:
- Start by attaching the walking foot to your sewing machine. Consult your machine’s manual for specific instructions.
- When sewing with the walking foot, it’s best to use a straight stitch or a zigzag stitch. These stitches will help to keep the fabric from slipping.
- If you’re working with a fabric that tends to stretch, you may want to use a stitch that locks in place, like a straight stitch with the backstitch function engaged.
- If you’re sewing multiple layers of fabric, it’s important to keep all of the layers aligned. The best way to do this is to use pins or clips to hold the fabric in place.
- When you’re ready to sew, lower the presser foot and begin sewing slowly. As you sew, keep an eye on the fabric to make sure it’s feeding evenly.
- If you find that the fabric is bunching up or not feeding evenly, stop sewing and adjust the placement of the fabric. Once you’ve got the fabric positioned correctly, continue sewing.
- As you sew, you may need to stop and adjust the walking foot from time to time. This is common and nothing to worry about.
- When you’re finished sewing, remove the fabric from the machine and press it. This will help to set the stitches and remove any wrinkles.
- If you’re working with a fabric that tends to stretch, it’s a good idea to press the seams open. This will help to keep the fabric from stretching out of shape.
- The walking foot can also be used for quilting. In fact, it’s one of the best tools for quilting evenly spaced lines.
Maintenance and Care of the Walking Foot
To ensure optimal performance and longevity of your walking foot, follow these maintenance tips:
- Regularly clean the walking foot after each use. Remove any lint, threads, or fabric fibers that may accumulate.
- Lubricate the moving parts of the walking foot as recommended by your sewing machine manual.
- Store the walking foot in a safe and dry place when not in use to prevent damage.
Conclusion: How to Use the Walking Foot
In conclusion, mastering the art of using a walking foot can revolutionize your sewing projects and take your craftsmanship to new heights. Whether you’re quilting, working with tricky fabrics, or stitching multiple layers, this invaluable sewing tool ensures precise, even stitches with ease.
By understanding its purpose, installing it correctly, and following a few key techniques, you can unlock the full potential of your walking foot. From preventing fabric shifting to achieving professional-looking finishes, this versatile accessory is a game-changer for any sewing enthusiast.
So, dust off your walking foot, embrace its remarkable functionality, and embark on a journey of creativity and excellence. With this indispensable tool in your sewing arsenal, your projects will stand out from the crowd, and your sewing skills will flourish like never before.
Get ready to elevate your sewing experience with the magic of the walking foot!
Frequently Asked Questions
Can I use a walking foot for free-motion quilting?
Yes, some walking feet have a convertible feature that allows them to be used for free-motion quilting. Refer to your walking foot’s instruction manual to determine if it has this capability.
Do I need a special sewing machine for a walking foot?
No, most walking feet are designed to be compatible with various sewing machine brands and models. However, it’s essential to ensure that the walking foot you choose is compatible with your specific machine.
Can I use a walking foot for hemming?
Yes, a walking foot can be used for hemming various types of fabrics. It helps prevent the fabric layers from shifting, resulting in clean and even hems.
Related Post: How much does it cost to hem pants
How do I clean my walking foot?
To clean your walking foot, remove it from the sewing machine and gently brush away any lint or debris with a small cleaning brush. You can also use a soft cloth dampened with water or a mild cleaning solution to wipe the surface of the foot. Be sure to dry it thoroughly before reattaching it to your machine.
Can I use a walking foot for leatherwork?
Yes, a walking foot can be used for sewing leather and other heavyweight materials. It provides the necessary feeding mechanism to handle the thickness and prevent slippage while sewing.
Can I use a walking foot for sewing zippers?
While a walking foot is not typically used for inserting zippers, it can be beneficial when sewing over bulky zipper seams or thick layers of fabric.
Can I use a walking foot for sewing stretch fabrics?
Yes, a walking foot is highly useful for sewing stretch fabrics. It helps prevent stretching and distortion while maintaining even feeding and stitch quality.
How do I choose the right walking foot for my sewing machine?
To choose the right walking foot, check the compatibility with your sewing machine model and ensure it matches your specific sewing needs, such as quilting, heavy fabrics, or stretch fabrics. Consult your sewing machine manufacturer or local sewing supply store for assistance.
Is a walking foot suitable for embroidery?
A walking foot is not typically used for embroidery, as it is designed for even feeding rather than free-motion stitching. For embroidery projects, consider using a specialized embroidery foot or hoop.
Can I use a walking foot for quilting on a regular sewing machine?
Yes, a walking foot is commonly used for quilting on regular sewing machines. It helps prevent fabric shifting and ensures even stitches while quilting large projects.


15 Comments