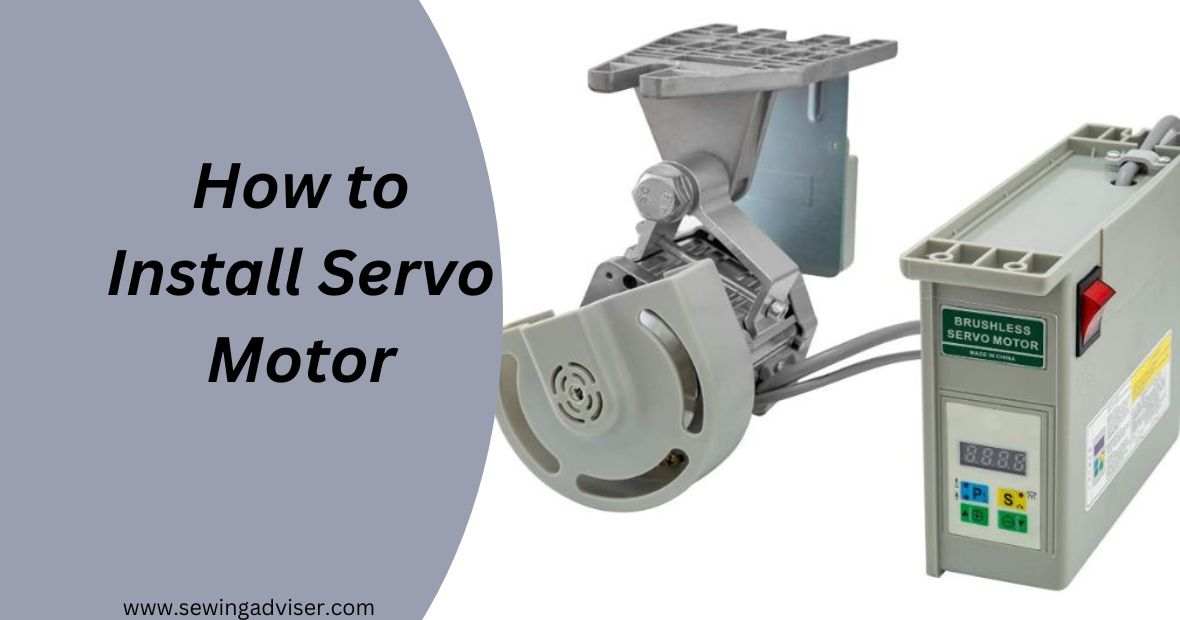
How To Install Servo Motor On Sewing Machine In 5 Mins: 2024
If you are planning to upgrade your old sewing machine, installing a servo motor is a great option. servo motor can significantly enhance the speed, accuracy, and efficiency of the machine.
Servo motors are an ideal replacement for traditional clutch motors, and they are widely used in the sewing industry due to their several benefits.
However, installing a servo motor on a sewing machine can seem like a daunting task, especially for beginners.
In this article, we will provide you with a comprehensive guide on how to install servo motor on sewing machine, including step-by-step instructions, safety tips, and troubleshooting.
What is a Servo Motor?
Before we dive into the installation process, let’s first understand what a servo motor is. A servo motor is an electronic device that converts electrical energy into mechanical energy.
It is a small motor that is used in many applications, including robotics, manufacturing, and sewing machines.
Servo motors are known for their precision, accuracy, and speed. They are much quieter than traditional clutch motors and are also energy efficient.
Why Should You Install a Servo Motor on Your Sewing Machine?
Installing a servo motor on your sewing machine can provide several benefits, including:
- Speed: Servo motors offer higher speeds than traditional clutch motors, allowing you to finish your sewing projects quickly and efficiently.
- Accuracy: Servo motors provide precise control over the sewing machine’s speed, making it easier to sew accurately.
- Efficiency: Servo motors are energy efficient, which means you can save money on your electricity bills.
- Quiet Operation: Servo motors are much quieter than traditional clutch motors, making it easier to work in a noise-free environment.
- Safety: Servo motors are designed to stop the machine quickly when the foot pedal is released, which makes them safer to use than traditional clutch motors.
How to Choose the Right Servo Motor
When choosing a servo motor for your sewing machine, there are several factors to consider, including motor power and speed, compatibility with your sewing machine, and cost.
Motor Power and Speed: The power and speed of your servo motor will depend on the type of sewing projects you typically work on. If you frequently work with heavy fabrics or require high-speed stitching, you’ll want a motor with higher power and speed.
Compatibility with Sewing Machine: Not all servo motors are compatible with all sewing machines. Make sure to check the manufacturer’s compatibility information before purchasing a servo motor.
Cost: The cost of servo motors can vary widely, from a few hundred to several thousand dollars. Consider your budget and the features you require when choosing a servo motor.
Tools Required
Before starting the installation process, ensure you have the following tools:
- Screwdrivers
- Wrenches
- Pliers
- Scissors
- Tape measure
- Electrical tape
- Wire strippers
- Soldering iron
- Solder
Preparation for the Installation
Before starting the installation process, make sure you have read the manufacturer’s instructions for your servo motor.
Also, ensure you have turned off the power and unplugged your sewing machine.
How to Install Servo Motor on Sewing Machine
Follow the steps below to install a servo motor on your sewing machine:
Step 1: Remove the Clutch Motor
Remove the clutch motor by unscrewing the bolts that hold it in place. Disconnect the wires from the motor.
Step 2: Install the Servo Motor
Attach the servo motor to the sewing machine using the mounting bracket provided by the manufacturer. Connect the wires to the motor and the pedal.
Step 3: Adjust the Belt
Adjust the belt tension to ensure the belt is tight enough to turn the sewing machine. The belt should not be too tight or too loose.
Step 4: Connect the Pedal
Connect the pedal to the servo motor using the provided cable. Make sure the cable is securely connected.
Step:5 Testing and Calibration
After installing the servo motor, it’s time to test and calibrate it to ensure that it’s working correctly. Here are the steps to follow:
Checking Motor Rotation
The first step is to check the motor rotation to ensure that it’s turning in the right direction. The user manual provides instructions on how to do this properly.
Testing the Sewing Machine
Next, test the sewing machine to ensure that it’s working correctly. Sew a few stitches on a scrap piece of fabric to check that the machine is stitching correctly.
Adjusting Motor Speed
If the motor is running too slow or too fast, adjust the speed using the controller provided with the kit. The user manual provides instructions on how to do this properly.
Calibrating the Motor
Finally, calibrate the motor to ensure that it’s running smoothly and efficiently. The user manual provides instructions on how to do this properly.
Benefits of a Servo Motor
A servo motor has several benefits over a clutch motor. It is energy-efficient, produces less noise, and provides a smoother operation.
The motor can be adjusted to your preferred speed, making it easier to sew at different speeds. It also generates less heat, which is great for the longevity of your sewing machine.
Types of Servo Motors
Sewing machine servo motors are specialized types of servo motors that are designed for use in sewing machines.
They provide precise control over the speed and motion of the sewing machine, allowing for high-quality stitching and increased productivity.
Here are some common types of sewing machine servo motors:
- Brushless DC Servo Motors: Brushless DC servo motors are a common type of sewing machine servo motor. They are known for their high efficiency, low maintenance requirements, and precise control over the speed and motion of the sewing machine.
- AC Servo Motors: AC servo motors are also used in some sewing machines. They are known for their high speed and accuracy and are commonly used in industrial sewing machines that require high-speed motion control.
- Clutch Motors: Clutch motors are an older type of sewing machine motor that is still used in some industrial sewing machines. They are known for their durability and high torque but are less precise than newer servo motor technologies.
- Stepping Motors: Stepping motors are not technically servo motors, but they are commonly used in some types of sewing machines. They provide precise control over the position of the sewing machine needle, allowing for precise stitching and embroidery.
SEE Also: How Many Watts Does A Sewing Machine Use?
Troubleshooting Common Issues
Despite following the instructions carefully, some issues may arise during or after the installation process. Here are some common issues and how to troubleshoot them:
Motor Not Turning On
If the motor is not turning on, check the power supply, foot pedal, and wiring connections. Also, ensure that the motor rotation is correct.
Motor Running Slow or Too Fast
If the motor is running too slow or too fast, adjust the speed using the controller provided with the kit.
Motor Vibrating or Making Noise
If the motor is vibrating or making noise, check the mounting bracket, wiring connections, and belt tension.
Sewing Machine Not Working Properly
If the sewing machine is not working correctly, check the wiring connections and ensure that the motor is calibrated correctly.
Safety Precautions When Installing Servo Motor
Installing a servo motor on a sewing machine involves working with electricity and moving parts, so it’s essential to take safety precautions seriously.
Here are some safety tips to follow:
Avoiding Electrical Shock
Ensure that the power supply is disconnected and the foot pedal is unplugged before beginning the installation process.
Protecting Fingers and Hands
Wear safety gloves and avoid placing your fingers or hands near moving parts.
Proper Use of Tools and Equipment
Use the tools and equipment provided with the kit, and ensure that they’re used correctly.
Maintenance Tips for Servo Motor
To keep your sewing machine and servo motor in good condition, follow these maintenance tips:
- Regularly clean your sewing machine and motor to remove any dust or debris.
- Check the belt tension periodically and adjust it if necessary.
- If you notice any unusual sounds or vibrations, stop using the machine and have it checked by a professional.
SEE Also: Why does my Sewing Machine keep Jamming
How do I know if my Sewing Machine is compatible with a Servo Motor?
You can check your sewing machine’s manual or contact the manufacturer to determine if it is compatible with a servo motor.
Some common signs that your machine may be compatible include a clutch motor, a belt-driven system, and a mounting plate for a motor.
Is it safe to Install a Servo Motor on my Sewing Machine?
When installed correctly, a servo motor is generally safe to use on a sewing machine.
However, it is important to follow all safety precautions, such as ensuring that the motor is securely mounted and that all wiring is properly insulated.
What should I do if my motor is not working properly?
If your motor is not working correctly, you should first check that it is installed correctly and that all connections are secure.
If the problem persists, you may need to contact the manufacturer or a professional for assistance.
Conclusion
I hope now that you are well aware of how to install servo motor on sewing machine fastly. In Conclusion, Installing a servo motor on your sewing machine can provide many benefits, including energy efficiency and smoother operation.
By following the steps outlined in this guide and properly maintaining your machine, you can enjoy these benefits for years to come.
FAQs: How To Install Servo Motor On Sewing Machine
Why should I install a servo motor on my sewing machine?
Installing a servo motor on your sewing machine can provide several benefits, such as increased speed control, smoother operation, and quieter performance. It can also help reduce energy consumption and save you money on electricity bills.
What kind of servo motor should I choose?
The type of servo motor you should choose depends on your sewing machine’s make and model and the type of sewing you plan to do. Some factors to consider include the motor’s power, speed range, and ease of installation.
How do I adjust the speed of the servo motor?
You can adjust the speed of the servo motor using a speed controller, which is typically included with the motor. This controller allows you to adjust the motor’s speed using a dial or knob.
How long does it take to install a servo motor?
The installation time can vary depending on the complexity of your sewing machine and the type of motor being installed. On average, it can take 1 to 3 hours.
Can I install the servo motor myself?
Yes, you can install the servo motor yourself as long as you follow the manufacturer’s instructions and have the necessary tools.


12 Comments