How To Sew With A Twin Needle: 2024 Best Tips & Tricks
Hey there, fellow sewing enthusiasts! Are you ready to take your stitching game to the next level?
If you’re eager to add professional-looking finishes and decorative details to your sewing projects, then mastering the art of sewing with a twin needle is a must!
In this guide, I’ll walk you through the steps about how to sew with a twin needle like a pro, unlocking a world of creative possibilities.
From achieving perfectly parallel stitches to creating stunning pintucks and hems, join me as we dive into the fascinating world of twin needle sewing!
Let’s get started and unravel the secrets of this amazing technique.
What is a Twin Needle Used for?
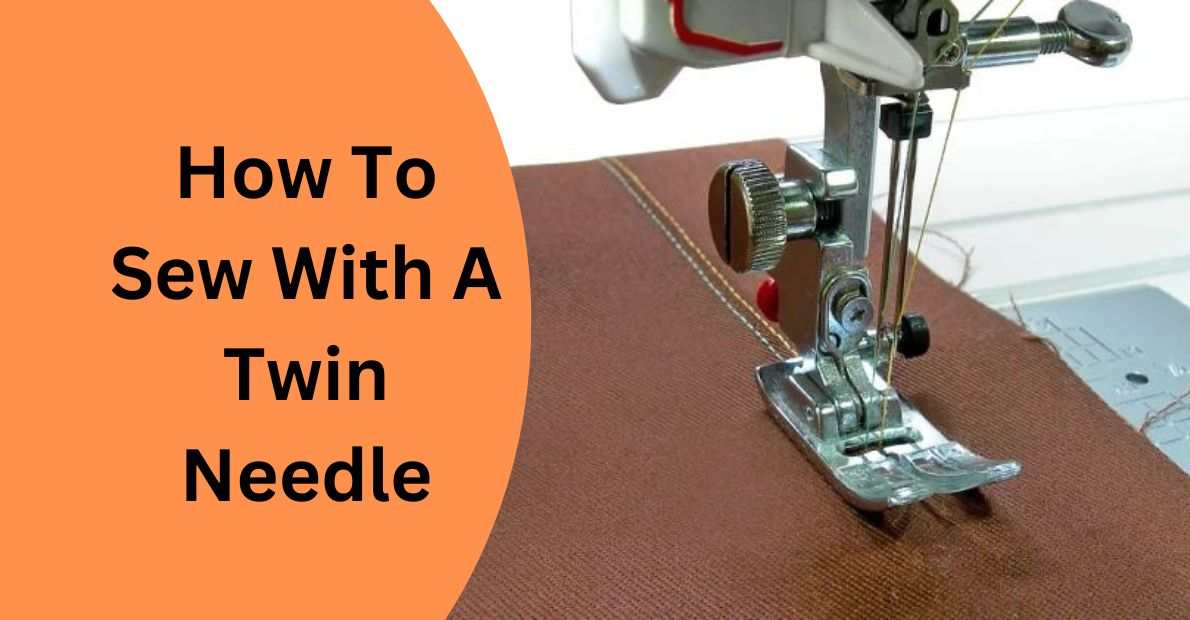
A twin needle, also known as a double needle, is a type of sewing needle that has two needles mounted on a single shaft. It is used in sewing machines for creating parallel rows of stitching with two threads simultaneously.
Related Post: How to Use a Double Needle ( Twin Needle)
The main purpose of using a twin needle is to achieve decorative stitching or functional effects in sewing projects. When the twin needle is inserted into the sewing machine, it creates two parallel lines of stitching on the fabric, typically with a small space in between. This creates a neat and professional-looking finish.
Twin needles are commonly used for various sewing techniques, such as:
- Hemming: Twin needles are ideal for hemming garments made of knit or stretchy fabrics. The parallel stitching helps create a flexible and durable hem that stretches along with the fabric.
- Topstitching: When you want to add decorative or reinforced stitching to the edges of collars, cuffs, pockets, or seams, a twin needle can be used to achieve parallel lines of stitching.
- Pintucks: Twin needles can be used to create pintucks, which are narrow, raised folds of fabric used for decorative purposes. The twin needle creates evenly spaced rows of stitching that form the pintucks.
- Decorative stitching: Twin needles come in different sizes and designs, allowing you to create various decorative patterns on your fabric. They are often used for adding embellishments and decorative effects to garments, quilts, and home decor items.
What Supplies Do I Need to Sew with a Twin Needle?
To sew with a twin needle, you will need the following supplies:
- Twin Needle
- Thread
- Bobbins
- Fabric
- Sewing Machine
- Needle Threader (optional)
- Scissors or Rotary Cutter
- Seam Guide or Marking Tools (optional)
- Sewing Pins or Clips
- Iron and Ironing Board
How to Sew With a Twin Needle
To sew with a twin needle, follow these steps:
- Prepare your sewing machine: Start by turning off your sewing machine and unplugging it for safety. Remove the current needle from the machine.
- Choose the appropriate twin needle: Select a twin needle with the desired stitch width and needle size for your project. Twin needles come in various sizes and configurations, so choose one that suits your fabric and desired stitch appearance.
- Insert the twin needle: Loosen the needle clamp screw on your machine by turning it counterclockwise. Insert the twin needle into the needle clamp with both needle shafts facing straight forward. Push the needle up as far as it will go and tighten the needle clamp screw by turning it clockwise. Make sure the needle is securely in place.
- Thread the machine: Thread your sewing machine as you would for regular sewing, following the threading path specified in your machine’s manual. Ensure that both threads are threaded correctly and pass through their respective guides, tension discs, and needle eyes.
- Test the stitch: Place a scrap piece of fabric under the presser foot and lower the presser foot. Choose a straight stitch or a small zigzag stitch, depending on your preference. Sew a few stitches on the scrap fabric to test the stitch formation and tension. Check that both threads are feeding smoothly through the twin needle.
- Adjust stitch settings: If necessary, adjust the stitch width and length to achieve the desired stitch appearance. Test different settings on the scrap fabric until you are satisfied with the results. Consider using a test fabric similar to your project fabric to get a more accurate representation of the final stitches.
- Sew your project: Once you are confident with the stitch settings, you can proceed with sewing your project. Place the fabric under the presser foot, aligning the desired stitching line with the twin needle. Start sewing, guiding the fabric evenly and smoothly. Take care not to pull or stretch the fabric, as it may cause distortion or puckering.
- Finish and secure the stitches: When you reach the end of your stitching line, sew a few additional stitches to secure the threads. Cut the threads and remove the fabric from the machine.
How to Insert a Twin Needle
Here are the steps to insert a twin needle fastly:
- Choose the appropriate twin needle size for your project. Twin needles come in different sizes, so select one that suits your fabric and desired stitch width.
- Turn off your sewing machine and unplug it for safety.
- Locate the needle clamp on your machine. It is usually on the left side of the needle plate.
- Turn the needle clamp screw counterclockwise to loosen it. This will allow you to remove the current needle.
- Gently pull down the needle clamp to release the current needle. To remove the needle, pull it out straight.
- Take your twin needle and examine it. Notice that it has two shafts with a bridge connecting them at the top.
- Insert one of the twin needle shafts into the needle clamp, making sure it is facing straight forward. Push it up as far as it will go without forcing it.
- Turn the needle clamp screw clockwise to tighten it. Make sure it is secure but be careful not to overtighten it.
- Thread your sewing machine as you normally would, following the threading path specified in your machine’s manual.
- Test your stitch on a scrap piece of fabric before starting your project. Ensure that the twin needle moves freely and doesn’t hit any other parts of the machine.
- Adjust your stitch settings if necessary. Depending on your machine, you may need to adjust the stitch width to accommodate the twin needle.
- Once you’re satisfied with the test stitch, you can proceed with your sewing project using the twin needle.
How to Thread a Twin Needle
Here are quick steps to thread a twin needle:
- Start by turning off your sewing machine and unplugging it for safety.
- Locate the thread spools on top of your machine. Choose two spools of thread in colors that you desire for your stitching.
- Take the first thread spool and place it on the designated spool pin. Ensure that it fits securely and that the thread unwinds smoothly.
- Locate the thread guides on your machine. Typically, there will be one or two vertical thread guides near the spool pin. Pass the first thread through the guides, following the arrows or numbers indicated.
- Look for the tension discs on your machine. These are usually located above or near the needle area. Thread the first thread through the tension discs, making sure it fits securely between them.
- Find the first thread guide near the needle area. It is typically a small metal or plastic hook. Pass the first thread through this guide from the right side to the left.
- Thread the first thread through the eye of the left needle in the twin needle. Pull the thread down and leave a tail of a few inches.
- Repeat steps 3 to 7 for the second thread spool and needle, ensuring that you keep the threads separate and untangled.
- Thread the second thread through the eye of the right needle in the twin needle. Again, pull the thread down and leave a tail of a few inches.
- Take both thread tails and gently pull them toward the back of the machine, ensuring that the threads pass smoothly through the needle eyes.
- Once the threads are at the back, locate the thread guide or guides for the bobbin area. Thread each thread through the appropriate guides, following the indicated path.
- Finish threading the machine as you would with a single needle, passing the threads through the remaining guides and the needle threader if your machine has one.
- Once you’ve completed threading, double-check that the threads are securely seated in their respective guides, tension discs, and needle eyes.
- Plug in your sewing machine, turn it on, and perform a test stitch on a scrap piece of fabric to ensure that both threads are feeding correctly through the twin needle.
What are the Best Stitch Settings for Twin needle Sewing
The best stitch settings for twin needle sewing can vary depending on factors such as the fabric you’re using, the desired stitch appearance, and your specific sewing machine. However, here are some general recommendations to help you get started:
- Stitch selection: Choose a straight stitch or a small zigzag stitch for twin needle sewing. A straight stitch will create parallel lines of stitching, while a small zigzag stitch can add a bit of stretch and flexibility to the seam. Test both options on scrap fabric to see which one works best for your project.
- Stitch width: Start with a narrower stitch width, typically around 2.5mm to 3.0mm, and adjust as needed. Make sure the stitch width allows the twin needle to move freely without hitting any machine parts or causing the fabric to pucker.
- Stitch length: Use a stitch length that suits your fabric and project. For general sewing, a stitch length of 2.5mm to 3.0mm is often suitable. However, consider adjusting the stitch length for thicker or thinner fabrics. Test different stitch lengths on scrap fabric to determine the desired appearance and stitch quality.
- Tension adjustment: It’s important to achieve balanced tension for both threads when using a twin needle. Start with the machine’s default tension settings and make slight adjustments if needed. Ideally, the upper and lower threads should form even, smooth stitches on the fabric. Refer to your sewing machine’s manual for guidance on adjusting tension for twin needle sewing.
- Needle size: Ensure that you select a twin needle size appropriate for your fabric and desired stitch width. Twin needles come in various sizes, so choose one that complements your project. Thicker fabrics may require a larger needle size, while delicate fabrics may require a smaller one.
- Needle position: If your sewing machine allows, adjust the needle position to ensure that both needles of the twin needle are centered within the presser foot. This helps create evenly spaced stitches and prevents the needles from hitting the presser foot or other machine parts.
Troubleshooting Twin Needle Sewing
When working with twin needle sewing, you may encounter some common issues. Here are troubleshooting tips for addressing them:
- Skipped stitches: If you notice that your twin needle is skipping stitches, try the following steps:
- Ensure that you are using the correct twin needle size for your fabric and project.
- Check that the needle is inserted correctly and securely.
- Verify that the upper thread is threaded properly and the tension is adjusted correctly.
- Test the stitch length and width to find the optimal settings for your fabric.
- Consider using a stabilizer or interfacing if the fabric is lightweight or prone to shifting.
- Needle breakage: If your twin needle is breaking, consider the following solutions:
- Check that you are using a compatible twin needle for your sewing machine.
- Verify that the needle is inserted correctly, with both shafts securely positioned in the needle clamp.
- Ensure that the needle size is appropriate for the fabric thickness.
- Examine the fabric and needle for any snags or rough areas that may be causing breakage.
- Reduce the speed of your sewing machine to prevent excessive strain on the needles.
- Uneven stitches: If your twin needle is creating uneven stitches, try these steps:
- Confirm that both threads are threaded correctly and passing through their respective guides and tension discs smoothly.
- Check that the tension settings are balanced for both upper threads.
- Ensure that the fabric is being guided evenly through the machine, without pulling or stretching.
- Test different stitch widths and lengths to find the settings that produce even stitches.
- Consider using a walking foot or a fabric stabilizer to help feed the fabric evenly.
- Fabric puckering: If your fabric is puckering along the twin needle stitching, consider these suggestions:
- Use a stabilizer or interfacing to provide additional support and prevent the fabric from stretching or distorting.
- Adjust the tension settings to achieve a balanced tension that doesn’t pull the fabric excessively.
- Experiment with different stitch lengths and widths to find the optimal settings for your fabric.
- Make sure the fabric is being guided smoothly and evenly through the machine, without excessive tension or pressure.
- Needle hitting presser foot: If the twin needle is hitting the presser foot, try the following steps:
- Ensure that you have a presser foot designed for twin needle sewing, with a wider gap between the toes to accommodate the needles.
- Adjust the needle position if your machine allows, ensuring that the twin needles are centered within the presser foot.
- Choose a narrower stitch width or change to a different presser foot if necessary.
Mistakes to Avoid while Using Twin Needle
When using a twin needle, it’s helpful to be aware of common mistakes to avoid for a smooth sewing experience. Here are some mistakes to watch out for when working with a twin needle:
- Using the wrong needle size: Using the incorrect needle size can lead to issues such as skipped stitches, needle breakage, or uneven stitching. Ensure that you choose the appropriate twin needle size for your fabric thickness and desired stitch width.
- Incorrect needle insertion: Improperly inserting the twin needle can cause it to come loose or result in incorrect stitch formation. Always make sure both needle shafts are securely inserted into the needle clamp and tightened properly.
- Not adjusting stitch width and settings: Neglecting to adjust your stitch width and settings can lead to needles hitting the presser foot, fabric puckering, or uneven stitching. Take the time to adjust your machine’s settings to accommodate the twin needle, ensuring that it can move freely without any obstructions.
- Using incompatible fabric: Twin needle sewing works best on stable, medium-weight fabrics. Avoid using extremely lightweight or stretchy fabrics that may cause the needles to skip stitches or result in uneven tension. If you’re working with delicate or lightweight fabrics, consider using a stabilizer or interfacing to provide extra support.
- Incorrect threading: Threading both threads correctly is essential for successful twin needle sewing. Make sure both threads are passing through their respective guides, tension discs, and needle eyes properly. Incorrect threading can lead to tangled threads, uneven tension, or stitch malformation.
- Sewing at high speeds: Sewing too quickly with a twin needle can increase the likelihood of needle breakage, skipped stitches, or fabric distortion. Slow down your sewing speed to give the twin needle time to create precise stitches and reduce strain on the needles.
- Forgetting to test on scrap fabric: Always test your twin needle stitching on scrap fabric before starting your actual project. This allows you to adjust and fine-tune your settings, ensuring that you achieve the desired stitch appearance and quality without any issues.
- Neglecting regular machine maintenance: Regular maintenance, such as cleaning, oiling, and changing needles, is crucial for smooth sewing with a twin needle. Neglecting maintenance can lead to thread jams, skipped stitches, or needle breakage. Follow your sewing machine’s maintenance guidelines to keep it in optimal condition.
Conclusion:
In conclusion, mastering the art of sewing with a twin needle can elevate your stitching projects to new heights. With its ability to create professional-looking hems, decorative accents, and parallel stitches, a twin needle is a versatile tool every sewing enthusiast should have in their arsenal.
By following the step-by-step guide provided in this blog, you can confidently thread, adjust tension, and maneuver with precision. Remember to experiment with different fabrics, needle sizes, and stitch patterns to unleash your creativity.
So, grab your twin needle, let your imagination soar, and unlock a world of endless possibilities in your sewing endeavors. Happy stitching!
FAQs: How To Sew With A Twin Needle
What types of stitches can I create with a twin needle?
Sewing with a twin needle opens up a world of stitching possibilities. You can create beautiful parallel stitches for topstitching, hems, and decorative details. Additionally, you can experiment with pintucks, and heirloom stitching, and even simulate the appearance of cover stitching.
How do I set up my sewing machine for twin needle sewing?
To prepare your machine, start by selecting a straight stitch and inserting the twin needle into the needle bar, ensuring it is secured tightly. Thread your machine using two separate threads, one for each needle. Make sure to thread each needle individually through the machine’s threading path.
What should I consider when using a twin needle?
When sewing with a twin needle, keep in mind the desired width of your stitches, fabric type, and needle size. Thicker fabrics may require a larger needle size and adjusting the tension settings accordingly. It’s also crucial to sew at a steady pace, guiding the fabric evenly to achieve consistent results.

6 Comments