How to Use a Brother Sewing Machine for Beginners: 2024 Guide
Did you know that 6 out of 10 people who buy a sewing machine are beginners? If you’re one of them, welcome to the world of crafting and creating with your Brother sewing machine.
Learning how to use a Brother sewing machine for beginners can be both exciting and overwhelming. In this guide, we’ll walk you through everything you need to know to get started on your sewing journey.
From threading the needle to choosing the right stitches for your projects, we’ve got you covered. Whether it’s hemming pants or making your own unique creations, using a Brother sewing machine is an essential skill for any aspiring seamstress or tailor. So, grab your machine, and let’s dive in!
See Also: Consider Before Buying Sewing Machines for Beginners
Setting Up Your Sewing Machine
Familiarize Yourself
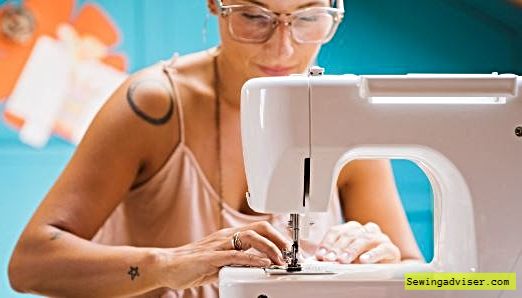
Before using a Brother sewing machine for beginners, it’s crucial to familiarize yourself with its different parts. The main components include the needle, presser foot, bobbin winder, and handwheel. Understanding these elements will help you operate the machine effectively.
When setting up your sewing machine, refer to the manual for specific instructions on threading. Each model may have unique threading requirements, so carefully following the manual is essential to ensure proper setup and avoid any issues while sewing.
It’s important to note that choosing the appropriate needle and thread is vital for achieving high-quality stitches. Different fabrics require different needles and threads. For instance, when working with lightweight fabrics like silk or chiffon, opt for a fine needle and lightweight thread to prevent damage to the fabric.
Adjust Stitch Length and Width
Another critical step in setting up your sewing machine is adjusting the stitch length and width according to your project’s requirements. For basic sewing tasks such as seaming or topstitching, a standard stitch length of 2-2.5mm is suitable.
However, if you’re quilting or basting fabrics together temporarily, longer stitches are preferable.
Moreover, adjusting the stitch width allows you to create various decorative effects based on your preferences. For example, when creating satin stitches or appliqué designs, widening the stitch width can enhance visual appeal.
Connecting the Power and Foot Pedal
Plug in the Power Cable
Before using a Brother sewing machine, it’s crucial to connect the power cable correctly. Start by plugging the power cable into a suitable electrical outlet. Then, locate the corresponding input on the sewing machine and firmly insert the plug.
Always ensure that the power switch is turned off before connecting or disconnecting any cables to prevent accidents or damage to the machine.
It’s important to use caution when handling electrical components. The power cable should be secured properly using the right tools provided with your sewing machine.
This will prevent any accidental disconnection during operation, ensuring a smooth and uninterrupted sewing experience.
Connect the Foot Pedal
The foot pedal is an essential part of operating a Brother sewing machine as it controls the speed of stitching. Refer to the manual for instructions on how to connect it properly. Typically, there will be a designated port where you can attach one end of the foot pedal cord securely.
Once connected, make sure that it is positioned comfortably for your foot to reach while sitting at your workspace. Using the right tools, such as clips or adhesive hooks, can help keep both ends of the cord in place without creating any obstructions during operation.
Checking Presser Feet and Inserting Needle
Checking Presser Feet
Before starting any basic sewing project, it’s crucial to check the presser feet on your sewing machine. Ensure that they are securely attached and in good condition.
Different presser feet serve different purposes, such as zipper foot for inserting zippers or buttonhole foot for creating buttonholes. Always refer to the machine’s manual for guidance on adjusting and changing presser feet.
It’s important to understand the function of each type of presser foot as it can significantly impact the quality of your stitches and overall sewing experience. For instance, using a walking foot is ideal when working with multiple layers of fabric or slippery materials like satin or silk.
When working on various projects, you might need to switch between different types of presser feet. Understanding how to attach and detach them properly will make your sewing skills more versatile.
Inserting Needle Correctly
Inserting the needle correctly is fundamental in ensuring smooth and precise stitching. Always refer to the machine’s manual for specific instructions on needle insertion based on your model of the sewing machine.
Different fabrics require different types and sizes of needles; hence, it’s essential to select an appropriate needle before starting any project.
For example, when working with lightweight fabrics like chiffon or organza, a fine needle (size 9-11) is recommended whereas denim or canvas requires a heavier needle (size 16-18).
Understanding how to insert needles properly not only ensures better results but also prevents potential damage to both your fabric and the sewing machine itself.
See Also: Best Sewing Machines for Heavy Fabrics
Remember that mastering these basic steps checking presser feet and inserting needles sets a strong foundation for developing more advanced sewing skills, allowing you to tackle various projects confidently.
Understanding Your Brother Sewing Machine

Step-by-Step Threading
Threading a Brother sewing machine may seem daunting at first, but with clear step-by-step instructions, it becomes straightforward. Begin by raising the needle to its highest position using the hand wheel.
Then, raise the presser foot and place your spool of thread on the designated pin. Next, pull the thread from the spool and guide it through specific points outlined in your machine’s manual.
Remember to pass the thread through each guide carefully and ensure that it is properly seated within all tension discs.
Once you’ve reached this stage, bring the thread down and loop it around before finally passing it through the needle’s eye from front to back. Always double-check if you’ve threaded accurately before proceeding.
Common Mistakes to Avoid
When threading your Brother sewing machine, there are common mistakes beginners often make that can lead to issues during stitching. One typical error is failing to fully engage or disengage the bobbin winding mechanism after threading.
Another mistake is neglecting to raise both the presser foot and needle when pulling out or inserting threads.
It’s also crucial not to overlook cleaning out any accumulated lint or debris within your machine as part of regular maintenance routines; this can prevent potential jams or malfunctions later on.
Preparing to Sew
Winding the Bobbin
Mastering the technique of winding a bobbin on a Brother sewing machine is crucial for seamless sewing. To wind the bobbin, ensure that you place the spool of thread on the designated shaft and follow the machine’s manual for precise instructions.
It’s essential to align and secure the thread properly during this process to prevent any tangling or jamming when using your sewing machine.
When winding a bobbin, always prioritize safety precautions, such as making sure that loose clothing or jewelry is not near moving parts. This will help minimize any potential accidents while operating your Brother sewing machine.
By following these steps diligently, you can guarantee smooth and efficient bobbin winding without any mishaps.
Inserting the Bobbin
Following clear instructions for inserting a wound bobbin into your Brother sewing machine is vital for successful stitching. Ensure that you position and orientate the bobbin correctly within its compartment by referring to your machine’s manual for guidance.
Proper placement guarantees smooth movement of thread from the bobbin during sewing, minimizing interruptions in your work.
Also Read: What is a bobbin?
Verifying smooth movement involves observing how smoothly the upper thread catches onto and pulls up the lower thread from below when beginning to sew. This ensures that both threads are properly engaged with each other before starting any stitching project.
See Also: How To Fix Bobbin Case In Singer Sewing Machine
Choosing Fabric and Thread
Understanding how to select suitable fabric and thread combinations is fundamental when working on different projects with your Brother sewing machine. Consider factors like fabric weight, stretch, fiber content, as well as needle size recommendations outlined in your user manual when choosing materials for various projects.
Avoid common mistakes in matching fabric and thread choices by ensuring that they complement each other well based on their characteristics like thickness, elasticity, and intended use in a specific project.
For instance, heavy fabrics like denim require sturdy threads such as polyester or cotton-wrapped polyester due to their durability compared to delicate fabrics which may necessitate finer threads like silk or rayon.
Starting Your Sewing Project
Fabric placement plays a crucial role in the outcome of your creation. Mastering proper fabric placement techniques is essential for different types of sewing projects.
Whether you’re working on a simple pillowcase or a more intricate garment, understanding how to position fabric layers accurately before starting to sew is fundamental.
Utilize tools such as pins or clips to secure the fabric in place during sewing. This helps prevent any shifting or misalignment while stitching, ensuring that your seams are straight and accurate.
For instance, when making a basic tote bag as your first project, placing the fabric pieces’ right sides together with pins along the edges will keep them aligned during stitching.
Sewing Techniques for Beginners
Straight Stitch
Mastering the basic sewing technique of creating precise straight stitches on a Brother sewing machine is crucial for beginners. Adjusting the stitch length according to different tasks is essential.
For instance, shorter stitches are suitable for delicate fabrics, while longer ones work well with heavier materials. Understanding these nuances will help beginners achieve professional-looking results in their projects.
When using a Brother sewing machine, exploring creative applications of straight stitches can elevate beginner projects.
For example, creating neat and even hems or topstitching along edges can add a polished finish to garments or home decor items. By utilizing this sewing skill, beginners can enhance the overall appearance and durability of their creations.
Zigzag Stitch
Learning how to set up and execute zigzag stitches effectively on a Brother sewing machine is another vital sewing skill for beginners to acquire. Experimenting with variations in zigzag stitch width and length allows beginners to explore both the decorative and functional purposes of this versatile stitch type.
They can use wider zigzag stitches for attaching elastic or decorative trims, while narrower ones are ideal for overcasting raw fabric edges.
Troubleshooting common challenges when using zigzag stitches also plays an important role in helping beginners become more confident sewers.
For instance, understanding how to address issues like skipped or uneven stitches ensures that beginner projects turn out as intended without frustrating setbacks.
Seam Sewing
Mastering techniques for sewing accurate seams with a Brother sewing machine is fundamental knowledge that every beginner should possess.
Understanding seam allowance measurements and guidelines is crucial when working on different types of seams such as plain seams, French seams, or flat-felled seams.
Troubleshooting Common Issues
Skipped Stitches
Skipped stitches can be frustrating, but understanding the causes and solutions can help you overcome this common issue. When using a Brother sewing machine for beginners, ensure that the needle is appropriate for the fabric being used.
Using a dull or bent needle can lead to skipped stitches. Improper threading or a low-quality thread may also cause this problem.
To prevent skipped stitches, make sure to use high-quality threads suitable for your projects. Regularly check and replace the needle as needed, especially when starting a new project with different fabrics.
Furthermore, keeping your machine clean and well-maintained will reduce the likelihood of encountering skipped stitch issues during your sewing endeavors.
Regular maintenance practices include cleaning out lint and dust from the bobbin area and changing needles after every major project or approximately every 8 hours of sewing time.
Thread Tension Problems
Understanding thread tension problems is crucial in achieving neat and professional-looking stitches in your sewing projects. Signs of incorrect thread tension include loose or tight stitches on both sides of the fabric.
As a beginner using a Brother sewing machine, you should learn how to adjust upper and lower thread tensions separately based on specific symptoms observed during stitching.
If you notice loose upper threads on the underside of your workpiece or vice versa, it’s essential to troubleshoot these issues by making small adjustments to either the upper tension discs or the bobbin case tension screw accordingly until achieving balanced stitch quality on both sides.
Remember that regular practice with different fabrics will improve your ability to recognize signs of incorrect thread tension while developing confidence in troubleshooting these common issues effectively.
Bobbin Issues
Bobbin-related problems are another frequent challenge faced by beginners using Brother sewing machines. Common issues such as bobbin jamming or unspooling can disrupt your sewing projects, causing frustration and delays if not promptly addressed.
Maintenance and Care
Cleaning the Machine
Use a soft brush to remove lint and dust. This simple step helps maintain the quality of your stitches. Remember to unplug the power cable before cleaning to prevent accidents. It’s also a good idea to take a photo of the threading before removing it for easy re-threading later.
Following these steps will ensure that your Brother sewing machine stays in top condition, ready for all your future projects.
Changing Needles
Changing needles is an essential part of maintaining your sewing machine. The type of fabric and thread being used determines when you should change needles. Always refer to the manual for guidance on how to do this properly.
Inserting the needle correctly into the shaft with its flat side facing backward is crucial for smooth stitching. By changing needles regularly, you’ll guarantee precise and flawless stitches every time, no matter what kind of project you’re working on.
Oiling the Machine
Oiling your sewing machine is crucial for its smooth operation and longevity. Regularly oiling it ensures that it continues to work efficiently over time without any hiccups or interruptions during your projects.
Refer back to your trusty manual which will guide you through locating where exactly oil should be applied on the machine. Be sure to only ever use sewing machine oil – using other types could damage your beloved equipment! Over-oiling can also cause problems, so remember: less is more!
Exploring Advanced Features
Buttonholes
Buttonholes are essential for creating closures in garments. To make them using a Brother sewing machine, ensure the fabric is securely positioned and select the appropriate buttonhole stitch setting on the machine.
Use the presser foot to guide the fabric and sew along the marked line, allowing the machine to automatically create the buttonhole. Once completed, carefully cut open the buttonhole using a seam ripper to reveal a neat and precise finish.
Creating buttonholes can be an intimidating task for beginners, but with practice and guidance from your manual, you’ll soon master this essential skill. Experiment with different fabrics and thread types to understand how they affect buttonhole creation.
Decorative Stitches
Decorative stitches add flair to your sewing projects. Experiment with different stitch patterns for a personalized touch by using decorative stitches on your Brother sewing machine. Ensure you’re using the right needle and thread for the best results, then adjust the machine settings to achieve your desired decorative effect.
By exploring various decorative stitches on your Brother sewing machine, you can elevate even simple projects into stunning creations that showcase your creativity as a beginner.
Attachments Usage
Using attachments correctly is crucial when working with a sewing machine like those offered by Brother. Utilize different presser feet for various materials and projects adjusting tension and stitch length according to what material you’re working with will help improve stitching quality significantly.
Furthermore, exploring additional attachments such as seam guides or zipper feet opens up new possibilities for creative work while making tasks more manageable during project execution.
Practice Projects for Beginners
Simple Pillowcase
When learning how to use a Brother sewing machine for beginners, start with simple projects like making a pillowcase. You only need basic sewing skills and good-quality fabric. Before starting, ensure the machine is threaded and the needle is in place.
Choose straight stitches and proper seam allowances for neat finishing. Take photos of your work as you progress to track your improvement over time.
Creating a simple pillowcase allows you to practice using the manual, threading the machine, choosing appropriate stitches, and mastering seam allowances.
Tote Bag
Another great idea for beginner sewing projects is stitching a tote bag using a Brother sewing machine. This project helps you familiarize yourself with different fabrics suitable for bags while enhancing your basic sewing techniques.
Select durable fabric material suitable for tote bags and ensure that the machine’s stitches secure the sides properly. Taking pictures of each step can help you see how much progress you’re making from one project to another.
By following these steps, not only will you learn how to operate your Brother sewing machine effectively, but also become proficient at creating sturdy seams on various materials.
Zippered Pouch
Making a zippered pouch is an excellent way to further develop your sewing skills as a beginner using a Brother sewing machine. Choose fabrics, stitches, and tools that are suitable for this particular project before getting started.
Ensure proper seam allowances and stitch placement when creating the pouch so that it has a clean finish. Remember always to refer back to your manual if needed during any stage of these projects or when working on new ones in the future.
Tips for Efficient Sewing
Speed Control
Speed control on a sewing machine is essential for beginners. It allows you to adjust the pace of the machine, ensuring that you can work comfortably and accurately.
By referring to the manual, you can learn how to modify the speed settings based on your project’s requirements. This feature helps maintain a consistent sewing speed across different projects, promoting precision and quality in your work.
For instance, when working on a delicate fabric or intricate design, reducing the speed can help prevent mistakes and ensure neat stitches.
On the other hand, when working on simpler projects with straight seams, increasing the speed might be more efficient without compromising accuracy.
Seam Allowances
Understanding seam allowances is crucial for beginners using a Brother sewing machine. Seam allowances are essentially the space between the edge of your fabric and where you sew your line of stitches.
Properly aligning your fabric with the appropriate seam allowance guide on your machine ensures that your stitches are placed at just the right distance from the fabric edge.
Consider this: When creating practice projects as a beginner, such as simple tote bags or pillow covers, mastering seam allowances will result in clean edges and professional-looking finishes. It’s like laying down tracks for a train; if they’re not aligned properly (or if there aren’t any tracks at all), it’ll be challenging for things to move forward smoothly!
Pressing Fabric
Before diving into stitching with a Brother sewing machine as a beginner, don’t forget about pressing your fabric! Using an iron to press out wrinkles and creases will make sewing much easier and give your finished piece a polished look.
When practicing basic sewing skills like making straight seams or hems on napkins or tablecloths as part of beginner projects, remember to press open those seams neatly before moving forward it makes everything look so much tidier! Adjusting iron temperature based on different fabrics is also important;
Building Your Sewing Skills
Online Resources
Online resources can be invaluable. You can find tutorials, and guides, and even access the machine’s manual online for quick reference. Websites also offer project ideas and material recommendations to help you get started on your sewing journey.
Video tutorials are especially helpful as they provide visual demonstrations of how to work with the machine, making it easier for beginners to grasp essential techniques.
Exploring these online resources will give you a solid foundation in understanding the basics of using a sewing machine. Whether you need step-by-step instructions or inspiration for your next project, these resources are readily available at your fingertips.
Taking Classes
For those who prefer hands-on learning, taking sewing classes is an excellent way to enhance your sewing skills as a beginner.
Local sewing classes specifically tailored for beginners allow you to learn the fundamentals of using a sewing machine while gaining practical experience through guided instruction.
In these classes, you’ll have the opportunity to work on different projects that gradually increase in complexity, helping you become more proficient with various stitching techniques and fabric types.
By immersing yourself in a supportive learning environment, you can build confidence in using your Brother sewing machine effectively and efficiently.
Joining Sewing Communities Another fantastic way to improve your sewing skills is by joining local or online sewing communities. These communities provide valuable opportunities for beginners to connect with experienced sewers who can offer guidance and support along their learning journey.
Summary – How to Use a Brother Sewing Machine for Beginners
You’ve now mastered the basics of using your Brother sewing machine. From setting it up to troubleshooting common issues, you’re well-equipped to embark on your sewing journey.
Remember, practice makes perfect, so don’t be discouraged by initial challenges. As you delve into the world of sewing, keep exploring the advanced features and trying out different projects to hone your skills.
Now, grab your fabric and let your creativity flow! Whether it’s crafting a simple tote bag or stitching a stylish garment, each project will enhance your expertise. Don’t forget to share your creations with fellow sewing enthusiasts and seek inspiration from their work. Happy sewing!
Frequently Asked Questions
How do I set up my Brother sewing machine as a beginner?
To set up your Brother sewing machine, start by connecting the power and foot pedal. Then, check the presser feet and insert the needle. Finally, familiarize yourself with your specific model’s features by referring to the user manual.
What are some essential tips for using a sewing machine step by step?
When using a sewing machine, ensure that you thread it correctly, adjust the tension settings according to your fabric type, and practice controlling speed with scrap fabric before starting on your project.
How can I troubleshoot common issues while using my Brother sewing machine?
If you encounter issues like uneven stitching or thread bunching, try rethreading the machine and adjusting the tension settings. It’s also important to regularly clean and maintain your sewing machine to prevent potential problems.
What are some effective maintenance tips for keeping my Brother sewing machine in good condition?
Regularly clean out the lint from under the needle plate and oil any recommended areas following your user manual’s instructions. Keep your machine covered when not in use to protect it from dust.
Can you recommend some practice projects suitable for beginners using a Brother sewing machine?
As a beginner practicing with a new Brother sewing machine, consider starting with simple projects such as pillowcases, tote bags, or cloth napkins. These projects will help you get comfortable with various stitches and build confidence in handling different fabrics.
