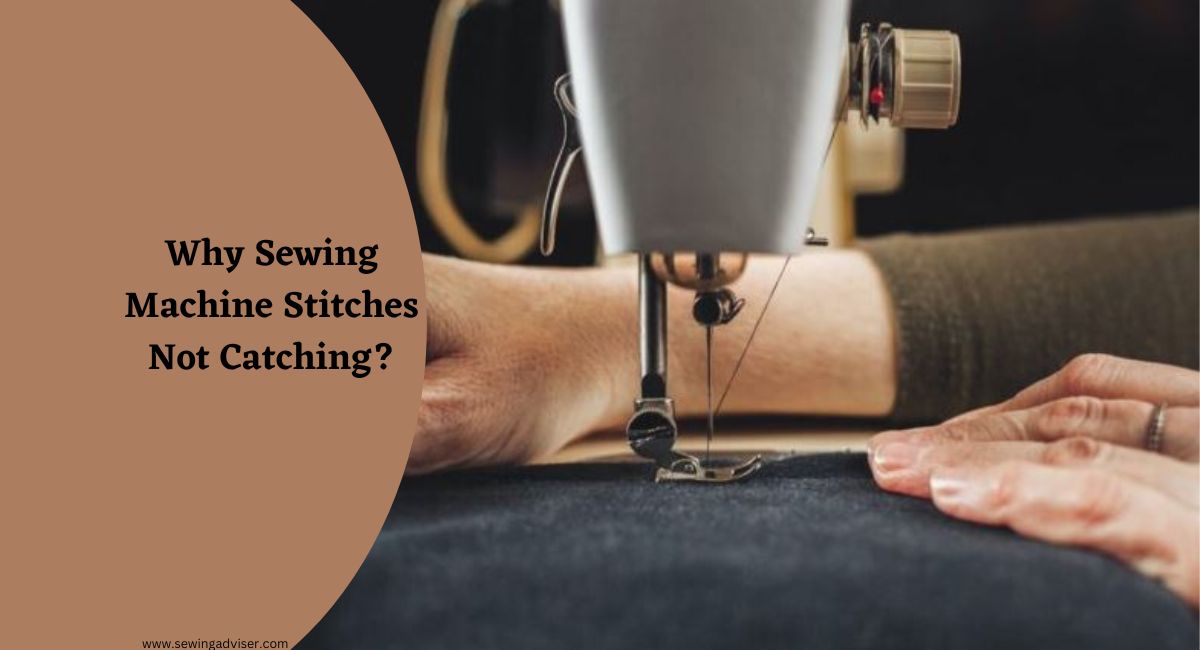
Sewing Machine Stitches Not Catching Discover Quick Fixes Now
Sewing is often fraught with frustration, whether it’s because you can’t find the right fabric or you’re grappling with a difficult pattern.
There are a lot of reasons why your Sewing machine stitches not catching. So, one of the most common reasons that I found is sewing machine needle is bent or dull. You can solve the problem by replacing the needles.
Most of us have experienced our stitches not catching at some point. Here are a few reasons why this may happen and how to fix the problem:
Causes of Sewing Machine Stitches Not Catching
Stitch Length too Long
If your stitches are too long, they will begin to unravel the fabric. To fix this, use a shorter stitch length until you have the right tension.
If you’re unsure about how long to make your stitches, try using a universal presser foot (Teflon-coated ones often come with markings).
The Needle Was Not Threaded Properly
Forgetting to thread the needle is easy, especially when you’re constantly changing between fabrics or colors.
Always take a moment to double-check that the needle is properly threaded before beginning a new project this often indicates why stitches aren’t catching.
Thread Tension Issue ( Tight or Too Loose )
If your stitches aren’t catching, it could be because the tension is either too tight or too loose.
The best way to test this is by attaching your bobbin case and setting it aside while you test with a new spool of thread on top.
If your thread is catching when you lower the presser foot, then increase the tension until it no longer catches with pressure.
Needle Is Bent Or Dull
A bent or dull needle cannot penetrate fabric as it should, which leads to skipped stitches.
To find out if this is your issue, open the bobbin cover of your machine and take the needle out of its shaft.
To remove any burrs along the top side of the needle, use a pair of pliers and proceed with caution too much bending will permanently ruin the shape of the needle.
You’ve Run Out of Bobbin Thread
There might be nothing wrong with your sewing machine if you’re running low on the bobbin thread and haven’t replaced it yet.
By replacing your spool of bobbin thread, you can avoid any sewing mishaps in the future.
Dirty Shuttle Case
A lot of fabric is made by cutting and tearing it. Over time, dirt and debris accumulate in the shuttle area, which obstructs the thread path and causes it to move slowly.
Presser Foot Pressure Is Too Low Or Too High
The presser foot pressure controls how much your sewing machine sews into the fabric. Too little pressure results in stitches that look loopy and about to come undone.
Stitching with the needle positioned too high can cause the fabric to get caught between the needle and the presser foot, resulting in holes or other damage.
Machine Timing Issue
If your machine’s components are not well-maintained or become worn over time, the needle might move slightly during sewing and cause a timing issue.
By servicing your sewing machine with an authorized service at least once a year, this issue can be remedied.
Poor Quality Thread
If your sewing machine is having trouble catching the thread, it might be because you’re using a poor-quality needle or thread.
A machine won’t work properly if the needle is low-quality; this can cause the needle to break or bend while you’re working.
If the machine is unable to pull low-quality fiber through the bobbin case, it will lead to inferior stitching and skipped stitches.
In order to have your sewing machine running smoothly, it is important to use quality needles and threads.
Fabric Is Too Thick
Having fabric that is too thick can make it difficult to sew on a machine. To avoid this issue, use needle nose pliers to check if the thickness of the fabric will be an impediment.
In addition, if your presser foot can’t open wide enough, it will cause problems while sewing on thicker fabrics like denim jeans. etc.
Sewing Machine Zig Zag Stitch Not Working
If the thread you’re using is of poor quality or incompatible with your bobbin case, this could lead to difficulty in forming a zigzag stitch.
Furthermore, lint covers on top threads or broken threads in front of the needle when sewing straight forward may also result in this problem.
Another potential cause of zigzag stitching problems is dirt or lint build-up in between the bobbin case and the bobbin holder.
If there are any dirt or lint particles preventing these two parts from moving smoothly, it will be difficult to sew with your machine.
How to Fix Sewing Machine Not Catching the Thread Issue
Check the Bobbin
The bobbin holds the bottom thread and has a tooth that catches the upper needle thread. This creates a stitch by pulling it in a circle to lock.
You need to ensure that the yarn smoothly unrolls from both the spool and bobbin. So, what do you do?
If your machine isn’t threading, take out the bobbin and put it back in. Ensure you wind the yarn correctly not too loose or tight. Before beginning your work, test the tension on some extra fabric to be certain.
Related Post: What Is a Bobbin?
Rethread Your Upper Thread
If your machine isn’t working right, it might just be that you need to take a few steps back. When threading, it’s easy to miss a stage and that can cause tension problems.
To fix this, completely undo the top thread on your machine and enter it again carefully. This could be the solution you’re looking for!
Check the Needle
If your needle is bent, it will probably be difficult to press the foot down. If the needle is only slightly bent, though, you might not notice anything’s wrong until you see that your sewing machine isn’t catching the thread. So what can you do?
It’s important to replace any needles that are either worn out or bent. In addition, ensure you’re using the correct size needle for your project small needles should be used on delicate or light fabrics while bigger needles should be utilized on heavier fabrics. If your machine is snagging thread, it likely means you need a bigger needle.
Tension
You can use any tension you like, as long as it matches the fabric’s required tension. To do this, be sure to thread carefully and set the tension knob to what is needed.
Messing with the tension on your sewing machine can be frustrating, especially if you’re not sure what you’re doing.
Before you start stitching, it’s always a good idea to test the tension on a scrap piece of fabric. That way, you’ll know for sure whether or not the tension is set correctly. You’ll know the tension is right when your stitches are perfect and even.
Change Your Fabric
If your machine isn’t catching the thread, it might be due to the fabric you’re working with. Try a different material and see if that works.
If the problem lies with the fabric, then you might have to change your technique for handling it.
Check Thread Type
As was mentioned before, the quality of the yarn is important. Inferior threads break more frequently. To avoid this, only use quality sewing thread.
Additionally, make sure to find a type that doesn’t form knots, damage your fabric, or jam your bobbin case.
The only things you need for beautiful, well-made fabric are a good machine needle, a dust-free feed dog and pressure foot, and the right tension. Get the right thread, and enjoy your stitching!
Replace The Broken Or Bent Needle
Replace your needle if it is blunt or bent. A dull needle will not cut the fabric cleanly, while a curved one will make it hard to sew a smooth line.
To fix this issue, change your needle.
Related Article: How to Change a Sewing Machine Needle In 58 Seconds
Thread The Machine Properly
Before you start sewing, check that there is no loose thread coming out from the spool holder on either side of the machine.
If there’s more thread coming out from one side or both sides then this could cause problems with your stitches catching or not catching properly due to too much friction between the spool holder and bobbin.
Use High-Quality Thread
The type of thread you use alters how securely your stitches attach to the fabric. You’ll have stronger results using a high-quality thread as opposed to cheap brands from discount stores. Additionally, if your thread is too thick or thin, it will cause stitching issues.
Use The Right Fabric For The Needle
If a fabric is too thick or thin for a certain needle, it can cause the needle to snap while in use.
With the myriad of fabrics available on the market, it’s essential to select the one that will work best for your project so you don’t run into any issues with your stitching.
Presser Foot Pressure Is Too Low Or Too High
If you lift up your presser foot and see a screw, this is how you adjust the height (you can also find more information on this in your manual).
Hold the screw in place while you adjust the height. The goal is to have it sit level with the fabric so that when you sew over an existing line or seam, you won’t hit any pins or pinholes.
If you’re looking to sew a thicker material that your sewing machine can’t handle, consider using another type of needle or thread combination with smaller eyelets.
This will make it easier for the machine to stitch the fabric together without skipping stitches.
Fixing The Zig Zag Stitch Not Working
The very first thing you should do is check the thread tension setting on your machine. Make sure that it corresponds with the type of fabric and loosen any screws or turn any knobs if necessary, so as to get a nice even stitch. You may also need to adjust the bobbin tension level (if applicable).
It’s not uncommon for dirt or lint to become stuck between the bobbin case and the bobbin holder when using a zigzag stitch.
Before taking any further action, ensure you have removed the bobbin case from your sewing machine. After that, give it a good cleaning, and be sure to let it air-dry before putting it back into place.
Make sure all of the components fit together correctly so there are no gaps among them that could allow lint or dust to get trapped inside your machine’s internal workings.
How to Fix The Stitch Length On a Sewing Machine
The type of sewing machine you have will determine the severity of this problem. For example, some Singer 6215c models from the 1980s come with gears made out of silicone, plastic, or rubber.
With enough use, the gear teeth will eventually wear down and prevent you from adjusting your stitch length.
If the whole gear has fallen off, it can be very difficult to change the length of your stitch. In this case, you should not try to restore it yourself. Special tools and expertise are needed in order to get the repair done correctly.
Repairs can be difficult, especially when necessary parts are not widely available or require a computerized sewing machine.
Even if nothing on your sewing machine is physically broken, the computer may be experiencing a malfunction that won’t allow you to change the stitch length. In this case, you’ll need an expert in sewing machine computers to handle the repairs.
Singer Sewing Machine Stitch Problems
If your Singer sewing machine is leaving a big mess of looped thread beneath your fabric, the problem can be fixed by simply checking and adjusting the upper thread tension.
If you find your machine looping, you may need to re-thread it. If your machine is skipping stitches, there may be a problem with the needle.
If your sewing machine needle is not broken and the issue persists, check if the flat side of the needle is facing toward the back of your Singer sewing machine. If that does nothing, try reinserting the needle completely to see if that fixes it.
Forgetting to place the top and bobbin thread under the presser foot is another common stitching issue. Without this support, your threads are too free and can move around.
The fix is easy simply realign the threads so they are placed toward the back of the machine and underneath the presser foot.
If the stitches look a bit distorted, this is likely because you accidentally helped the feed dog by pulling or pushing the fabric. To fix this, let the feed dog do its job on its own.
Reverse Stitching Problems
The reverse function on sewing machines can be difficult to find because they are not all designed the same way. The best way to locate it is by consulting your owner’s manual.
The first thing you should check if your sewing machine is having trouble reverse stitching is to see if the button is jammed.
The second thing I think of is a button that isn’t working right. Instead of pushing it down, you would have to unjam the lever to make sure it’s functional again.
If your sewing machine is computerized, then the onboard processor may have malfunctioned.
You would need a skilled repairman to fix it in this case. Another possibility is that your feed dogs are stuck and only going in the reverse direction.
It is best to take your machine to a qualified repairman when it starts having problems, especially if it is still under warranty. Your DIY method may void the warranty if you’re not careful.
How to Fix The Zig-Zag on a Sewing Machine
If the problem you’re experiencing with your zig-zag function is a common one, then the solution will likely be just as trivial. For some of the easier problems mentioned earlier, all that might be required is to clean your machine.
You might choose to do this process yourself or bring it to a professional instead, in order to assure the machine is cleaned properly and ready for use. Oftentimes, solve various problems with just one good cleaning.
Doing some routine maintenance on your machine now will save you time and headaches later. Putting a few drops of oil where the owner’s manual says to is one easy way to do this.
If the aforementioned solutions don’t work, read your owner’s manual to see what the correct settings should be.
Once you know that, adjust your zig-zag settings accordingly. If there is still lint or debris around, remove the bobbin and bobbin plate.
If your cam is in good condition and not the root of your problem, reset the timing by adjusting the cam.
Check your owner’s manual to find its location. Turn the screws clockwise to increase speed, and counterclockwise to reduce speed.
Make sure your tension isn’t affecting your zig-zag feature. Loosening the tension may fix the issue. If these tips don’t help, take your machine to a professional for further assistance.k
Why Are My Stitches Lose On My Sewing Machine
Many things can cause this common sewing issue, but lint is often the culprit. If there’s lint build-up under your presser foot or around the feed dogs, it’ll be tough to get a tight grip on your fabric and sew with precision.
The size of your needle or the type of fabric you are using may be incorrect for what you’re trying to sew. Tension is also oftentimes the issue at hand.
Always check your tension before beginning to sew in order to avoid loose stitches. Do a test beforehand with both the top and bottom thread tensions to guarantee that everything is running smoothly.
Finally, sewing speed will result in less precise stitches. If you’re not careful and resist the temptation to manually help the feed dog, your pushing or pulling of the fabric will affect this. Manual assistance ruins the precision that is necessary for accurate Sewing.
Troubleshooting Loose Stitches
The feed dog is the part of the sewing machine that helps to move the fabric through. You may be accidentally helping it without realizing it, which you will have to stop doing if you want your machine to do all the work.
If your machine is producing tension issues, you should re-thread it from the top and bottom to ensure even tension on both the upper and lower threads.
Also, check to see if there is any loose thread or lint that shouldn’t be there as those could also be causing problems.
Test your sewing machine by removing any items that could interfere with the grip of the feed dog or ruin thread tension, etc. This will save you frustration later on when you are in the middle of your project.
Make sure you check the size of your needle before you start sewing. If it is too small or not suited for the fabric, replace it with one that is the right size.
Not to mention, if you keep your machine clean and oiled, you can also prevent loose stitches.
Related Article: Why Is My Sewing Machine Skipping Stitches – 2023 Full Guide
Conclusion
I hope now you are well aware of why sewing machine stitches not catching. It could be due to a problem with the sewing machine’s needle, such as it is bent or dull.
It could also be due to the type of thread being used, or the tension settings on the machine being incorrect. Another possible issue is that the fabric being sewn is too thick or too slippery for the machine to handle properly.
Finally, the problem could be related to the sewing machine itself, such as a malfunctioning feed dog or a misaligned hook.
To troubleshoot the issue, it is important to carefully examine all of these potential causes and take appropriate action to fix the problem.
FAQs: Sewing Machine Stitches Not Catching
What To Do If Your Sewing Machine Is Not Stitching On Top?
First, check to make sure the machine is threaded properly and the top thread tension is not too tight. If these things are okay, try cleaning and oiling the machine. If the problem persists, try replacing the needle or consulting the machine’s manual for further troubleshooting steps.
What To Do If Your Sewing Machine Is Not Stitching On The Bottom?
First, check to make sure the machine is threaded properly and the bobbin is inserted correctly. If these things are okay, try cleaning and oiling the machine. It could also be a problem with the presser foot or the feed dogs, so you may need to check those as well.


26 Comments