
What Is An Overcast Stitch & How to Sew: 2024 Complete Guide
Do you often find yourself looking at a crochet pattern and seeing the term “Overcast Stitch” thrown around, but not having any idea of what it is or how to do it?
If so, then today is your lucky day! Here we will be covering everything you need to know about this stitch so that you can confidently incorporate it into your crocheting projects.
From explaining what is an Overcast Stitch and how to make one step-by-step, right down to discussing how the Overcast Stitch could be helpful in creating specific pieces.
This blog post has all the information that you’ll need on this technique. So without further ado, let’s get started learning about the mysterious Overcast Stitch!
What Is An Overcast Stitch?
An Overcast Stitch is a type of crochet stitch used mainly for edging and joining pieces.
The overcast stitch forms a tight, even row of stitches that are designed to give a neat finished look as well as provide extra strength and stability to the edges of your project.
It’s also commonly used when joining two or more pieces together, as it gives a much neater finish than just leaving them open-ended.
There are several variations of the overcast stitch, such as the whip stitch, which involves wrapping the thread around the edge of the fabric after each stitch, or the blanket stitch, which creates a decorative edge.
The overcast stitch can be used on a variety of fabrics, from lightweight cotton to heavy wool, and is suitable for both straight and curved edges.
How to Hand-Sew With Overcast Stitch
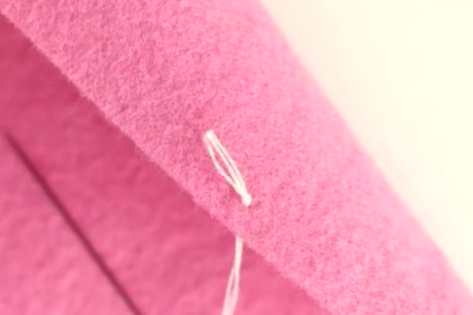
To begin your overcast stitch, secure a knot. Make sure to leave some tail to work with when stitching, but still ensure the knot is firmly bound.
Then poke your needle up through the fabric or seam from back to front; if you’re sewing multiple layers of material together, hide the knot in between them for extra security.
Thread the needle back through to the front of your fabric, pulling it taut. To ensure uniformity in each stitch, make sure you are maneuvering the thread in a single direction as you go along this will also help secure its hold on the material’s edge.
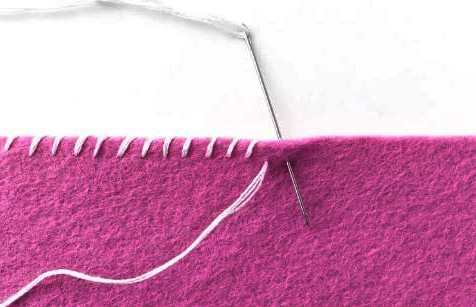
To guarantee your stitches remain at the fabric’s edge, gently tug on each one bit by bit. It might take a little practice to keep everything consistent, but with time and effort, you’ll be able to accomplish even tension effortlessly!
To ensure a neat and even-looking overcast stitch, it’s essential to keep the stitching spacing consistent throughout.
To properly execute the overcast stitch, take a tiny tacking stitch through the back layer of your fabric or just partially into the material if you are working with felt. Once complete, tie it off to secure it in place.
Why Use An Overcast Stitch?
The main reason to use an overcast stitch is to prevent the raw edges of fabric from fraying. If left untreated, raw edges can come apart, making the garment or item unusable. Overcasting creates a finished edge that looks neat and professional.
Types Of Overcast Stitches
There are several variations of the overcast stitch, including:
Whip Stitch
The whip stitch is one of the most common types of overcast stitches. It involves sewing over the edge of the fabric in a diagonal motion, creating a zigzag pattern.
Overhand Stitch
The overhand stitch involves sewing over the edge of the fabric in a straight line, creating a row of stitches that go up and down the edge.
Serger Stitch
A serger stitch is a type of overcast stitch done by a serger machine. It involves trimming the edge of the fabric and then sewing over it with multiple threads.
Blanket Stitch
The blanket stitch is another type of overcast stitch that creates a decorative edge. It involves sewing the thread over the edge of the fabric and then looping it back through the same stitch, creating a “blanket” effect.
Finishing a Seam With Overcast Stitch
When sewing garments or other items, you will likely need to apply a seam finish. Overcast stitch is not the most reliable option but it works without any special tools or materials.
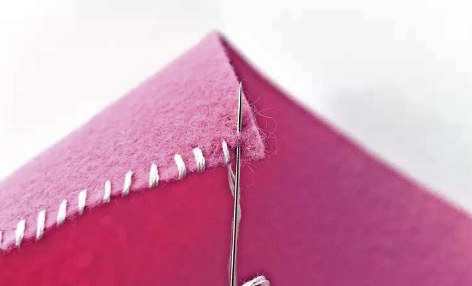
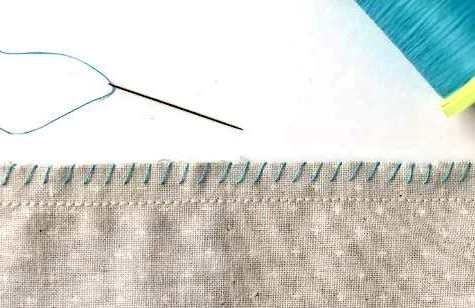
Following the same stitches mentioned above to whip stitch your seams can create a neat edge that blends in with the project. Although a contrasting thread was used for this example so it could be seen more easily, try using a matching thread instead to get optimal results!
To reinforce your stitching, after working one line of overcast stitch in a single direction, come back and sew another row in the opposite way. This will give you a result that looks like a zigzag pattern on an ordinary sewing machine.
What Is Overcasting In Sewing?
Overcasting is a sewing technique used to create a neat and professional-looking edge on fabrics. It involves stitching around the edges of two pieces of fabric to secure them together, as well as reinforcing weak spots or binding off raw edges.
Overcasting can be done either by hand or with a machine, and it is often used in conjunction with other seam finishes such as hemming or binding.
It’s an especially useful technique for materials that are prone to fraying and unraveling, such as lightweight cotton fabrics.
In addition, this method also provides a decorative finish when using contrasting colors of thread!
How Do You Bind Off Knitting?
Binding off knitting is the process of securing the final row of stitches from the knitting project so that they don’t unravel.
This is commonly done by using a yarn needle to weave through each stitch and loop it off once, then repeating this for all stitches in the row.
Once all stitches have been looped off, you can cut the yarn close to the fabric and pull on the tail to secure it in place.
If desired, you can also use a crochet hook or an overcast stitch to bind off your knitting instead of weaving it with a yarn needle.
What Is Single Crochet?
Single Crochet (or “sc”) is one of the most basic crochet techniques used in projects such as blankets, shawls, and even clothing. It is a simple stitch that creates a neat, uniform look when worked in rows or rounds.
To work single crochet, you will insert your hook into the designated stitch, yarn over and pull up a loop, yarn over again and draw through both loops on your hook.
Single crochet is an easy stitch to learn and is often used as the foundation for many beginner crochet projects!
Is An Overcast Stitch The Same As An Overlock Stitch?
No, an overcast stitch is not the same as an overlock stitch. An Overcast Stitch (or “oc”) is a type of seam finish used to bind two pieces of fabric together and reinforce weak spots or raw edges.
It involves stitching around the edges of two layers in order to create a neat and professional-looking edge.
On the other hand, an Overlock Stitch (or “ol”) is a type of serging technique used to join two pieces of fabric together by sewing a line of stitches along the seam allowance.
This helps keep seams from fraying and provides a more durable finish than just using an Overcast Stitch alone.
Both techniques are useful for finishing garments, but they should be used in different situations depending on the project.
When To Use An Overcast Stitch?
The Overcast Stitch is generally used when you want the edges of your work to be neat and tidy, as well as for joining two pieces together. It’s also a great stitch for reinforcing weakened fabrics or preventing fraying around the edges.
The overcast stitch can also be used to secure raw seams, such as on clothing or quilts, and is often used in applique projects. Not only does it provide strength and stability, but it also looks neat and professional!
How To Do An Overcast Stitch?
There are two main ways to do an overcast stitch: by hand or by machine.
Hand Overcast Stitch
To do a hand-overcast stitch, follow these steps:
- Thread your needle with a matching thread and knot the end.
- Hold the fabric edge together and insert the needle from the back to the front, about 1/8 inch from the edge.
- Bring the needle over the edge of the fabric and insert it into the fabric about 1/8 inch from where you started.
- Pull the thread tight and repeat the process, making sure to keep the stitches close together.
Machine Overcast Stitch
To do a machine overcast stitch, follow these steps:
- Set your machine to the overcast stitch setting.
- Place the fabric edge under the presser foot, making sure the needle is lined up with the edge of the fabric.
- Sew along the edge of the fabric, making sure to keep it straight and even.
How to Make an Overcast Stitch with a Crochet Hook?
If you’re looking to use the Overcast Stitch with a crochet hook rather than a needle and thread, there are some slight differences in technique. Instead of stitching through the fabric, you will instead be working over it hence its name!
- Begin by inserting your crochet hook into the edge of your project at A.
- Wrap your yarn around the crochet hook twice before pulling through, creating two loops on the hook.
- Yarn over again and pull this loop through both of the previous loops on the hook to create one chain stitch.
- Repeat steps 1-3 until you reach the end of your row or seam, inserting your hook slightly further away from the previous stitch each time.
- To finish off, slip stitch into the last chain and then tie off your yarn.
Different Ways to Use the Overcast Stitch
The Overcast Stitch is extremely versatile and can be used in a variety of ways from closing up seams on clothing to creating decorative edges around blankets.
Here are some different ways you can use the overcast stitch:
To join two pieces of fabric together: This technique works particularly well for fabrics that are prone to fraying or for items such as baby blankets with lots of little bits and pieces. The overcast stitch securely binds two pieces together, making them look like one continuous piece.
To reinforce weak spots or bind off raw edges: If you’re working with a fabric that has weak spots or edges that tend to fray, then using an overcast stitch will help keep these areas secure. Simply stitch around the edge, making sure to catch any loose threads or fraying edges.
To create a neat finish: The overcast stitch is perfect for giving your project a neat and tidy look by creating a professional finish on the edges. It can also be used to add decorative details such as blanket stitches or buttonholes.
Conclusion
I hope now that you are well aware of what is an Overcast Stitch. In Conclusion, The Overcast Stitch is an incredibly useful technique that is often overlooked by crocheters, but it can be extremely helpful in creating beautiful projects with a clean and neat look.
Whether you’re looking for an easy way to join two pieces of fabric together or want to give your work a polished finish, the Overcast Stitch has you covered! So next time you’re wondering how to finish a project neatly, keep the Overcast Stitch in mind!

7 Comments