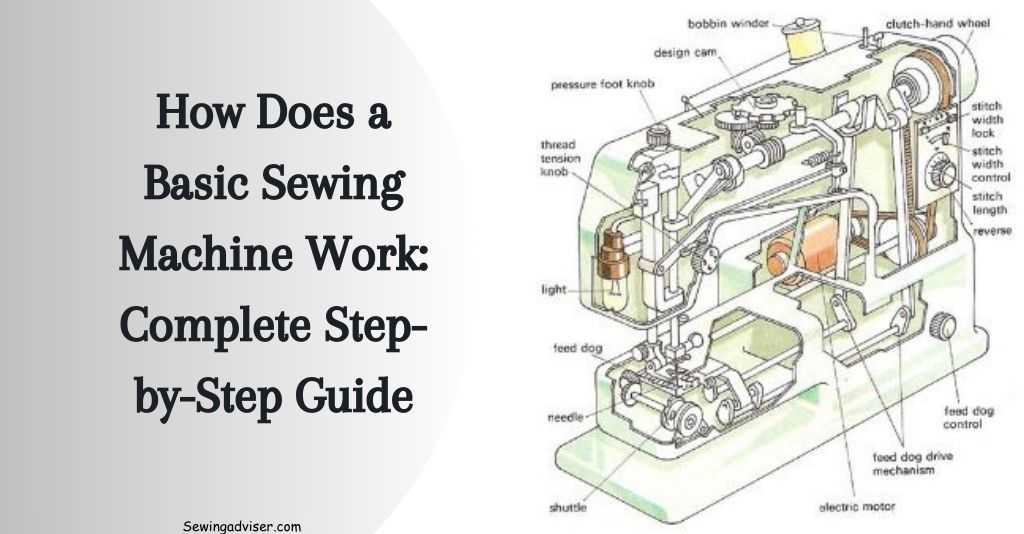
How Does a Basic Sewing Machine Work: 2024 Step By Step Guide
Welcome to my guide on how does a basic sewing machine works! Whether you’re just starting out or have been sewing for years, understanding the ins and outs of this essential tool is crucial.
In this post, I’ll take you through the inner workings of a standard sewing machine, breaking down its stitches, tension mechanisms, and bobbin systems.
So grab your needle and thread, and let’s dive into the fascinating world of sewing machine mechanics together.
Key Takeaways
- Understanding the history of sewing machines can provide insight into the evolution of this essential tool for creating garments and other fabric items.
- Familiarizing yourself with the key components of a sewing machine, such as the needle, bobbin, and presser foot, is crucial for efficient and successful sewing.
- Threading the machine correctly is fundamental to ensure smooth and precise stitching, and it’s important to follow the manufacturer’s instructions for your specific model.
- Knowing the stitch formation process, including the role of the needle and bobbin thread, helps in achieving different types of stitches for various sewing projects.
- Mastering basic sewing machine operation, including adjusting tension and stitch length, is essential for creating professional-looking seams and finishes.
- Learning various sewing techniques and fabric manipulation tips can elevate your sewing skills and expand your creative possibilities.
- Being able to troubleshoot common issues with your sewing machine, such as thread tension problems or jammed needles, can save time and frustration during sewing projects.
- Regular maintenance of your sewing machine, such as cleaning and oiling, is vital for prolonging its lifespan and ensuring consistent performance.
History of Sewing Machines
Sewing machines have come a long way from the hand-cranked models to the sophisticated electric ones we use today.
The first functional sewing machine was patented in 1846 by Elias Howe, revolutionizing the textile industry.
Sewing machine designs have continuously evolved over time, making them more efficient and versatile.
Related Post: Best Sewing Machine for Fashion Designer
Invention Evolution The journey of sewing machines began with the manual operation of hand-cranked models.
These early machines required human effort to operate, limiting their speed and efficiency.
However, with technological advancements, electric sewing machines were introduced, significantly improving productivity and ease of use.
For instance, Elias Howe’s invention laid the foundation for subsequent innovations in sewing machine technology.
Modern Advancements Today’s sewing machines are equipped with advanced features that enhance functionality and convenience for users.
Automatic needle threading is one such feature that simplifies the setup process before sewing.
This innovation eliminates the need for manually threading needles, saving time and effort for sewers.
Furthermore, computerized sewing machines offer programmable stitch patterns and a variety of presser feet, allowing users to create intricate designs with precision and consistency.
Some modern sewing machine models boast built-in embroidery designs as part of their capabilities.
This feature enables individuals to explore creative projects by incorporating various embroidery patterns into their sewing work using a foot.
Key Components Explained
The needle mechanism and foot are crucial parts of how a basic sewing machine works. It moves up and down to create stitches on the fabric. Different fabric types require different needle sizes for optimal results.
Proper installation of the needle is essential for smooth sewing operations without any disruptions.
For instance, when working with delicate fabrics like silk, a finer needle should be used to prevent snags or runs in the material.
On the other hand, heavier fabrics such as denim necessitate a sturdier needle to penetrate the layers effectively.
Understanding these nuances ensures that the right needle is chosen for each sewing project, resulting in high-quality finished products.
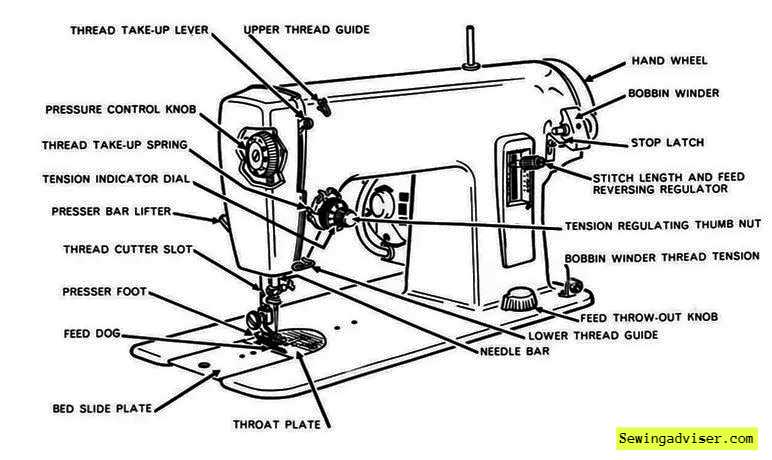
Threading the Machine
Understanding how does a basic sewing machine works involves learning about threading the machine.
The upper thread path is crucial for smooth stitching. It includes threading through various guides and the needle. Following the correct thread path prevents errors and ensures seamless operation.
Proper bobbin placement is another essential aspect of sewing machine functionality. Different machine models may have top-loading or front-loading bobbins, but regardless of the type, ensuring proper bobbin placement is critical for smooth thread feeding during sewing.
Incorrect bobbin placement can lead to issues with stitching quality and overall performance.
Threading a sewing machine correctly ensures that stitches are formed evenly and accurately. If the upper thread path is not followed correctly, it can result in tangled threads or even breakage during sewing.
By understanding how to navigate the upper thread path, users can avoid common mistakes that may disrupt their sewing process.
Placing the bobbin properly within its designated area allows for consistent tension control while stitching fabric together.
Bobbins play a crucial role in creating well-formed stitches on both sides of the fabric being sewn together; therefore, incorrect placement could lead to uneven or unreliable stitching results.
The Stitch Formation Process
Interlocking Threads
Understanding how a basic sewing machine works involves grasping the interlocking process of upper and lower threads. When the needle plunges into the fabric, it creates a loop with the upper thread.
Simultaneously, the rotating bobbin hook catches this loop and intertwines it with the lower thread, forming a secure stitch on the fabric layers.
Achieving well-interlocked threads relies on maintaining proper tension balance between the upper and lower threads.
This ensures that they intertwine seamlessly, contributing to high-quality stitching without loose loops or skipped stitches.
Proper tension balance is crucial for preventing issues like thread bunching or puckering of fabric during sewing projects.
By fine-tuning the tension settings based on different fabric types and thread weights, you can avoid these common problems and achieve smooth, even stitches across various materials.
Regularly checking and adjusting tension not only maintains stitch quality but also enhances the overall sewing experience by reducing frustration caused by stitching imperfections.
Stitch Length Control
When exploring how a basic sewing machine works, understanding how to control stitch length is essential for achieving desired outcomes in different projects. Adjusting stitch length allows you to create versatile effects ranging from closely spaced stitches for strong seams to longer stitches for basting or gathering fabrics efficiently.
By manipulating this setting according to specific project requirements, you can customize your sewing results based on functionality and aesthetics.
Fine-tuning tension prevents thread bunching or puckering of fabric. Regular tension checks maintain stitch quality across different projects. Sewing machines offer various stitch types such as straight, zigzag, and decorative options.
Choosing appropriate stitch types enhances project outcomes. Understanding different stitch selections expands creative possibilities.
Basic Sewing Machine Operation
Starting the Machine
Before you begin sewing, it’s essential to familiarize yourself with the machine controls and locate the power switch.
This will ensure that you can easily turn the machine on and off as needed. Proper positioning of the foot pedal is crucial for a smooth start-up.
By placing your foot in a comfortable position on the pedal, you’ll be able to control the speed of the machine more effectively. Always remember to follow safety guidelines when starting the sewing machine to prevent any accidents.
When starting your basic sewing machine, understanding how to properly place your fabric is key. Ensuring that fabric placement on the machine bed is correct will result in even stitching and prevent any potential issues during sewing.
Understanding grain line and fabric alignment plays a significant role in preventing distortion while working on your project.
Properly positioning your fabric before stitching ensures smooth feeding through the feed dogs, which contributes to high-quality results.
Guiding Material
Guiding material evenly through the feed dogs is an important aspect of using a basic sewing machine effectively. Doing so promotes straight stitching lines and prevents any irregularities or bunching in your seams.
Maintaining consistent speed while guiding fabric enhances seam quality by ensuring that stitches are uniform throughout your project.
Sewing Techniques Mastery
Straight Stitching
Understanding straight stitching is fundamental. This stitch is the most common and simplest to master.
The needle moves up and down, creating a straight line of stitches on the fabric. To achieve this, ensure that the fabric is aligned with the edge of the presser foot for even stitches.
To start, thread your machine by following the user manual instructions. Then, place your fabric under the presser foot and lower it.
Next, gently step on the foot pedal to begin sewing. As you guide the fabric through, keep an eye on maintaining a consistent speed for uniform stitching.
Remember that practicing on scrap fabrics can help perfect your technique before working on actual projects like hemming or making simple garments.
Sewing Curves
Sewing curves require finesse when using a basic sewing machine. It involves pivoting at precise points while maintaining control over both the speed and direction of stitching.
When navigating around curves such as those found in armholes or rounded corners, reduce your machine’s speed for better control.
Start by positioning your fabric with one hand slightly ahead of where you want to sew next while guiding it with your other hand from behind.
Pivot carefully when necessary by lifting the presser foot without removing the fabric from underneath it.
For instance, when sewing curved seams in clothing construction like sleeves or collars, taking these measures will result in neat and professional-looking finishes.
Backstitching Skills
Backstitching plays a crucial role in securing sewing seams at their beginning and end to prevent unraveling over time. It involves reversing directions briefly at both ends of a seam to lock the stitches in place.
To backstitch effectively using a basic sewing machine:
- Begin by lowering your needle into the position where you want to start.
- Engage in reverse mode either by pressing a button or lever.
- Gently guide your fabric backward for about three stitches.
- Securely switch back into forward mode before continuing with regular stitching towards completing your seam.
Fabric Manipulation Tips
Handling Different Textures
It’s essential to adjust the machine settings based on the fabric you’re working with. For lightweight and delicate fabrics like chiffon or silk, use a smaller needle size to prevent pulling or tearing. Reduce the tension on your machine to avoid puckering or distorting the fabric as you sew.
On the other hand, when working with heavier fabrics such as denim or canvas, opt for a larger needle size and increase the tension on your sewing machine.
This will ensure that the stitches penetrate through the thick material without causing any skipped stitches. Remember that practice fabric is crucial for testing out these adjustments before starting your actual project.
Sewing machines also have specific presser feet designed for different fabric types. For instance, if you’re sewing stretchy knits, using a walking foot can help prevent uneven stretching and distortion of the fabric while stitching.
When handling slippery fabrics like satin or taffeta, attach a Teflon foot to glide smoothly over the material without sticking.
In addition to adjusting machine settings and using specialized presser feet, consider using pins or clips strategically when working with various textures.
Pinning perpendicular to the seam allowance helps keep slippery materials in place during stitching while preventing bunching up underfoot pressure.
Seam Techniques
Understanding various seam techniques is fundamental in achieving professional-looking results regardless of what type of fabric you’re working with.
For woven fabrics prone to fraying such as cotton or linen, finishing seams by either serging (overlocking) them or using pinking shears can prevent unraveling over time.
Moreover, mastering techniques like French seams adds an elegant touch for lightweight sheer fabrics where visible seam allowances are undesirable.
On thicker materials like wool blends or upholstery fabrics used for home decor projects, flat-felled seams provide strength and durability while concealing raw edges neatly within the seam.
As part of perfecting your skills in handling different textures and utilizing varied seam techniques effectively, consistent practice on diverse types of fabric is key.
Troubleshooting Common Issues
Skipped Stitches
Skipped stitches can be frustrating, but understanding how a basic sewing machine works can help troubleshoot this issue. One common reason for skipped stitches is using the wrong type or size of needle for the fabric.
For instance, if you’re working with a heavy fabric like denim and using a fine needle, it may not penetrate the fabric properly, resulting in skipped stitches.
Another cause of skipped stitches could be an improperly inserted or worn-out needle. It’s important to ensure that the needle is correctly installed and not bent or dull.
Make sure to use high-quality thread suitable for your fabric. Low-quality threads are more likely to cause stitching problems such as skipping.
To prevent skipped stitches when sewing stretchy fabrics like jersey or spandex, consider using a ballpoint needle designed specifically for knit fabrics.
These needles have rounded tips that slide between the fibers instead of piercing them, reducing the likelihood of skipped stitches.
Thread Bunching
Thread bunching under your fabric while sewing is another common issue that can arise when using a basic sewing machine. This problem often occurs due to incorrect threading or tension issues within the machine.
Start by re-threading both your upper and lower threads carefully according to your machine’s manual.
Check if there are any tangles in the bobbin area causing thread bunching and remove them before continuing with your project.
Adjusting the tension settings on your machine might also resolve thread bunching issues; experiment with different tension levels until you find one that produces smooth and even stitches without any bunching underneath.
If you’ve tried these troubleshooting steps and still experience thread bunching, it might be worth considering whether you’re using compatible threads in both the top and bobbin threads.
Needle Breakage
Needle breakage is not uncommon when operating a basic sewing machine incorrectly or encountering certain issues during operation.
One frequent cause of needle breakage is attempting to sew through thick layers of material without adjusting your sewing machine settings accordingly.
For example, when quilting through multiple layers of batting and fabric at once, it’s essential to use an appropriate needle size (like 90/14) capable of penetrating all those layers without breaking.
If you’ve confirmed that you’re using an appropriate needle size but still experiencing frequent breakages, consider checking for burrs on other parts where needles pass through during stitching. Regular maintenance will help eliminate burrs from occurring near moving parts inside your **
Maintaining Your Sewing Machine
Cleaning Procedures
To keep your basic sewing machine in top working condition, regular cleaning is essential. Dust and lint can accumulate over time, affecting the machine’s performance.
Start by unplugging the machine to ensure safety. Remove the needle plate and bobbin case to access the interior parts.
Use a small brush or a handheld vacuum with a soft brush attachment to remove dust and lint from these areas.
Pay close attention to the feed dogs, tension discs, and thread cutter area as they are prone to accumulation.
After cleaning these areas, use a soft cloth dampened with water or mild soap solution to wipe down the exterior of the machine.
Ensure that no moisture seeps into any electrical components or moving parts during this process. Once cleaned, allow all parts to dry completely before reassembling them back into place.
Regular cleaning not only prevents build-up but also helps maintain smooth operation while extending the lifespan of your sewing machine.
Oiling Points
Proper lubrication through oiling is crucial for ensuring smooth movement of mechanical components within your sewing machine.
Refer to your user manual for specific instructions on oiling points as different machines may require varying amounts and types of oil at different locations.
Typically, you should apply a drop of sewing machine oil at designated points such as pivot joints and other moving parts indicated in your manual every few months or after prolonged use. Over-oiling can attract more dust and lint leading to clogging issues so it’s important not to overdo it.
Regularly maintaining proper lubrication ensures reduced friction between metal parts which minimizes wear and tear while promoting seamless stitching operations.
Regular Check-Ups
In addition to regular cleaning procedures and periodic oiling, scheduling routine check-ups for your sewing machine is vital for its longevity. Consider taking it for professional servicing annually or bi-annually depending on usage frequency.
During these check-ups, technicians will thoroughly clean internal components that may be difficult for users alone. They will also inspect various mechanisms including tensions settings, timing adjustments, and any signs of wear-and-tear needing replacements.
These preventive measures help identify potential issues early while keeping your sewing machine in optimal working condition throughout its lifespan.
How Does a Simple Sewing Machine Work?
A simple sewing machine works by using a combination of mechanical components to create stitches in fabric.
When you press down on the foot pedal or activate the machine through other means, it starts a series of actions.
First, the needle descends into the fabric, carrying the upper thread with it. As the needle rises back up, a hook catches the thread and loops it around the bobbin thread below, forming a stitch.
The feed dogs, located beneath the needle plate, then move the fabric forward, allowing for continuous stitching.
This process repeats rapidly, creating a seamless line of stitches as you guide the fabric through the machine.
Additionally, various controls and settings on the machine, such as stitch length and tension adjustments, allow for customization and precision in sewing different types of fabric and projects.
How Does a Sewing Machine Work for Kids?
A sewing machine for kids typically operates similarly to a standard sewing machine but with simpler features and safety precautions designed for younger users. These machines are often smaller in size, lightweight, and easy to use, making them more manageable for children.
In terms of functionality, a kid-friendly sewing machine usually has basic stitching options, such as straight and zigzag stitches, and may include features like a single dial for selecting stitches or a simplified threading system.
These machines often have a slow stitching speed to ensure safer operation for kids and typically come with built-in safety features like finger guards and automatic needle guards to prevent accidents.
Additionally, sewing machines for kids often come with colorful designs, fun patterns, and beginner-friendly instructions to make the sewing experience enjoyable and engaging for young users.
Some models even incorporate educational elements, teaching children basic sewing skills and encouraging creativity through simple projects and activities.
Overall, a sewing machine for kids provides a safe and enjoyable way for children to learn the basics of sewing while fostering creativity and fine motor skills in a supervised and supportive environment.
Closing Thoughts – How Does a Basic Sewing Machine Work
You’ve now unraveled the inner workings of a basic sewing machine, from its fascinating history to mastering essential techniques.
By understanding the key components, threading process, and stitch formation, you’re equipped with the knowledge to operate your machine with confidence. Remember to troubleshoot common issues and maintain your sewing machine regularly to keep it in top-notch condition.
Now it’s time to put your newfound knowledge into practice. Grab some fabric, thread your machine, and start sewing! Whether it’s crafting a new garment or simply practicing different stitches, the more you sew, the more proficient you’ll become.
Embrace the journey of learning and experimentation it’s where creativity truly blossoms.
Frequently Asked Questions
How did the invention of sewing machines impact society?
The invention of sewing machines revolutionized the textile industry, leading to increased efficiency and productivity in garment production. This innovation also played a significant role in empowering individuals to create and repair their clothing, contributing to self-sufficiency.
What are the essential components of a basic sewing machine?
Key components include the spool pin, tension discs, presser foot, needle bar, bobbin case, feed dog, and handwheel. Each part serves a crucial function in guiding the fabric and thread through the stitching process for seamless results.
Can I troubleshoot common issues with my sewing machine at home?
Yes! Many common issues such as thread bunching or needle breakage can often be resolved by re threading the machine correctly or adjusting tension settings. Regular maintenance like oiling moving parts can also prevent potential problems from arising.
How do I master different sewing techniques with a basic machine?
Mastering various techniques involves practice and patience. Start with simple stitches like straight stitch and gradually progress to more complex ones like zigzag or decorative stitches. Experimentation with different fabrics will help you understand how your machine behaves under varying conditions.
What is an effective way to maintain a basic sewing machine?
Regular maintenance is key – keep your machine clean by removing lint build-up after each use. Follow manufacturer guidelines for oiling moving parts periodically to ensure smooth operation. Proper storage in a dust-free environment will also extend its longevity.

2 Comments