
Learn How To Sew A Basting Stitch, When & Why To Use It: 2024
Welcome to the wonderful world of sewing! If you’re new to this craft or simply looking to brush up on your skills, mastering the basting stitch is an essential technique that will elevate your sewing projects to the next level.
A basting stitch is a temporary stitch used to hold fabric layers together before permanent sewing. This beginner-friendly stitch provides stability and allows you to make adjustments with ease.
In this comprehensive guide, we’ll walk you through step-by-step instructions on how to sew a basting stitch, ensuring your sewing endeavors are precise and professional.
So, grab your needle and thread, and let’s dive into the world of basting stitches!
What is Basting Stitch?
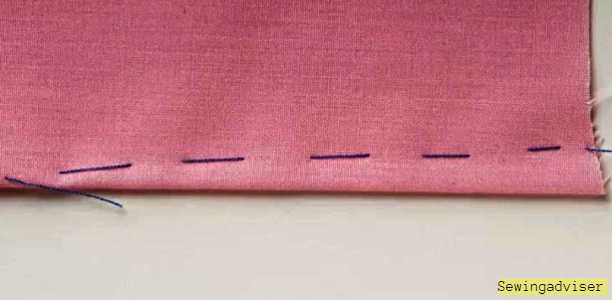
A basting stitch is a temporary and loose stitch used in sewing to hold fabric pieces together temporarily.
It is typically created using a longer stitch length on a sewing machine or by hand sewing with large, easily removable stitches.
The purpose of a basting stitch is to hold the fabric in place temporarily while you work on other parts of a sewing project or to provide a guideline for fitting or altering garments before permanent stitching is done.
Basting stitches are easily removed or undone because they are not meant to be a permanent part of the final sewing.
Once the fabric pieces are securely positioned or the fitting adjustments are made, the basting stitches can be removed, allowing for the final stitching to be done.
Why do you Baste?
Basting is most commonly used in quilting when multiple layers of fabric need to be held together before stitching. By basting the layers together, you can avoid shifting and ensure accuracy.
Basting is also often used to gather fabric. This can be done by hand or machine but is typically done by machine for a more even gathering.
See Also: How to Gather Fabric With Elastic
How to Sew a Basting Stitch
To sew a basting stitch, follow these steps:
- Start by selecting a needle and thread suitable for the fabric you are working with. A needle with a larger eye and a thread that contrasts with the fabric color will make it easier to see the stitches.
- Thread the needle and knot the end of the thread to secure it.
- Hold the fabric layers together that you want to baste. Place the needle through both layers at the starting point, and bring it up to the surface.
- Leave a tail of thread about 2-3 inches long on the wrong side of the fabric to prevent the thread from slipping out.
- Take a small stitch on the surface of the fabric, about 1/4 inch in length. Insert the needle back into the fabric, parallel to the first stitch, and bring it up again a short distance away.
- Continue making small, even stitches along the fabric, keeping the stitches parallel and evenly spaced. The length of the stitch can vary depending on your project, but generally, it should be shorter than the regular sewing stitch.
- Avoid pulling the thread too tightly, as it should allow for easy removal later. Keep the stitches loose but secure enough to hold the fabric layers together temporarily.
- When you reach the end of the area you want to baste, make a small backstitch to secure the thread. Insert the needle into the fabric, bring it up a short distance away, and then insert it back into the fabric at the starting point.
- Cut the thread, leaving a tail, and knot it to secure the basting stitch.
- If needed, repeat the process in other areas of the fabric that require basting.
How to Sew a Basting Stitch by Hand
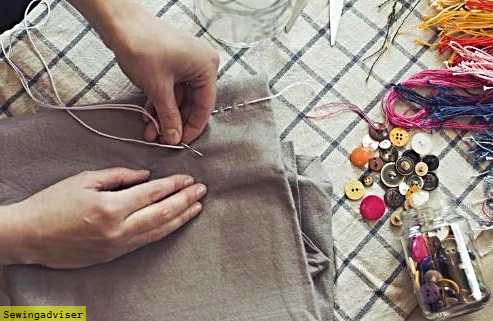
To sew a basting stitch by hand, follow these steps:
- Prepare your materials: Select a needle and thread suitable for the fabric. Choose a needle with a larger eye and a thread that contrasts with the fabric color for better visibility.
- Thread the needle: Thread the needle and knot the end of the thread to secure it.
- Hold the fabric layers together: Align the fabric layers you want to baste and hold them securely in place.
- Start sewing: Insert the needle through both layers of fabric at the starting point. Bring the needle up to the surface, leaving a tail of thread about 2-3 inches long on the wrong side.
- Take small, even stitches: Make small, even stitches on the surface of the fabric, keeping them parallel and evenly spaced. The length of the stitches can vary based on your project, but they should generally be shorter than regular sewing stitches.
- Continuous stitching: Continue sewing along the fabric, maintaining a consistent stitch length and spacing. Keep the stitches loose but secure enough to hold the fabric layers together temporarily.
- Backstitch at the end: When you reach the end of the area you want to baste, secure the thread with a small backstitch. Insert the needle into the fabric, bring it up a short distance away, and then insert it back into the fabric at the starting point.
- Knot and cut the thread: Cut the thread, leaving a tail, and knot it to secure the basting stitch.
How to Sew a Basting Stitch by Machine
Certainly! Here are the quick steps for sewing a basting stitch by machine:
- Prepare your sewing machine: Set up your sewing machine on a sturdy surface and ensure it is in good working condition. Choose a straight stitch setting and adjust the stitch length to a longer setting, such as 4mm or higher.
- Prepare your materials: Select a contrasting thread color and wind the bobbin with it. Thread the machine and insert the bobbin, following the machine’s instructions.
- Layer and align the fabric: Place the fabric layers you want to baste together, aligning the edges and ensuring they are smooth and flat. Pin the layers in place if necessary.
- Set up the fabric: Place the fabric under the presser foot, with the pinned or aligned edge aligned with the center needle position.
- Start sewing: Lower the presser foot and gently start sewing. Begin with a few backstitches to secure the thread.
- Sew the basting stitch: Sew a straight line of stitches along the edge of the fabric, making sure to keep the stitches parallel and evenly spaced. Aim for a longer stitch length to make it easier to remove later.
- Finish the basting stitch: Once you’ve sewn the desired length, sew a few backstitches to secure the thread at the end.
- Cut the thread: Cut the thread, leaving a tail, and remove the fabric from the machine.
How to Remove Basting Stitches
Here are some tips on how to remove basting stitches.
- First, cut the thread that is holding the basting stitches in place. You can use either scissors or a seam ripper. If you are using a seam ripper, be careful not to rip the fabric.
- Next, gently pull the fabric apart at the seam. The basting stitches should come out easily. If they are stuck, you can use a seam ripper to help loosen them.
- Finally, press the fabric flat. The basting stitches should be completely removed and the fabric should be flat.
Basting stitches are a great way to temporarily hold the fabric in place. If you know how they are easy to remove. With these tips, you should be able to remove basting stitches easily.
Different Types of Basting Stitches
There are several different types of basting stitches, each with its own specific purpose.
Gathering Stitches
Gathering stitches are used to gather fabric or to create ruffles. To gather fabric, you simply sew a row of basting stitches along the top edge of the fabric. Then, you pull on the threads to gather the fabric.
To create ruffles, you sew a row of basting stitches along both the top and bottom edges of the fabric and then pull on the threads.
Running Stitches
Running stitches are the most basic type of basting stitch. They are simply a series of evenly spaced stitches that can be used to hold the fabric together temporarily.
Running stitches are often used to baste seams together before sewing them with a machine.
Backstitches
Backstitches are stronger than running stitches and are often used to temporarily stitch hems in place. To sew a backstitch, you start by sewing a few stitches forward.
Then, you sew a single stitch backward and start sewing forward again. You repeat this process, sewing a few stitches forward and then one stitch backward.
Also Read: How to Backstitch by Hand
Slip Stitches
Slip stitches are a type of invisible stitch that is often used to hem garments. To sew a slip stitch, you insert the needle into the fabric and then come up through the fabric a short distance away.
Then, you insert the needle back into the fabric at the point where you first came up. You repeat this process, making small stitches that are barely visible on the surface of the fabric.
Blind Hem Stitches
Blind hem stitches are another type of invisible stitch that is used to hem garments. Blind hem stitches are similar to slip stitches, but they are sewn a little differently.
To sew a blind hem stitch, you start by inserting the needle into the fabric and then come up a short distance away.
Read also: What is a Blind Hem Foot
How to do a Basting Stitch on a Singer Sewing Machine
To sew a basting stitch on a Singer sewing machine
- Start by setting the stitch length to the longest setting.
- Then, put the fabric you want to baste under the needle and lower the presser foot.
- As you sew, hold the top thread and bobbin thread lightly so they don’t get too tangled.
- When you’re finished, knot the two threads together and cut the excess thread.
Alternatives to Baste Stitch
There are other ways to hold the fabric in place besides using the best basting stitch.
Whipstitch
The whipstitch is a simple hand-sewing stitch where the needle is passed over the edge of two pieces of fabric, creating a series of diagonal stitches. It is commonly used for joining fabric edges together, hemming, or attaching trims.
Machine Stitching
Using a sewing machine offers several alternatives to the basting stitch, depending on the type of machine and the desired outcome.
Options include straight stitches, zigzag stitches, serger stitches, or decorative stitches. Machine stitching is generally faster and provides more consistent results compared to hand stitching.
Fusible Tape or Adhesive
Fusible tape or adhesive offers a non-sewing alternative to basting. It involves applying a strip of heat-activated adhesive between fabric layers and using an iron to bond them together.
This method is often used for temporary or quick fixes but may not be suitable for all fabric types.
Fabric Clips or Wonder Clips
Fabric clips or wonder clips are small, clamp-like devices used to hold fabric layers together without the need for stitching.
They are especially useful for delicate fabrics or when pinning might cause damage. Clips can be easily repositioned or removed, making them ideal for temporary or mock-up work.
Spray Adhesives
Spray adhesives provide a temporary bond between fabric layers without the need for stitching. They are typically used for temporary holds, appliqué work, or when working with fabrics that are difficult to pin or mark.
However, it’s important to choose a spray adhesive specifically designed for fabric used to prevent damage or residue.
Read Also: How Strong is Gorilla Glue for Clothes
Hand Tacking
Hand tacking involves making temporary stitches with a needle and thread to hold fabric layers or pattern pieces together.
It is similar to basting but involves larger, more noticeable stitches. Hand tacking can be useful for fitting purposes, mock-ups, or when basting is not practical.
Temporary Fabric Markers
Instead of stitching, temporary fabric markers can be used to mark fabric placement or seam lines. These markers are designed to disappear with heat, water, or time, allowing for easy removal without leaving permanent marks.
Note: Remember to consider the specific project, fabric type, and desired outcome when choosing an alternative to the basting stitch. Each method has its advantages and limitations, so experimentation and practice are key to finding the most suitable technique for your needs.
When do I use a Basting Stitch?
Here are a few situations when you might use a basting stitch:
Fitting a Garment
When sewing clothing, basting stitches are commonly used to temporarily hold seams together before final fitting. This allows you to make adjustments and ensure a proper fit before permanently stitching the seams.
SEE Also: How to Shorten Straps on a Dress
Gathering Fabric
If you want to create gathers or pleats in fabric, a basting stitch can be helpful. By stitching a long basting stitch along the edge you want to gather and then gently pulling the thread, you can create evenly distributed gathers or pleats. Once the desired effect is achieved, you can secure the gathers with permanent stitching.
Quilting
Basting is crucial in quilting to temporarily hold the quilt sandwich layers (top, batting, and backing) together before quilting. It allows you to work smoothly without the layers shifting, ensuring neat and even quilting stitches. Once the quilting is complete, the basting stitches are removed.
Read Also: Best Affordable Quilting Machine
Easing a Sleeve
When attaching a sleeve to a garment, basting stitches can be used to ease the fullness of the sleeve cap into the armhole smoothly. The basting stitches can be adjusted as needed to distribute the fabric evenly before permanent stitching.
Zippers
Basting stitches can be helpful when inserting zippers. By basting the zipper in place first, you can ensure that it is properly aligned and centered before stitching it permanently. Once the zipper is secure, the basting stitches can be removed.
Making Ruffles
Basting stitches are often used to create ruffles or gather in fabric. By sewing a long basting stitch along the edge you want to gather, you can then gently pull the thread to create the desired fullness. Once the ruffles are in place, you can sew them permanently.
Sewing Trim
Basting stitches can be used to temporarily attach trims, such as lace or ribbon, to the fabric. This allows you to experiment with placement and make adjustments before sewing them permanently.
Serging
While serging is a technique used to finish raw edges with a specialized sewing machine called a serger, basting stitches may not be required in this particular context. However, if you want to temporarily hold fabric pieces together before serging, you can use basting stitches for that purpose.
Read Also: Where to Buy a Serger Machine
What is the Difference between a Basting Stitch and a Regular Stitch?
A basting stitch is a temporary stitch made with a long stitch length to hold fabric layers together temporarily. It is often used for fitting, tacking, gathering, or quilting.
On the other hand, a regular stitch is a permanent stitch made with a moderate stitch length to permanently join fabric pieces together. Regular stitches are used for constructing garments, sewing seams, attaching trims, and creating various stitch types.
They are more secure and durable compared to basting stitches, which are meant to be removed or replaced with permanent stitches.
What is the Difference between Basting and Tacking?
Basting and tacking are two temporary stitching techniques used in sewing. Basting involves making long, temporary stitches to hold fabric layers together for fitting, gathering, or quilting purposes.
Tacking, on the other hand, uses short, temporary stitches to secure fabric layers or trims temporarily before final stitching. Basting stitches are typically longer and easily removable while tacking stitches are shorter and provide temporary stability.
Both techniques serve temporary purposes, but basting is more commonly used for holding fabric layers together, while tacking is used for temporarily securing various elements before permanent stitching.
What is the length of a Baste Stitch?
The length of a basting stitch can vary depending on the project and personal preference, but it is typically set to a longer length than regular stitches.
A common length for basting stitches is around 4 to 5 millimeters (approximately 1/8 to 3/16 inch).
The longer stitch length makes it easier to remove the basting stitches later when they are no longer needed, as they are meant to be temporary in nature.
Conclusion: How to Sew a Basting Stitch
In conclusion, mastering the art of the basting stitch is a game-changer for any sewing enthusiast. With its versatile applications in garment construction, quilting, and fabric fitting, it’s a fundamental technique worth perfecting.
By following the step-by-step guide outlined in this blog post, you can now confidently execute a precise basting stitch that ensures accurate seam placement and temporary fabric hold.
Whether you’re a beginner or an experienced sewer, incorporating the basting stitch into your repertoire will elevate your sewing projects to new heights of professionalism and precision.
So go ahead, grab your needle and thread, and embark on a basting stitch journey that will revolutionize your sewing endeavors!
FAQS: How to Sew a Basting Stitch
What is Basting Sewing?
In sewing, basting is a temporary stitching technique used to hold fabric layers together or create temporary markings. It involves making long, loose stitches that can be easily removed or adjusted later. Basting helps secure fabric during cutting, fitting, and aligning seams accurately. It can be done by hand or machine and is removed after permanent stitching. Basting is a useful method for ensuring precise sewing and professional-looking results in sewing projects.
What type of thread should I use for basting?
For basting stitches, it’s recommended to use a thread that contrasts with your fabric, making it easier to remove later. Cotton or polyester threads in a medium weight are commonly used for basting.
What stitch length and tension should I set for basting?
To create a basting stitch, set your sewing machine to a longer stitch length, typically between 4mm to 6mm. Adjust the tension slightly looser than you would for regular stitching to ensure easy removal.
How do I sew a basting stitch by hand?
To sew a basting stitch by hand, thread a needle with a contrasting thread. Insert the needle through the fabric, leaving a long tail of thread on one end. Take long stitches, approximately 1/2 inch to 1 inch in length, through the layers of fabric. Continue stitching until you have basted the desired area.
Can I reuse the thread after removing the basting stitches?
In most cases, you can reuse the thread after removing the basting stitches. However, if the thread appears frayed or damaged, it’s better to replace it with fresh thread for subsequent sewing projects.
Are basting stitches necessary for all sewing projects?
Basting stitches are not always necessary, but they can greatly assist in achieving accurate and precise results. They are especially beneficial when working with complex or tailored garments, ensuring proper fitting and alignment before permanent stitching. However, in simpler projects or when time is a constraint, basting stitches may be skipped.

4 Comments