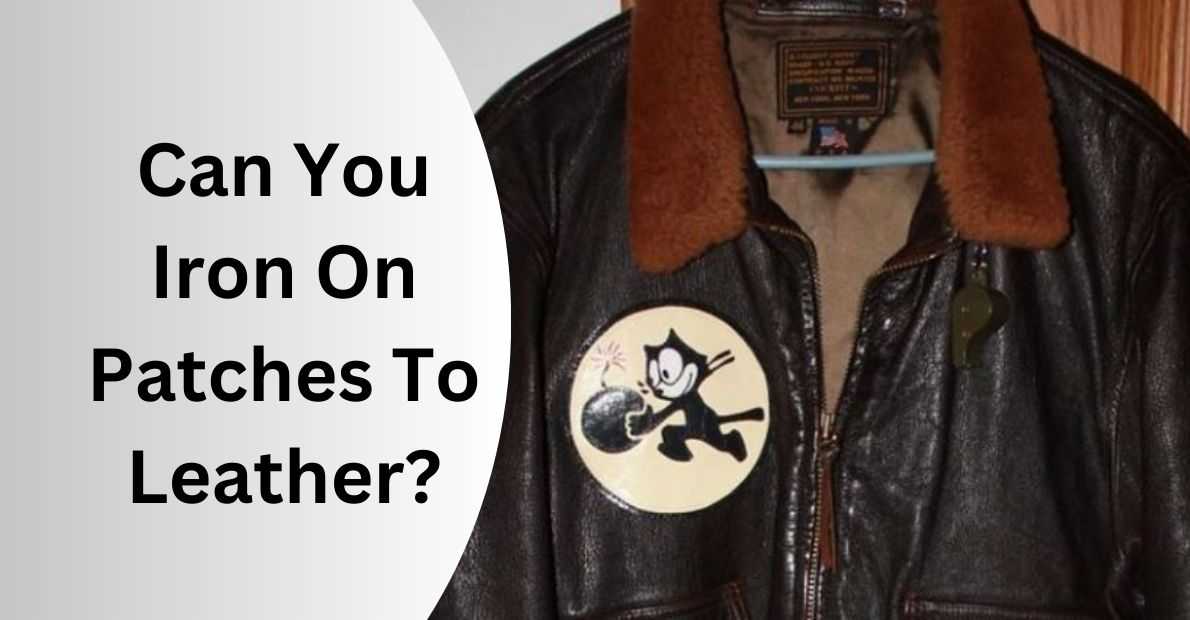
Can You Iron On Patches To Leather? Expert Guide & Tips 2024
Hey there! Are you a fan of adding a touch of personality to your leather items? Well, you’re in luck because today I’m going to dive into the exciting world of iron-on patches and how they can be a game-changer for your leather accessories.
Picture this: your favorite leather jacket, bag, or pair of boots transformed into a unique masterpiece, showcasing your personal style with just a few simple steps. But hold on a second, you might be wondering, “Can you iron on patches to leather?”
Fear not, because I’m here to share all the insider tips and tricks on how to achieve flawless results, ensuring your patches stay securely in place for years to come.
Let’s get started on this creative journey together!
Can You Iron On Patches to Leather?
Yes, you can iron on patches to leather, but it is important to follow certain guidelines to avoid damaging the leather.
- Set your iron to a low or medium heat setting with no steam.
- Place a thin cloth or piece of fabric over the leather to protect it.
- Position the patch on the desired area and cover it with the cloth.
- Press the iron firmly on the cloth, applying even pressure for around 15-20 seconds.
- Allow the patch and leather to cool before removing the cloth.
By following these steps, you can successfully attach iron-on patches to leather.
Leather is sensitive to heat and can be damaged if exposed to high temperatures for an extended period. Therefore, ironing on patches directly to leather is not recommended.
Factors to Consider
When deciding whether to iron on patches to leather, several factors should be taken into account:
- Leather Type: Different types of leather have varying levels of heat resistance. Some leathers may withstand the heat from an iron, while others may scorch or warp. It’s crucial to know the type of leather you are working with before attempting to attach patches.
- Patch Material: The material of the patch also plays a role. Some patches are made of delicate fabrics or synthetic materials that may not withstand the heat required for ironing.
- Adhesive Compatibility: The adhesive on iron-on patches is designed to bond with fabric fibers. Leather has a different surface texture, making it less compatible with the adhesive.
Potential Risks
Ironing on patches directly to leather can pose several risks, including:
- Damage to Leather: Excessive heat can cause the leather to become discolored, warped, or even burned, resulting in permanent damage.
- Adhesive Failure: The adhesive on iron-on patches may not effectively bond with the leather surface, leading to the patch peeling off over time.
How To Iron On Patches On Leather
Here are the complete steps for ironing on patches of leather, just follow these short steps to complete your work:
- Choose the patch: Select the patch you want to iron onto your leather item. Make sure it’s the right size and design that you desire.
- Prepare the leather: Lay the leather item flat on a clean, heat-resistant surface, such as an ironing board or a towel-covered table. Smooth out all wrinkles or creases in the leather.
- Position the patch: Place the patch on the desired spot of the leather item. Take your time to align it properly and ensure it’s centered and straight.
- Protect the leather: To prevent any damage to the leather, place a thin cloth or a pressing cloth over the patch. This will act as a protective barrier between the patch and the direct heat of the iron.
- Heat the iron: Preheat your iron to a medium-high heat setting. Be sure to follow the manufacturer’s instructions for your particular iron model.
- Press the patch: Once the iron is heated, gently place it on top of the pressing cloth covering the patch. Apply firm pressure for about 10-15 seconds, focusing on the edges and corners of the patch. Make sure the heat is evenly distributed across the entire patch.
- Check the adhesion: Lift the iron and carefully peel back the pressing cloth to check if the patch has securely adhered to the leather. If it’s still loose or partially attached, repeat step 6 and apply more pressure for a few additional seconds.
- Let it cool: Allow the patch and the leather to cool down completely before handling. This will ensure that the adhesive properly sets and the patch stays in place.
- Test the attachment: After the patch has cooled down, gently tug on it to ensure it’s firmly attached to the leather. If it comes off easily, repeat the ironing process or consider using an alternative method, such as sewing or using fabric glue.
- Enjoy your patched leather item: Once the patch is securely attached, you can proudly wear or display your personalized leather item with the iron-on patch.
How To Sew Patches Onto Leather By Hand
- Gather the materials: You’ll need the patch you want to sew, a leather needle, a spool of strong thread (such as nylon or polyester), a thimble (optional but recommended), scissors, and some tailor’s chalk or a washable marker.
- Prepare the leather: Clean the leather surface where you want to attach the patch. Use a damp cloth to remove all dirt or dust. Make sure the leather is dry before proceeding.
- Position the patch: Place the patch on the desired spot on the leather. Use a tailor’s chalk or a washable marker to lightly trace around the edges of the patch. This will help you position it accurately.
- Thread the needle: Cut a length of thread that is long enough to sew around the patch. Pass the needle through the eye and tie a knot at the end.
- Start sewing: Begin sewing from the inside of the leather, coming up through one of the traced lines. Pull the needle and thread through until the knot rests against the leather.
- Sew along the edge: Using a basic whipstitch or a running stitch, sew along the traced lines, keeping your stitches close together. Be careful not to pull the thread too tightly, as it may damage the leather. Take your time and sew at a comfortable pace.
- Secure the stitches: Once you have sewn around the entire patch, finish off the stitching by making a few small stitches on top of each other. This will secure the thread in place. Make sure the final knot is on the inside of the leather.
- Cut the thread: Trim the excess thread, leaving a small tail that you can tuck under the stitches. This will help prevent the thread from unraveling over time.
- Repeat if necessary: If your patch has multiple edges or corners, repeat the sewing process for each side until the patch is securely attached to the leather.
- Finishing touches: After sewing all the sides, inspect your work to ensure the patch is securely attached. If you’re satisfied, clean off any remaining chalk or marker lines using a damp cloth.
That’s it! You have successfully sewn a patch onto the leather by hand.
How to Glue Patches on Leather Clothes
Here’s a step-by-step guide on how to glue patches on leather clothes:
- Gather your supplies
- Leather patch: Choose a patch that matches the color and size you desire.
- Leather glue: Look for a high-quality adhesive specifically designed for leather.
- Scissors: Use them to trim the patch if necessary.
- Clean cloth: Prepare a soft, lint-free cloth to wipe the leather surface.
- Optional: Wax paper or parchment paper to protect your work surface.
- Prepare the leather surface: Start by ensuring that the area where you want to attach the patch is clean and free of any dirt, dust, or oils. Use a clean cloth to gently wipe the surface, removing any contaminants. This step is crucial for optimal adhesion.
- Trim the patch (if needed): If the patch is larger than the area you want to cover, use scissors to carefully trim it to the desired size and shape. Take your time and make precise cuts to achieve the desired fit.
- Apply the glue: Apply a thin and even layer of leather glue to the back of the patch. Spread the glue evenly, ensuring complete coverage. Avoid applying too much glue, as it may seep through the edges of the patch.
- Position the patch: Carefully place the patch onto the desired location on the leather garment. Make sure it is aligned correctly and positioned precisely before pressing it down. Take your time to avoid any mistakes.
- Press firmly: Once the patch is in place, press down firmly on the entire surface. Apply even pressure with your hands or use a clean cloth to ensure that the patch adheres well to the leather. This step is essential for a secure bond.
- Allow drying time: Follow the instructions provided by the leather glue manufacturer to determine the drying time required. It usually takes a few hours for the adhesive to be fully set. During this time, avoid moving or stressing the patched area to prevent displacement.
- Check the bond: After the recommended drying time, gently test the patch’s adhesion by lightly tugging at the edges. If the patch feels secure and does not lift or peel off, it has bonded successfully. If there are any weak spots, apply a small amount of additional glue to reinforce them and repeat the pressing process.
- Optional: Protect the patch: To further enhance the longevity and appearance of the patched area, consider applying a leather conditioner or protector. Follow the instructions provided with the product to ensure correct use.
How To Sew Patches Onto Leather Jackets by Sewing Machine
To sew patches onto the leather using a sewing machine, follow these steps:
- Prepare the materials: You will need a sewing machine, leather patches, leather needles, thread (preferably a heavy-duty thread like nylon or polyester), and clips or pins to hold the patches in place.
- Choose the appropriate needle and thread: Select a leather needle for your sewing machine, as it is designed to penetrate leather without causing damage. Use a thread that matches the color of the patch or a contrasting color for decorative purposes. Make sure the thread is strong and suitable for heavy-duty stitching.
- Position the patches: Decide where you want to place the patches on the leather item. Use clips or pins to hold the patches in position temporarily.
- Set up your sewing machine: Insert the leather needle into the sewing machine according to your machine’s instructions. Thread the machine with the chosen thread and make sure it is properly threaded and tensioned.
- Test on scrap leather: Before sewing on the actual leather item, it’s a good idea to practice on a scrap piece of leather or fabric to ensure your machine settings are correct and the stitch length is suitable.
- Sew the patches: Place the leather item under the sewing machine foot, starting with one of the patches. Lower the foot and align the needle just outside the edge of the patch. Begin sewing slowly, using the handwheel if necessary, to ensure the needle penetrates the leather properly. Stitch along the edges of the patch, keeping the stitches close together for a secure hold.
- Reinforce the stitching: After sewing around the patch once, you may want to reinforce the stitching by sewing a second line of stitches parallel to the first one. This will provide extra strength and durability.
- Repeat for other patches: Once you have finished sewing the first patch, repeat the process for any additional patches you want to attach.
- Trim excess threads: After sewing all the patches, trim any excess threads to give your work a neat and finished appearance.
What You Need To Know About Iron-on Patches
Iron-on patches are a popular way to personalize and decorate clothing items. They are patches with a heat-activated adhesive on the back, allowing them to be attached to fabric using an iron.
Here’s what you need to know about iron-on patches:
Application
Iron-on patches are easy to apply. Start by preheating your iron to the temperature recommended by the patch manufacturer (usually indicated on the packaging or instructions).
Place the patch on the desired area of the fabric with the adhesive side down. Cover the patch with a thin cloth or parchment paper to protect it from direct heat. Apply pressure with the iron for the recommended duration, typically around 10 to 15 seconds.
Fabric Compatibility
Iron-on patches work best on fabrics that can withstand heat, such as cotton, denim, and canvas.
Avoid using them on delicate fabrics or those prone to melting or scorching, like silk or nylon. Always check the patch instructions for specific fabric compatibility.
Patch Positioning
Before ironing, carefully position the patch on the fabric to ensure it’s in the desired location. You can use pins or temporary fabric adhesive to hold it in place while ironing.
Ironing Technique
When applying heat to the patch, use firm pressure and move the iron in a back-and-forth or circular motion.
Ensure that all parts of the patch receive equal heat and pressure to ensure a secure bond. Avoid sliding the iron across the patch, as this can shift or distort the design.
Cooling and Testing
After ironing, allow the patch to cool for a few minutes before testing its adhesion. Gently tug on the edges of the patch to ensure it’s firmly attached.
If any corners or edges lift, reapply heat and pressure using the iron for a few more seconds.
Permanent Attachment
Iron-on patches provide a semi-permanent attachment. While they can withstand regular washing and drying, it’s best to turn the garment inside out before laundering to protect the patch. For added security, you can also reinforce the patch by sewing around its edges.
Patch Removal
If you want to remove an iron-on patch, place a cloth or paper towel over it and apply heat with an iron.
The heat will reactivate the adhesive, making it easier to peel off the patch. However, be cautious, as excessive heat or prolonged ironing can damage the fabric.
Design Options
Iron-on patches come in a wide range of designs, including logos, symbols, flags, and custom designs.
They offer a convenient way to add personal style to clothing, backpacks, hats, and more. Some patches are embroidered, while others may be made of printed or woven materials.
How To Prevent Your Iron-on Patch From Coming Out
To prevent your iron-on patch from coming off, follow these steps:
- Clean and dry the fabric: Ensure the fabric you want to attach the patch to is clean and free from any dust, dirt, or residues. Wash and dry it beforehand if needed.
- Choose the right fabric: The fabric you use should be suitable for iron-on patches. Natural fibers like cotton or denim work best as they can withstand the heat of the iron without getting damaged.
- Heat the iron to the correct temperature: Check the instructions that came with the patch or packaging for the recommended iron temperature. Usually, it’s best to set the iron to a medium-high setting without steam.
- Position the patch: Place the patch on the fabric in the desired position. Use pins or temporary adhesive if necessary to keep it in place during the ironing process.
- Use a pressing cloth: Put a thin, clean cloth like a cotton handkerchief or a tea towel over the patch before applying the iron. This will prevent direct contact between the hot iron and the patch, protecting it from scorching.
- Apply pressure and heat evenly: Press the iron down firmly on the patch and hold it in place for the recommended time (usually around 15-30 seconds). Make sure you apply even pressure across the entire patch.
- Check for adhesion: Carefully lift the corner of the patch to see if it has adhered properly. If not, reapply the iron and pressure until the patch is fully attached.
- Let it cool down: Allow the fabric and patch to cool down completely before handling it. This will help the adhesive bond properly.
- Stitch it on (optional): For extra security, consider stitching the patch onto the fabric after ironing. This will ensure it stays in place even with frequent washing or heavy use.
- Wash and care instructions: Follow the washing and care instructions provided with the patch. Avoid using harsh detergents, high-temperature washing, or abrasive cleaning methods to preserve the patch’s longevity.
What are the Cons of the Iron-on option?
The iron-on option, typically referring to iron-on transfers or iron-on patches, has a few potential drawbacks or cons:
- Durability: Iron-on transfers may not be as durable as other methods of attaching designs or patches to the fabric. Over time, they can start to peel or crack, especially with frequent washing or exposure to heat. This can result in the design losing its original appearance or becoming less secure on the fabric.
- Limited application: Iron-on transfers work best on fabrics that can withstand the heat required for the transfer process. Certain delicate fabrics or materials with low melting points may not be suitable for iron-on applications. Additionally, some surfaces like plastic or metal cannot be effectively used with iron-on transfers.
- Difficult to remove or modify: Once an iron-on transfer has been applied, it can be challenging to remove or modify without potentially damaging the fabric. This lack of flexibility can be a disadvantage if you want to change or update the design at a later time.
- Heat sensitivity: Iron-on transfers require heat to adhere properly to the fabric. However, excessive heat or improper ironing techniques can cause damage to the fabric or the transfer itself. This can result in discoloration, scorch marks, or even burns on the fabric.
- Professional appearance: Depending on the context or purpose, iron-on transfers may not provide the same level of professional or high-quality appearance as other methods like embroidery or sewing. They can sometimes appear more casual or temporary, which may not be desirable in certain settings.
- Limited customization: While iron-on transfers offer a wide range of pre-made designs and patches, they may not provide the same level of customization compared to other methods. If you have a unique or intricate design in mind, iron-on transfers may not be the best option to achieve that level of customization.
Is it Better to Sewing or Iron on a Patch?
When it comes to attaching a patch, whether it’s better to sew or iron it depends on your specific needs and preferences. Sewing offers a more secure and durable attachment, ensuring the patch stays in place even with regular washing and wear.
On the other hand, ironing on a patch is quicker and easier, making it a convenient option for temporary or decorative purposes. Consider the desired longevity and usage of the patch to determine which method suits you best.
Which is the best safest method to add patches to leather?
When it comes to adding patches to leather, one of the best and safest methods is to sew them on. Sewing ensures a secure and long-lasting attachment while minimizing the risk of damaging the leather.
Will Iron on Patches Come Out in Wash?
Iron-on patches are designed to adhere to the fabric when applied correctly. However, there is a possibility that they may come off in the wash over time, especially if the adhesive is not strong or if the patches are not properly secured.
To increase the chances of the patches staying in place, it is recommended to follow the instructions provided by the manufacturer and ensure proper application and care of the patches.
Can I use an iron on a low heat setting to attach patches to leather?
It is not advisable to use an iron on any heat setting to attach patches directly to the leather. Leather is sensitive to heat and can be damaged even at low temperatures.
Can I remove patches from the leather once they are attached?
Yes, if you have used sewing or other removable methods, patches can be easily removed from leather without causing significant damage.
Is there a specific type of leather glue I should use for attaching patches?
Yes, there are leather glues available that are specifically formulated for attaching patches to leather. Look for products designed for this purpose.
Can I use the same methods to attach patches to synthetic leather or faux leather?
Yes, the alternative methods mentioned in this article, such as sewing or using leather glue, can also be used for synthetic or faux leather.
Are there any precautions I should take when attaching patches to leather?
It’s always a good idea to test any method or adhesive on a small, inconspicuous area of the leather before attaching patches to ensure compatibility and avoid any potential damage.
Conclusion
In conclusion, ironing on patches of leather can be a convenient and effective way to personalize your leather items. However, it is crucial to follow the correct procedure to ensure successful adhesion.
Preparing the leather surface, using the right heat setting, and protecting the patch are key steps to consider. By taking these precautions, you can confidently add patches to your leather garments or accessories, creating a unique and stylish look while maintaining the integrity of the material.
FAQs: Can You Iron On Patches To Leather
Can I iron on patches to leather?
Ironing on patches to leather is not recommended. Leather is a delicate material that can be easily damaged by heat. The high temperatures required for ironing patches can scorch or warp the leather, causing irreversible damage.
What should I do instead of ironing patches onto leather?
Instead of ironing, it is best to sew patches onto leather garments or accessories. Sewing provides a secure and long-lasting attachment without the risk of damaging the leather.
Are there any specific methods to sew patches onto leather?
Yes, when sewing patches onto leather, it is essential to use a leather needle, which is specifically designed to penetrate through the material. Additionally, using a strong thread, such as nylon or polyester, will ensure that the patch stays securely attached.
Can I use glue to attach patches to leather?
Gluing patches onto the leather is another option, but it is important to use the right adhesive. Look for a leather-specific adhesive or a strong fabric glue that is suitable for use on leather. Test the glue on a small, inconspicuous area of the leather first to ensure it does not cause any damage or discoloration.
Can I iron on patches to other fabric materials?
Yes, iron-on patches are typically designed to adhere to various fabric materials such as cotton, denim, polyester, or nylon. Always follow the instructions provided with the patch to ensure the best results.


4 Comments