
Singer Sewing Machine Light Bulb Replacement: 2024 Best Tips
Looking to brighten up your sewing sessions?
If you’re in the middle of a project and your Singer sewing machine’s light bulb has decided to call it quits, don’t fret!
We’ve got you covered with the ultimate guide to Singer sewing machine light bulb replacement.
Whether you’re a seasoned pro or just starting your sewing journey, this article will walk you through the process step by step.
Say goodbye to dimly lit workspaces and hello to a brilliantly illuminated sewing experience.
Let’s dive right in and shed some light on this essential task!
Why Replacing Your Singer Sewing Machine Light Bulb is Important?
Your sewing machine’s light bulb plays a crucial role in ensuring you have clear visibility while working on your sewing projects.
A burnt-out bulb can lead to eye strain and less precise stitching. Replacing it in a timely manner will enhance your sewing experience and help you achieve professional results.
See Also: Best Sewing Machine for Everyone
Singer Sewing Machine Light Bulb Replacement: Easy Steps
Identifying the Issue
First, let’s diagnose the problem. If the light on your sewing machine goes dark, it is probably due to a burnt-out light bulb.
This is a common problem with sewing machines and the good news is that it can be easily fixed.
Related Post: How to Change Singer Sewing Machine Motor Belt
Gathering the Essentials
Before you dive into the bulb replacement process, make sure you have the following tools at your disposal:
- A replacement light bulb is compatible with your Singer sewing machine model.
- A screwdriver (usually Phillips or flathead, depending on your machine).
- Safety goggles (optional but recommended for eye protection).
- A soft cloth or tissue
Safety First
Before you start, ensure your sewing machine is unplugged to avoid any electrical accidents. Safety first, always!
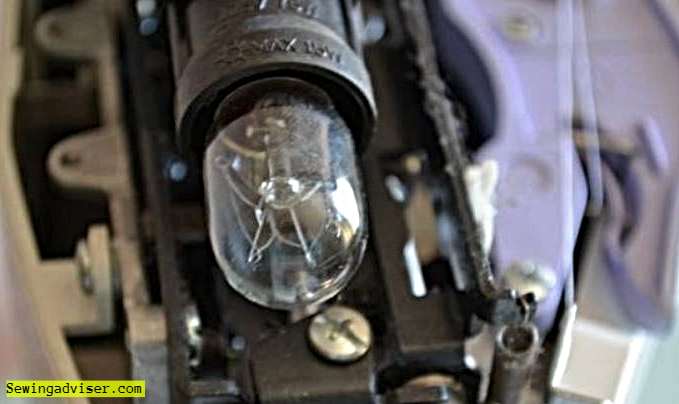
Accessing the Bulb
The location of the light bulb varies from one Singer sewing machine model to another.
Typically, you’ll find it beneath the sewing machine’s arm. You might need to remove a cover or casing to access it.
Removing the Old Bulb
Using your screwdriver, carefully unscrew the cover or casing that conceals the light bulb. Once it’s open, gently remove the old bulb.
Be cautious when handling the old bulb; it might be hot if you’ve recently used your machine.
Installing the New Bulb
Now, it’s time to bring the light back! Take your replacement light bulb and securely screw it into the socket. Ensure it’s snug but not overly tightened.
Reassembling
With the new bulb in place, put the cover or casing back on, and use your screwdriver to secure it in position.
Testing while Replacing Your Singer Sewing Machine Light Bulb
Plug in your Singer sewing machine and power it on. Voilà! Your sewing workspace should be brilliantly illuminated once again.
If the light doesn’t come on, double-check the bulb’s installation and ensure it’s the correct type for your machine.
See Also: How to fix bobbin case in Singer Sewing Machine
Maintenance Tips for Changing Singer Sewing Machine Light Bulb
To prevent future issues, periodically check your sewing machine’s light bulb for any signs of wear or dimness.
Replace it as needed to maintain optimal visibility while sewing.
Tips and Tricks for a Bulb Smooth Replacement
- Ensure your replacement bulb matches the specifications of your Singer sewing machine model.
- If you’re unsure about the bulb type, consult your sewing machine’s manual or contact Singer’s customer support.
- Take your time and work carefully to avoid damaging any components.
5 Types of Singer Sewing Machine Light Bulb
Let’s explore the 5 most useable types of Singer sewing machine light bulbs to help you make an informed choice for your sewing needs.
1. Incandescent Light Bulbs
Incandescent bulbs have been a traditional choice for Singer sewing machines for many years.
They emit a warm, soft light that’s easy on the eyes during long sewing sessions. These bulbs are known for their simplicity and reliability.
They are compatible with most Singer sewing machines and are readily available in stores.
2. LED (Light Emitting Diode) Bulbs
In recent years, LED bulbs have gained popularity among sewers. They offer several advantages, including energy efficiency and bright, cool white light that mimics natural daylight.
LED bulbs are excellent for detailed sewing work and reduce eye strain. They are also durable and have a long lifespan, so you won’t need to change them frequently.
3. Halogen Bulbs
Halogen bulbs provide a balanced lighting option for Singer sewing machines. They emit clear, crisp light that’s perfect for precision sewing tasks.
Like LEDs, halogen bulbs are energy-efficient and long-lasting. They offer a good compromise between the warmth of incandescent bulbs and the brightness of LEDs.
4. Fluorescent Light Bulbs
Fluorescent bulbs are known for their even and bright illumination. They are a reliable choice for sewing spaces where consistent lighting is essential.
These bulbs are energy-efficient and have a decent lifespan. However, it’s crucial to check compatibility with your specific Singer sewing machine model, as they may not fit all machines.
5. Specialty Bulbs
Singer offers a range of specialty bulbs designed to fit particular sewing machine models perfectly.
These bulbs ensure optimal lighting for your machine. If you’re unsure about which bulb to choose, consulting your sewing machine’s manual or reaching out to a Singer expert can help you find the right match.
How to Change a Singer Featherweight Light Bulb
Before you begin replacing the light bulb, make sure you have the following tools:
- Phillips-head screwdriver
- Replacement light bulb (15-watt, clear, bayonet base)
- A soft cloth or tissue
Safety First
Remember, safety always comes first when working with electrical components.
Ensure that your Singer Featherweight is unplugged from the power source before you start. This step is crucial to avoid any accidents or electric shocks.
Removing the Old Bulb
Locate the bulb cover on your sewing machine. It’s usually situated near the top of the machine, just above the needle area.
Using a Phillips screwdriver, carefully loosen the screws securing the lamp cover.
Once the screws are removed, also carefully remove the cover to reveal the old light bulb.
To remove the old bulb, hold it and unscrew it counterclockwise. If it gets stuck, use a soft cloth or fabric to get a better grip and try again.
Choosing the Right Replacement Bulb
Now that you’ve removed the old bulb, it’s time to choose a suitable replacement. Opt for a 15-watt clear bulb with a bayonet base.
This type of bulb is readily available and compatible with Singer Featherweight machines.
Installing the New Bulb
Take your new bulb and screw it clockwise into the socket. Ensure it’s snug but don’t over-tighten.
Place the bulb cover back on the socket and secure it with the screws using your Phillips-head screwdriver.
Testing the Singer Featherweight Light Bulb
Plug in your Singer Featherweight and turn it on to test the new light bulb.
The improved illumination will make your sewing projects easier and more enjoyable.
Maintenance Tips for Singer Featherweight Bulb
To keep your Singer Featherweight sewing smoothly, remember these maintenance tips:
- Periodically clean the bulb cover and the area around it to prevent dust buildup.
- Replace the bulb if you notice a decrease in brightness or any flickering.
Why Sewing Machine Bulb Constantly Blowing Out?
Are you tired of your sewing machine light bulb constantly burning out while you’re in the middle of a project?
It’s frustrating, isn’t it? But don’t worry, you’re not alone. Many sewing enthusiasts face the same problem for several reasons.
Quality Matters
First, let’s talk about the quality of the sewing machine bulb. Sometimes the bulbs provided are not of the best quality.
It’s important to invest in high-quality light bulbs that can withstand the vibration and heat of sewing machines.
Choose bulbs specifically designed for sewing machines as they are designed to last longer.
Wattage and Compatibility
Another important factor to consider is the wattage of the bulb. Sewing machines come with bulbs of different wattages, and using the wrong bulb can often result in burns.
You can find the recommended lamp power in your sewing machine manual. Using a higher-wattage bulb may cause premature burnout.
See Also: How many watts does a Sewing Machine Use?
Loose Connections
Sometimes the problem is not with the bulb itself but with the connections. Loose connections can cause the bulb to flicker and burn out.
Make sure all cables and connections are secure. If you notice any frayed wires or loose connections, repair them immediately to avoid further problems with your light bulb.
Heat and Overuse
Sewing machines generate heat, especially during long sewing sessions. Excessive heat can lead to bulbs blowing out.
To prevent this, take breaks during extended sewing sessions to allow the machine to cool down.
Additionally, using a sewing machine with a built-in fan or cooling system can help reduce the heat generated.
Voltage Fluctuations
Voltage fluctuations in your sewing area can also contribute to bulb blowouts. Sudden spikes or drops in voltage can damage the bulb.
Consider using a voltage stabilizer or surge protector to regulate the power supply to your sewing machine. This can help protect your bulb and extend its lifespan.
Dust and Debris
Dust and debris can accumulate inside your sewing machine over time, leading to overheating and bulb issues.
Regularly clean your sewing machine, especially around the bulb area. Use a soft brush or compressed air to remove any dirt and dust particles.
A clean machine runs more efficiently and is less likely to cause bulb blowouts.
Related Post: How to Clean Treadle Sewing Machine Base
Seek Professional Help
If you’ve tried all the above tips and your sewing machine bulb keeps blowing, it might be time to seek professional help.
A certified sewing machine technician can inspect your machine for any underlying issues and provide the necessary repairs or replacements.
Read Also: How Much For Western Electric Sewing Machine? 2023 Price
Do all Sewing Machines use the same Bulb?
In the world of sewing machines, not all of them use the same bulb. Sewing machine bulbs vary in type, including incandescent and LED.
The specific bulb your machine requires depends on its make and model. Always consult your machine’s manual for the correct bulb type.
What Size is a Sewing Machine Light Bulb?
The size of a sewing machine light bulb typically ranges from 7/16 inch to 5/8 inch in diameter, with a length of approximately 1 inch.
However, it’s crucial to consult your sewing machine’s manual for the exact bulb size recommended for your specific model to ensure a perfect fit and optimal illumination.
Related Post: What Size Sewing Machine Needle for Cotton
How do I know when it’s time to replace the light bulb on my Singer sewing machine?
The most common sign is when your sewing area gets dimmer than on a cloudy day. If your Singer sewing machine’s light starts flickering like a stubborn firefly or goes completely dark, it’s high time for a bulb change. Don’t worry; it’s an easy fix!
What type of light bulb should I use for my Singer sewing machine?
Choosing the right bulb is crucial. You want to go for a small, mighty, and energy-efficient bulb.
The most common type is the screw-in LED or incandescent bulb. Just make sure it’s a 15-watt bulb with a small screw base, and you’ll be stitching in the spotlight.
How do I replace the light bulb on my Singer sewing machine?
- First, unplug your sewing machine for safety.
- Then, locate the bulb cover, which is usually right above your needle.
- Twist it gently counterclockwise to remove it.
- Pop out the old bulb, screw in the new one, and twist the cover back on.
- Plug it in, and voila! You’re ready to sew with a well-lit stage.
Can I use a different wattage bulb in my Singer sewing machine?
Well, it’s best to stick with that trusty 15-watt bulb. Using a higher wattage might generate too much heat and could cause problems for your machine.
So, keep it simple and stick with the recommended wattage for a smooth sewing experience.
Where can I buy replacement light bulbs for my Singer sewing machine?
Finding these bulbs is easier than finding a needle in a haystack. You can snag them at most sewing supply stores, craft shops, or even online marketplaces.
Just make sure you’re getting the right type, and you’ll have a well-lit sewing adventure ahead of you.
Video Tutorial on Singer Sewing Machine Light Bulb Replacement
I found this video helpful for changing a sewing machine light bulb:
Conclusion: Singer Sewing Machine Light Bulb Replacement
In conclusion, replacing the light bulb in your Singer sewing machine is a manageable task that can greatly improve your sewing experience.
With the right tools, a bit of patience, and our expert guidance, you can keep the spotlight on your creativity and continue crafting beautiful pieces.
FAQs: Singer Sewing Machine Light Bulb Replacement
Is it safe to change the bulb while the sewing machine is plugged in?
No, it’s not safe. Always unplug your sewing machine before attempting to change the light bulb to avoid any electrical accidents.
How often should I change the light bulb in my sewing machine?
It depends on how frequently you use your sewing machine. If you notice the light getting dim or flickering, it’s time for a change. For regular sewers, this might be every year or two.
My bulb still doesn’t work after replacement. What should I do?
Check the wiring and connections, or consult a professional if the issue persists.
Can I use any small bulb I find at the store as a replacement?
No, It’s best to stick with the specific bulb recommended in your sewing machine’s manual. Using the wrong bulb could lead to overheating or other issues.


4 Comments