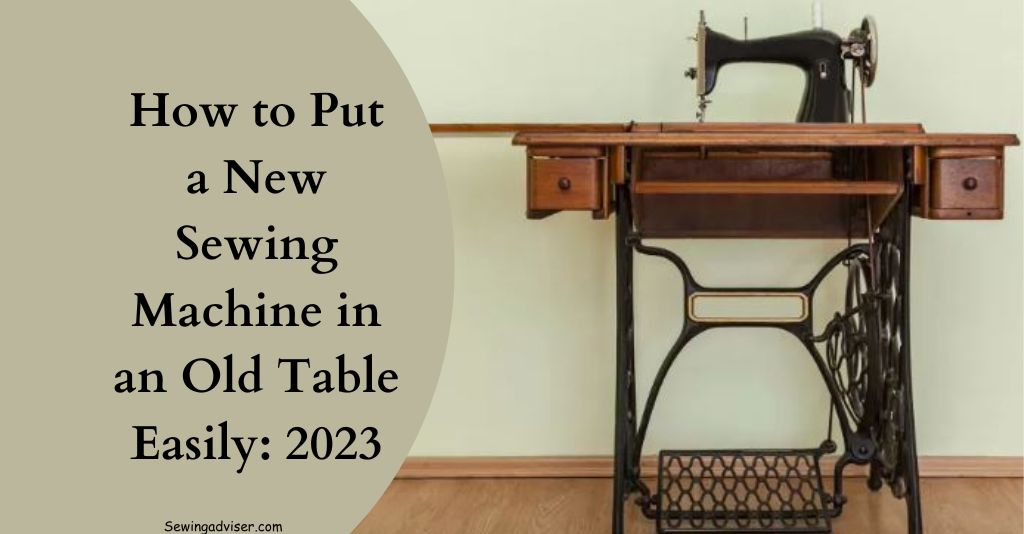
Learn How to Put a New Sewing Machine in an Old Table: 2024
Got a shiny new sewing machine and an old table?
Time to marry the two! Discover the art of seamlessly integrating your modern sewing companion into a vintage table with our step-by-step guide.
Unveil the charm of blending old and new as we show you how to give that antique table a fresh twist while keeping the classic vibe intact.
Keeping your needs in mind, you can rest assured that this place will meet all of them.
How to Put a New Sewing Machine in an Old Table
1. Assessing Compatibility: Is Your Antique Table Ready?
Before embarking on this creative venture, it’s crucial to ensure that your antique sewing table is compatible with a new sewing machine.
Examine the dimensions, structure, and overall design of the table. Make note of any intricate carvings, delicate details, or structural limitations that might impact the installation process.
2. Gathering the Essentials: Tools and Materials You’ll Need
To successfully marry tradition with innovation, you’ll need a toolkit that combines the old and the new.
Gather items such as measuring tape, screwdrivers, brackets, and sturdy adhesive materials.
You’ll also need your chosen sewing machine, selected based on its dimensions and functionalities.
3. Preparing the Table: Preserving the Aesthetic Appeal
Preserving the aesthetic integrity of your antique sewing table is paramount. Begin by carefully cleaning and refinishing the table’s surface, enhancing its original beauty.
Consider applying a protective layer to shield it from potential scratches or damage during the installation process.
4. Measuring and Marking: Precision is Key
Accurate measurements are the foundation of a successful project. Measure the dimensions of your sewing machine and mark the desired placement on the table.
This step requires meticulous attention to detail, ensuring that your machine fits snugly within the table’s confines.
5. Creating the Perfect Fit: Installing the Sewing Machine
With measurements and markings in place, it’s time to integrate your new sewing machine into the antique table.
Carefully follow the manufacturer’s instructions for installation. Secure the machine in place using brackets and screws, ensuring stability while allowing for easy access to controls.
6. Concealing Wires and Cables: Maintaining a Neat Appearance
Modern sewing machines often come with electrical components that need power. Concealing wires and cables is essential to maintain the table’s classic charm.
Create discreet channels or compartments within the table to route the wires, keeping them hidden from view while ensuring accessibility.
7. Aesthetic Harmony: Blending Old and New
Achieving a harmonious blend between your antique sewing table and the new machine is an art form.
Consider adding custom elements, such as a fabric skirt or decorative panels, to seamlessly integrate the machine into the table’s design.
This creative touch preserves the table’s authenticity while embracing modern convenience.
8. Functional Testing and Finishing Touches
Before you put your revitalized sewing space to use, conduct thorough functional testing.
Ensure that the sewing machine operates smoothly and that all controls are easily accessible. Make any necessary adjustments to optimize functionality.
Finally, add personal touches like a cushioned seat or personalized pin cushion to make the space uniquely yours.
How to Install Sewing Machine in Table
Setting up your sewing machine on a table is a breeze. Check out these simple steps:
- Get Ready: Grab your sewing machine, the table, and any tools you need.
- Pick a Spot: Choose a comfy spot for your table, preferably with good lighting.
- Table Position: Place the table where you want it. Make sure it’s nice and steady.
- Machine Setup: Take off any detachable parts from your sewing machine.
- Place the Machine: Put the machine on the table where you want it to sit.
- Align and Attach: Match up the holes on the machine’s base with the holes on the table.
- Screw It In: Use the screws provided to attach the machine’s base to the table. Don’t over-tighten.
- Cord Management: If your machine has cords, guide them through openings in the table.
- Stability Check: Give the machine a gentle shake to ensure it’s secure.
- Tools and Stuff: Keep your sewing tools handy nearby.
- Power Up: Plug in your machine and make sure it turns on.
- Adjust Height: If your table has an adjustable height, set it to your liking.
- Lighting: Make sure your work area is well-lit.
- Ready to Sew: With your sewing machine happily on the table, you’re all set to start sewing. Have fun!
It’s all about keeping it simple and enjoying your new sewing setup!
How Do You Attach a Sewing Machine to a Table?
Here’s a step-by-step guide on how to attach a sewing machine to a table:
- Gather Your Materials: Get your sewing machine, the table you want to attach it to, and the screws that came with your sewing machine.
- Choose the Right Location: Decide where you want your sewing machine to sit on the table. Make sure it’s a comfortable and convenient spot for your sewing tasks.
- Prepare the Sewing Machine Base: Most sewing machines come with a base or plate specifically designed for attaching to a table. Place this base on the table where you want your machine to be.
- Flip the Sewing Machine: Gently turn your sewing machine upside down to access the underside.
- Locate the Screw Holes: Examine the bottom of your sewing machine. You’ll find screw holes designed for attaching it to a table. These are usually located near the corners of the machine.
- Select the Screws: Take a look at the screws that came with your sewing machine. Choose the ones that fit the screw holes on your machine.
- Align the Sewing Machine: Position the sewing machine over the base on the table. Make sure the screw holes on the machine align with the holes on the base.
- Insert the Screws: Insert the selected screws into the screw holes on the sewing machine. Use a screwdriver to gently tighten them. Be careful not to overtighten – you want the machine to be secure but not strained.
- Check the Stability: Once the screws are snug, give the sewing machine a gentle wiggle to ensure it’s securely attached to the table. It should feel stable and not wobble.
- Test the Setup: Plug in your sewing machine and give it a test run. Sew a few stitches to make sure everything is working smoothly and that the machine remains steady on the table.
- Adjust as Needed: If you notice any wobbling or instability during the test, double-check the screws’ tightness. You might need to adjust them slightly to achieve the perfect balance.
- Enjoy Sewing! With your sewing machine securely attached to the table, you’re all set to embark on your sewing adventures. Enjoy your newfound setup and let the creativity flow!
How to Use an Old Sewing Machine Table?
Absolutely, I’ll break it down nice and easy for you! Here’s how to work with an old sewing machine table:
Okay, let’s dive in and make the most of that cool old sewing machine table:
- Clean It Up: First thing, give it a good cleaning. Wipe off the dust so it’s all spiffy.
- Find a Spot: Put the table where it won’t wobble. Nice and steady is the way to go.
- Open the Top: Lift the lid – that’s where the magic happens. It’s like a secret surprise!
- Get Ready to Work: The open top is your workspace. Spread out your stuff – fabric, patterns, whatever you need.
- Put the Machine On: If your old sewing machine fits, put it on the table. Fasten it with screws if they’re around. It should sit snug.
- Stuff in Drawers: If the table has drawers, stash your sewing things there. Neat and tidy!
- Sit Down: Get a comfy chair that’s the right height. No straining, just comfy sewing.
- Light It Up: Good light is important. Put a lamp or use sunlight so you can see what you’re doing.
- Sew Time: Now, start sewing! Let the machine do its thing. Have fun!
- Clean Up: When you’re done, fold down the top and put your stuff away.
- Keep It Nice: Give the table a wipe sometimes. Take care of it, and it’ll last.
- Enjoy Yourself: Using an old sewing machine table is like stepping back in time. Enjoy sewing and making stuff!
Can You Put a New Sewing Machine in an Old Table?
Yes, you can put a new sewing machine on an old table. Just make sure the table is sturdy enough to hold the machine and that there’s enough space for it to fit comfortably.
You might need to make some adjustments or modifications to the table, like creating an opening for the machine to sit in. But with a bit of creativity, you can give your old table a new purpose and have a fantastic sewing setup!
Can you use a Regular table for a Sewing Machine?
Yes, you can definitely use a regular table for a sewing machine. Just make sure the table is stable and at a comfortable height for you to work on.
If the table isn’t specifically designed for sewing, you might want to place a non-slip mat underneath the sewing machine to keep it steady while you sew. As long as the table provides a suitable surface and stability, you’re good to go!
How to Install a Singer Sewing Machine into a Cabinet?
Installing a Singer sewing machine into a cabinet is a piece of cake. Just follow these steps:
- Prep Your Space: Find a spot for the cabinet that’s convenient and well-lit. Make sure you have enough room to move around comfortably.
- Open the Cabinet: If your cabinet has doors, swing them open and get ready for action.
- Clear the Deck: Make sure the cabinet’s surface is clean and clutter-free. You want a nice, clear workspace.
- Place the Machine: Gently set your Singer sewing machine into the designated spot on the cabinet. It should fit snugly.
- Secure It: Some cabinets have clips or brackets to hold the sewing machine in place. If yours does, use them to secure the machine.
- Power Up: If your sewing machine needs to be plugged in, make sure there’s an outlet nearby.
- Thread the Cord: Guide the power cord and any other cords (like the foot pedal) through any openings designed for them.
- Position the Pedal: Place the foot pedal in a comfortable spot where you can easily reach it while sitting in the cabinet.
- Test It Out: Plug in the machine, turn it on, and give it a test run to make sure everything’s working smoothly.
- Check the Height: Adjust the machine’s height if needed. You want it to be level with the cabinet’s surface for seamless sewing.
- Accessorize: Keep your sewing tools and supplies within arm’s reach. You can use the cabinet’s drawers or shelves to store them.
- Ready to Sew: With your Singer sewing machine snugly nestled in the cabinet, you’re all set to sew up a storm! Get creative and have a blast.
And that’s it! You’ve successfully installed your Singer sewing machine into a cabinet. Happy sewing!
Are sewing machine tables Universal?
Sewing machine tables aren’t always universal. Different sewing machines and tables come in various shapes and sizes.
While some tables might fit a range of sewing machines, it’s important to check the specifications and measurements to make sure your machine will match.
Some tables are designed to accommodate specific sewing machine models, while others offer more flexibility with adjustable platforms. To ensure a proper fit, it’s a good idea to double-check compatibility before making a choice.
Do you need a Special table for the Sewing Machine?
You don’t always need a special table for a sewing machine, but it can be quite helpful. A sewing machine table is designed with features that make sewing more convenient, like a stable surface and a comfortable height.
However, you can also use a regular table or desk as long as it’s sturdy and provides a suitable workspace. If you’re a serious sewer, a dedicated sewing machine table might be worth considering, but it’s not an absolute requirement, it’s about what works best for you and your sewing setup.
Can you put a Brother Sewing Machine in a Cabinet?
Yes, you can definitely put a Brother sewing machine in a cabinet. Many sewing machine cabinets are designed to accommodate various brands and models, including Brother sewing machines.
Just make sure the cabinet dimensions match those of your Brother sewing machine and you’re good to go. It’s a great way to organize your sewing space and create a dedicated workspace for your sewing projects.
Will My Sewing Machine Fit in a Table Easily?
Determining if your sewing machine will fit in a table easily depends on the dimensions of both your sewing machine and the table. Measure the length, width, and height of your sewing machine and compare them to the available space in the table.
If the table’s dimensions comfortably accommodate your sewing machine’s size, then it should fit easily. Taking accurate measurements and considering any extra space needed for accessories or attachments will help ensure a smooth fit.
How to Refurbish a Sewing Machine Cabinet?
Here’s a step-by-step guide on how to refurbish a sewing machine cabinet:
Refurbishing a sewing machine cabinet can breathe new life into an old gem. Here’s how to do it:
- Assessment Time: Start by giving the cabinet a good look-over. Check for any damage, scratches, or worn-out parts that need fixing.
- Clear the Space: Find a well-ventilated area to work. Lay down newspapers or a drop cloth to protect your workspace.
- Remove Hardware: If the cabinet has hardware like knobs or handles, take them off. This will make refinishing easier.
- Clean and Sand: Give the cabinet a thorough cleaning. Use a mild soap and water to remove dirt and grime. If there’s old paint or finish, gently sand it down to create a smooth surface.
- Patch Up Holes: Fill any holes or dents with wood filler. Once it’s dry, sand the area again for a seamless finish.
- Choose a finish: Decide how you want your furniture to look. It can be painted, dyed, and also left natural. Make sure you choose a finish that suits your style and the layout of your space.
- Prime (If Painting): If you’re painting the cabinet, apply a primer first. This helps the paint adhere better and gives you a smoother finish.
- Paint or Stain: Apply your chosen paint or stain. Use smooth brush strokes or a roller for an even coat. Let it dry completely between coats.
- Protective Coating: After the paint or stain has dried, apply a protective coating such as varnish or polyurethane. This prevents wear and tear.
- Replace Hardware: Put back the knobs, handles, or any other hardware you removed earlier. If they’re looking shabby, consider replacing them for a fresh look.
- Interior Touch-Up: If the cabinet has shelves or compartments, give them a touch-up too. You can line shelves with fabric or paper for a decorative touch.
- Polish Metal Parts: If there are any metal parts like hinges, give them a polish to make them shine like new.
- Final Inspection: Once everything is dry and in place, do a final inspection. Check for any missed spots or imperfections.
- Enjoy Your Refurbished Cabinet: Put your sewing machine or other items back into the cabinet. Admire your handiwork and enjoy your refreshed sewing space!
Refurbishing a sewing machine cabinet takes a bit of time and effort, but the end result is a lovely, rejuvenated piece that adds character to your sewing corner.
Conclusion: How to Put a New Sewing Machine in an Old Table
And there you have it, folks! Putting a new sewing machine into an old table might sound like a tricky task, but as we’ve seen in this guide, it’s totally doable.
By following these mentioned above simple steps, you can bring new life to that beloved vintage table and create a sewing space that’s both functional and stylish.
So don’t hesitate to give it a try with a little patience and some basic tools, you’ll be stitching away in no time. Happy sewing!
Pro Tip: Remember that every antique sewing table is unique, so adapt our guide to suit your specific table and sewing machine combination. Enjoy the journey of creating a functional work of art that celebrates the best of both worlds!
FAQs
Can I really put a new sewing machine on an old table?
Absolutely! With a bit of creativity and some elbow grease, you can transform that old table into a stylish sewing station that’s perfect for your new machine.
How do I measure the sewing machine to fit the table?
Start by measuring the dimensions of your sewing machine – its width, length, and height. You’ll need these measurements to make sure the table’s opening is a snug fit for the machine.
What’s the first step in putting the sewing machine on the table?
First, flip that old table over and remove the legs. This will give you a good look at the underside, where you’ll be making the necessary adjustments.
How do I create a space for the sewing machine in the table?
Using the measurements you took earlier, mark the dimensions of the sewing machine on the underside of the table. Then, carefully cut out the marked area using a saw. Take your time to ensure a neat and accurate cut.
Can I paint or finish the table after putting in the sewing machine?
Definitely! This is your chance to get creative. Sand down the entire table to create a smooth surface, then apply your choice of paint or finish to match your style.


6 Comments