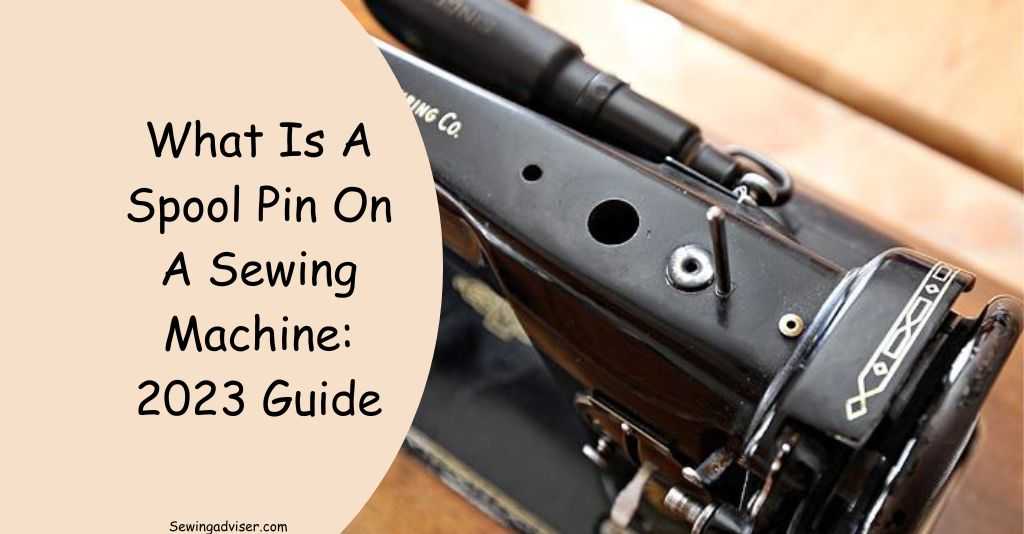
What Is A Spool Pin On A Sewing Machine: 2024 Ultimate Guide
Hey there, sewing enthusiasts! If you’ve ever wondered what is a spool pin on a sewing machine and why it matters, you’ve come to the right place.
In the world of sewing, the spool pin is a tiny yet crucial component that plays a big role in the smooth operation of your trusty sewing machine. Think of it as the unsung hero in your sewing adventures.
In this article, we’ll unravel the mysteries of the spool pin, shedding light on its functions, and types, and why choosing the right one can make all the difference in your stitching endeavors.
So, grab your favorite fabric, thread that needle, and let’s get sewing-savvy! 🧵💫
What do you mean by Spool?
A spool is a cylindrical device used for storing and dispensing sewing thread. It plays a crucial role in maintaining the thread’s organization, preventing tangling, and ensuring a smooth and consistent thread feed during sewing.
Spools are a fundamental tool for sewers and are available in a wide range of sizes and materials to suit various sewing needs.
What Is a Spool Pin on a Sewing Machine?
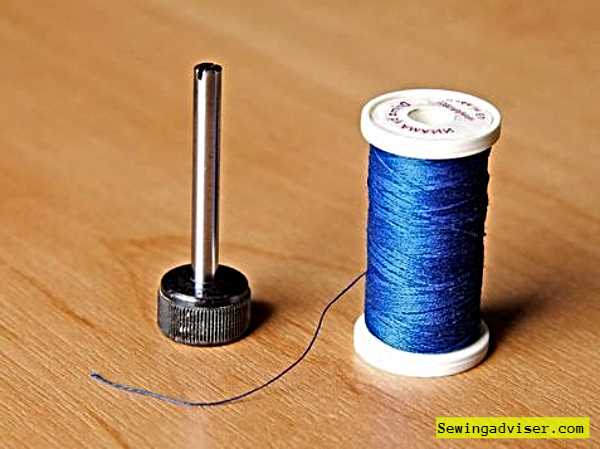
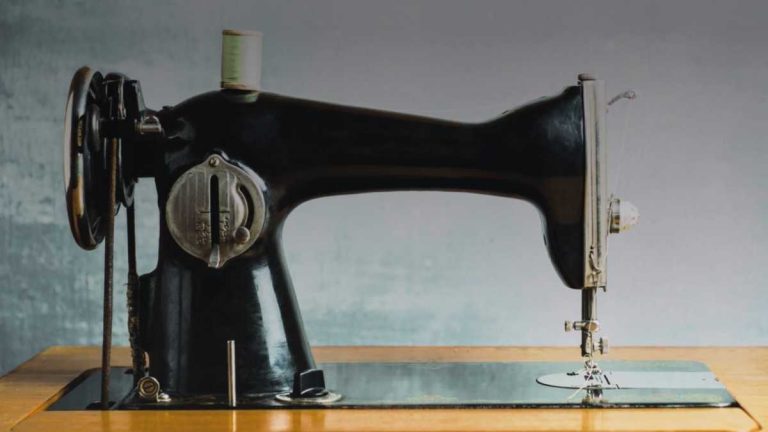
The spool pin is a small but vital component of a sewing machine. It’s a metal rod typically found on the top of the sewing machine.
Its primary function is to hold the thread spool in place while you’re sewing. Essentially, it acts as a support for the thread spool and allows the thread to unwind smoothly as you sew.
Imagine it as the “DJ” of your sewing machine, responsible for spinning the thread spool, so the thread can be fed through the machine’s various components, ultimately creating your stitches.
Without the spool pin, the thread would not feed properly, leading to sewing troubles like tangles and uneven stitches.
There are different types of spool pins, including horizontal and vertical ones, depending on your sewing machine’s design.
Horizontal spool pins resemble a long, sturdy branch, while vertical ones stand upright like a tower next to your sewing machine.
In essence, the spool pin is a seemingly simple but essential part of the sewing machine that ensures your thread flows smoothly, allowing you to create neat and precise stitches in your sewing projects.
Read Also: Sewing Machine Light Bulb Replacement
What’s the Role of the Spool Pin in Sewing Machine
Here’s a closer look at the role of the spool pin in a sewing machine:
- Thread Holder: The primary function of the spool pin is to hold the thread spool in place. It keeps the spool from rolling around or falling off the machine while you’re sewing. This ensures a steady and consistent supply of thread to the machine.
- Thread Unwinding: As you sew, the thread needs to unwind smoothly from the spool. The spool pin facilitates this by allowing the thread to rotate freely as needed. This rotation prevents the thread from tangling or getting caught, which can lead to sewing difficulties and uneven stitches.
- Thread Tension: Proper tension in the sewing thread is critical for creating neat and balanced stitches. The spool pin is part of the thread’s path to the sewing machine’s tensioning system. It ensures that the thread feeds evenly, contributing to the correct tension throughout the sewing process.
- Thread Compatibility: Spool pins are designed to accommodate different sizes and types of thread spools. Whether you’re working with small spools for delicate projects or larger ones for heavy-duty sewing, the spool pin can hold them securely.
- Thread Control: Depending on the sewing machine’s design, the spool pin’s placement can affect how the thread feeds into the machine. Some machines have horizontal spool pins, while others have vertical ones. The choice depends on the machine’s design and the user’s preference.
- Maintenance: Like any part of a sewing machine, the spool pin requires occasional maintenance. Dust and lint can accumulate, potentially affecting its performance. Regular cleaning and inspection help ensure that the spool pin continues to function properly.
8 Types of Spool Pins
Spool pins come in different types and designs, each serving a specific purpose or catering to various sewing machine models. Here are some common types of spool pins:
1. Horizontal Spool Pin
This type of spool pin is a horizontal rod or spindle that sticks out from the top of the sewing machine. It’s a straightforward and widely used design. You place the thread spool horizontally onto this pin.
2. Vertical Spool Pin
Vertical spool pins stand upright, typically next to the sewing machine. They are commonly used in older sewing machines and some modern models. The thread spool is positioned vertically on this type of pin.
3. Built-In Spool Holder
Some sewing machines have built-in spool holders, often in the form of a vertical column or tower. These built-in holders can accommodate multiple spools simultaneously, making them convenient for projects that require different thread colors or types.
4. Dual Spool Pins
As mentioned in a previous response, some advanced sewing machines have dual spool pins. These machines feature two spool pins side by side, allowing you to work with two different threads simultaneously. This is useful for tasks like twin needle stitching or using different threads for decorative effects.
5. Adjustable Spool Pins
Adjustable spool pins can be moved or tilted to different angles, providing flexibility in thread placement. They are useful for accommodating non-standard thread spools or for controlling the direction of thread delivery.
6. Cone Spool Holders
Cone spool holders are designed to hold large thread cones, which are commonly used in industrial sewing machines. These holders are built to handle the weight and size of industrial-grade thread cones.
7. Thread Stand
Thread stands are separate accessories that hold thread spools, usually on a tall, adjustable stand. They are often used for embroidery machines or long-arm quilting machines, allowing easy access to a variety of thread colors.
8. Thread Mast
A thread mast is another type of accessory that can hold multiple thread spools on a vertical mast, often used in commercial or industrial sewing setups.
Important Note:
The choice of spool pin or holder depends on the sewing machine’s design, the type of sewing you’re doing, and personal preference. It’s important to follow your sewing machine’s user manual for guidance on the appropriate spool pin or holder to use and how to correctly place the thread spool for optimal sewing performance.
Alternates of Spool Pins on the Sewing Machine
While spool pins are the most common way to hold and dispense thread on a sewing machine, there are alternative methods and accessories that can be used, depending on your sewing needs. Here are some alternatives to spool pins:
Thread Stand:
A thread stand is a separate accessory that holds one or more thread spools vertically on a stand. This is particularly useful for sewing machines that do not have built-in spool pins or for situations where you need to use larger thread cones. Thread stands often have adjustable height and tension mechanisms to control thread delivery.
Cone Holders:
Cone holders or cone thread stands are designed specifically for holding large thread cones, which are commonly used in industrial sewing machines. These holders can accommodate the weight and size of industrial-grade thread cones.
Thread Nets:
Thread nets are mesh covers that can be placed over thread spools to prevent thread from slipping off and tangling. They are useful when using slippery or delicate threads that tend to unwind unevenly.
Thread Racks:
Thread racks are horizontal or vertical racks with pegs or hooks where you can hang multiple thread spools. They keep your threads organized and easily accessible, making it convenient to select the desired color for your sewing project.
Thread Stands with Multiple Spindles:
Some thread stands come with multiple spindles, allowing you to hold and use several thread spools at once. This is beneficial for projects that require frequent thread changes or color variations.
Bobbin Winders:
Some sewing machines have built-in bobbin winders that can double as spool holders. While primarily used for winding bobbins, these can also hold smaller thread spools.
Specialty Holders:
Depending on your sewing machine’s make and model, there may be specialty holders or attachments designed for specific types of threads, such as metallic thread holders or specialty thread stands.
Hand-Held Thread Dispensers:
In some situations, especially when hand sewing or quilting, you may use a hand-held thread dispenser, which is a small handheld device that allows you to pull thread directly from the spool as you work.
It’s essential to consult your sewing machine’s user manual and consider the type of sewing projects you undertake to determine which alternative to spool pins best suits your needs. The choice may also depend on the size and weight of the thread spools you’re using and your personal preferences for thread management.
What do Spool Pins do in Sewing?
Spool pins in sewing play a crucial role in ensuring your sewing machine operates smoothly and that your stitches come out looking perfect.
These unassuming little rods are like the unsung heroes of the sewing world, quietly doing their job to make your sewing projects a breeze.
Let’s dive into what spool pins do and why they matter:
- Thread Holder: At its core, a spool pin is a thread holder. It keeps your thread spool in place while you sew. This might seem like a small task, but it’s essential for maintaining consistent tension in your thread as it feeds through the machine.
- Prevents Tangles: Have you ever had your thread tangle into a knotty mess while sewing? That’s where the spool pin comes to the rescue. Holding the thread spool steady and allowing it to unwind smoothly, prevents those frustrating tangles that can ruin your sewing experience.
- Thread Control: Spool pins give you control over your thread. Different sewing machines may have horizontal or vertical spool pins. The choice between them depends on your machine’s design and personal preference. Some sewers prefer horizontal pins, while others find vertical ones more convenient. The key is to ensure that the thread unwinds freely without any snags.
- Thread Tension: Achieving the right thread tension is critical for good-quality stitching. Spool pins are part of this equation. They ensure that the thread flows evenly from the spool to the needle, contributing to consistent and balanced tension.
- Compatibility: Spool pins are designed to accommodate various types of thread spools. Whether you’re working with large or small spools, the spool pin can handle them all. Just make sure to use the appropriate spool cap if needed to secure the thread in place.
- Maintenance: Like any part of your sewing machine, spool pins require a little maintenance. Dust and lint can accumulate over time, affecting their performance. A clean spool pin ensures smooth thread flow, so don’t forget to include it in your machine maintenance routine.
SEE Also: How Many Watts Does A Sewing Machine Use?
How to Fix or Maintain a Sewing Machine Spool Pin Easily?
Maintaining and fixing a sewing machine spool pin is essential for ensuring smooth and trouble-free sewing.
Whether you’re dealing with a clogged spool pin or a loose one, here’s a step-by-step guide to help you keep this vital component in optimal condition:
Tools and Materials You’ll Need:
- Screwdriver (usually a small one)
- Cleaning brush or compressed air
- Sewing machine oil or lubricant
- Replacement spool pin (if necessary)
Maintenance Steps:
- Turn Off and Unplug the Machine: Safety first! Before doing any maintenance on your sewing machine, make sure it’s turned off and unplugged from the power source.
- Remove the Old Thread: If there is any thread on the spool pin, gently unwind and remove it. This will give you better access to the pin.
- Inspect for Debris: Use a small flashlight to inspect the spool pin area for any dust, lint, or debris that might have accumulated. If you see any, remove it with a cleaning brush or by blowing compressed air. Make sure the area is clean and free from obstructions.
- Check for Loose Parts: Gently wiggle the spool pin to check if it’s loose or wobbly. If it is, you may need to tighten it. Use a screwdriver to access the screw or mechanism holding the spool pin in place. Tighten it carefully, but do not overtighten it, as this could damage the machine.
- Lubricate the Spool Pin: Apply a small amount of sewing machine oil or lubricant to the spool pin. This helps reduce friction and ensures smooth rotation. Be sure to use a sewing machine-specific lubricant, as other types of oil may damage the machine over time.
- Test the Spool Pin: After cleaning and lubricating, insert an empty spool or bobbin onto the spool pin and rotate it to ensure it moves smoothly without any resistance.
Replacing a Spool Pin (If Necessary):
If your spool pin is damaged or cannot be fixed, you may need to replace it. Here’s how:
- Identify the Spool Pin Type: Determine whether your sewing machine uses a horizontal or vertical spool pin. Purchase a replacement spool pin that matches the type used on your machine.
- Remove the Old Spool Pin: If there are screws or mechanisms holding the spool pin in place, use a screwdriver to remove them. Carefully pull out the old spool pin.
- Install the New Spool Pin: Insert the replacement spool pin into the same location where the old one was. Secure it in place using the screws or mechanisms you removed earlier.
- Lubricate and Test: Apply sewing machine oil to the new spool pin, as mentioned in the maintenance steps above. Test its rotation to ensure it moves smoothly.
- Reassemble and Test: Reassemble any parts you removed, such as the thread guide or cover, and test your sewing machine with an empty spool or bobbin to make sure the new spool pin functions correctly.
Regular maintenance of your sewing machine’s spool pin is essential for trouble-free sewing. By keeping it clean, lubricated, and in good condition, you can ensure a smooth and enjoyable sewing experience for years to come.
Is it Possible to Use a Sewing Machine without a Spool Pin?
Using a sewing machine without a spool pin can be challenging and may lead to various issues during your sewing projects.
The spool pin serves as a critical component in the sewing machine’s threading and tension system.
Here’s why it’s essential and the challenges you may face without one:
- Thread Management: The primary function of the spool pin is to hold the thread spool securely in place. Without it, your thread would have nowhere to sit, making it nearly impossible to feed smoothly through the machine.
- Thread Tension: Achieving proper thread tension is crucial for producing neat and even stitches. The spool pin plays a role in this by allowing the thread to unwind at a consistent rate. Without a spool pin, it’s challenging to control the thread’s tension effectively, resulting in uneven stitches and potentially causing thread breakage or jams.
- Thread Tangling: Without the spool pin’s guidance, the thread may tangle and knot easily as it unwinds from the spool. This can be frustrating and time-consuming to resolve, interrupting your sewing flow and potentially damaging your sewing machine.
- Limited Thread Types: Some sewing machines are designed to work with specific thread delivery systems. Without a spool pin, you may be limited to using only certain types of threads that don’t require a traditional spool, which limits your sewing options.
- Increased Difficulty: Sewing without a spool pin can be compared to trying to drive a car without a steering wheel. It’s possible, but it’s far from ideal, and you’ll likely encounter numerous challenges and frustrations along the way.
Where does the Spool go On a Sewing Machine?
Placing the spool on a sewing machine is a fundamental step in setting up your machine for sewing. The spool, which holds the thread, needs to be positioned correctly for smooth and trouble-free sewing. Here’s where the spool goes on a typical sewing machine:
Spool Pin
Most sewing machines come equipped with a spool pin. This is a small, usually vertical or horizontal rod located on the top of the sewing machine. It’s designed to hold the thread spool in place. The spool pin may be positioned at different locations depending on the machine’s make and model.
Thread Spool Placement
To insert the spool onto your sewing machine, follow these steps:
- If your machine has a horizontal spool pin, simply slide the thread spool onto the pin. Make sure the spool rotates freely without any resistance.
- If your machine has a vertical spool pin, you’ll usually slide the spool onto the pin from the side. Again, ensure that the spool can rotate smoothly on the pin.
Thread Guide
Once the spool is on the spool pin, look for the thread guide. This is a small metal or plastic loop or hook that is typically located near the spool pin. Pass the thread through this guide to direct it towards the rest of the threading path. Thread
Path
After passing through the thread guide, follow the threading path indicated in your sewing machine’s user manual. This typically involves passing the thread through a series of thread guides, tension discs, and finally, through the needle’s eye.
Tension Control
Ensure that you properly thread the machine’s tension control system, adjusting it as needed for your specific sewing project.
Bobbin Winding
Before you start sewing, make sure the bobbin is wrapped with thread and correctly inserted into the bobbin case according to your machine’s instructions.
Note that the exact placement and threading process may vary depending on the make and model of your sewing machine.
Always refer to your sewing machine manual for detailed instructions on threading and bobbin placement.
To achieve consistent, reliable stitches on your sewing projects, proper bobbin settings and machine threading are essential.
Where do you place the Spool of Thread?
Here’s how to insert a spool of thread into your sewing machine:
- Locate the Spool Pin: Find the spool pin on your sewing machine. It may be positioned vertically or horizontally, depending on your machine’s design.
- Prepare the Spool: Take your spool of thread and ensure that it’s in good condition. Check for any tangles or knots in the thread.
- Position the Spool: If you have a horizontal spool holder, simply slide the spool onto the spool holder. Make sure it rotates freely without any resistance.
- Thread Guide: After placing the spool on the pin, look for the thread guide on your sewing machine. This is usually a small metal or plastic loop or hook located near the spool pin. Pass the thread through this guide to direct it towards the rest of the threading path.
- Thread Path: Follow the threading path as indicated in your sewing machine’s user manual. This typically involves passing the thread through a series of thread guides, tension discs, and finally, through the needle’s eye.
- Tension Control: Ensure that you properly thread the machine’s tension control system, adjusting it as needed for your specific sewing project.
Why are there Two Spool Holders on a Sewing Machine?
Two spool holders on a sewing machine? It might seem like an extra feature, but it serves a crucial purpose, offering flexibility and convenience to sewers.
Let’s dive into why some sewing machines come equipped with two spool holders and how they can benefit your sewing projects:
1. Dual Thread Capability:
One of the most important advantages of two spool holders is the ability to work with two different threads at the same time. This can be extremely useful for various sewing techniques. For example, if you’re doing decorative stitching or embroidery, you may want to use a different color or type of bobbin thread than the top thread. Thanks to two thread spool pins, this is possible without having to constantly change the thread.
2. Twin Needle Stitching:
Dual spool holders are often used when sewing with a twin needle. A twin needle creates parallel rows of stitches, giving your sewing projects a professional and finished look. Each thread spool is placed on a separate holder, allowing the twin needles to pull threads independently.
3. Varied Thread Types:
Sometimes, you need different thread types for a single project. For instance, you might use regular sewing thread for most of your project but require a thicker, more decorative thread for topstitching or embellishments. With two spool holders, you can easily switch between thread types as needed.
4. Time-Saving:
Having two spool holders can save you time during your sewing projects. You won’t have to stop and rethread your machine when changing threads for various parts of your project. This efficiency can make your sewing process smoother and more enjoyable.
5. Quilting Benefits:
Quilters often use two spool holders to work with contrasting threads for piecing and quilting. This helps emphasize the quilting design and gives a polished look to the finished quilt.
6. Creative Freedom:
Whether you’re a seasoned sewer or just starting, having two spool holders allows for greater creative freedom. You can experiment with different thread combinations, colors, and textures to add uniqueness to your sewing projects.
Tips for Using a Spool Pin Effectively?
Absolutely! Here are a few pro tips:
- Make sure your spool pin is clean and free from dust or old thread bits. A clean pin ensures smoother thread flow.
- Use spool caps or disks if your machine includes them. These nifty accessories can prevent the thread from tangling or getting caught.
- If you’re sewing with delicate or slippery threads, consider using a thread net. It helps keep the thread in check on the spool.
- Don’t forget to check your sewing machine’s manual for specific instructions on using the spool pin. Different machines may have unique features.
Conclusion
let’s wrap it up with a concise yet informative conclusion on “What Is A Spool Pin On A Sewing Machine?”
In the grand world of sewing machines, the spool pin is a humble hero. As we’ve seen, this small but crucial component plays a vital role in holding your thread spool securely. It ensures that your stitching journey remains smooth and hassle-free.
Understanding the ins and outs of the spool pin, from its types to its placement, is key to mastering the art of sewing. So, as you embark on your sewing adventures, keep this knowledge close to your heart, and may your spool pins never let you down.
Happy sewing, fellow enthusiasts!
FAQs: What Is A Spool Pin On A Sewing Machine
Can a spool pin cause sewing problems?
Yes, it can. If your spool pin is damaged or bent, it may cause uneven tension or even thread breakage. That’s why it’s essential to inspect your sewing machine regularly and ensure that all its components, including the spool pin, are in good shape.
Is it possible to replace a damaged spool pin?
Yes, you can replace a damaged spool pin. Many sewing machine manufacturers offer replacement parts, including spool pins. If you’re not sure how to do it, it’s a good idea to consult your sewing machine’s manual or seek help from a professional technician.
Can I use thread cones on a spool pin?
Yes, you can use thread cones on a spool pin, but it’s essential to use a cone holder or stand designed for this purpose. Thread cones are larger and heavier than regular spools, so using them directly on a spool pin can cause tension and threading issues.
Can I use different types of thread on the same spool pin?
It’s generally not recommended. Using threads of vastly different thicknesses or materials on the same spool pin can lead to tension issues and uneven stitches. It’s best to use a separate spool pin for each type of thread you plan to use.

One Comment