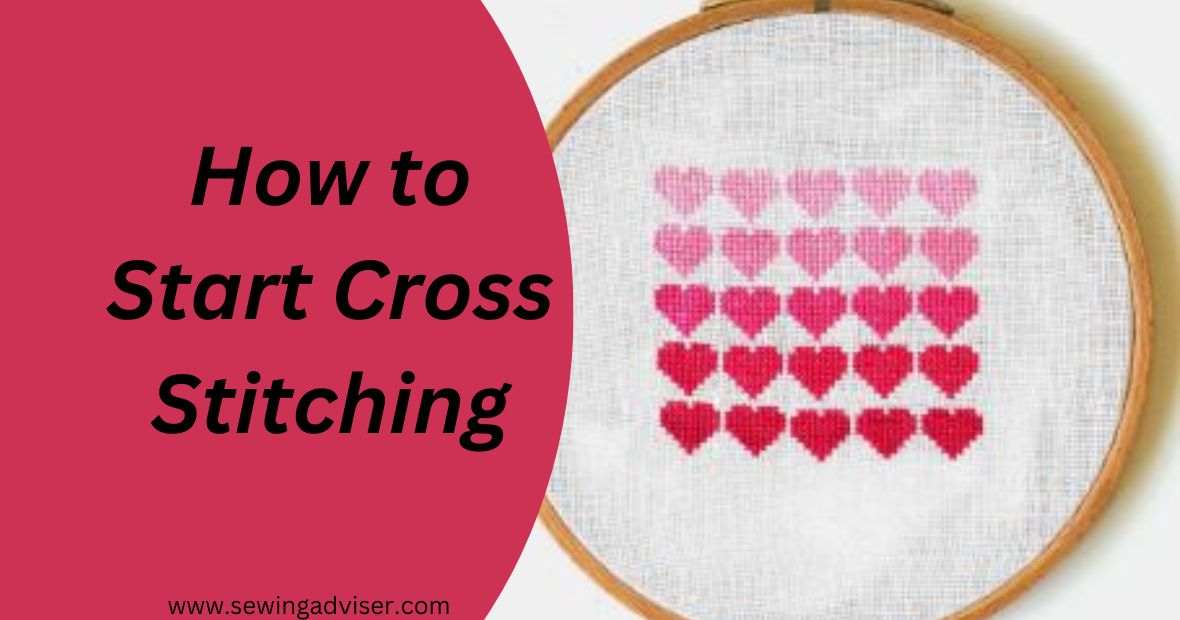
How to Start Cross Stitching: 2024 Complete Beginners Guide
If you’re looking for a fun and creative way to pass the time, cross-stitching is a great option to consider. This timeless craft has been enjoyed for generations and involves using a needle and thread to create intricate designs on a piece of fabric.
Whether you’re looking to create a personalized gift for a loved one or simply want to unwind and express your creativity, cross-stitching is a fantastic hobby to pick up.
In this article, we’ll cover the basics of how to start cross-stitching, from choosing your materials to learning the basic stitches.
So grab a cup of tea, settle in, and get ready to discover the wonderful world of cross-stitching!
What Is Cross Stitch?
Cross stitch is a form of needlework where a design is created by stitching small X-shaped stitches onto a fabric.
The design is usually created using a chart that shows the placement of each stitch and the color of embroidery floss to use.
How to Start Cross Stitching: Step By Step Guide
To start cross-stitching, you can follow these easiest steps:
Materials Needed
Before you can start cross stitching, you’ll need to gather some supplies. Here are the items you’ll need:
- Aida cloth or other cross stitch fabric
- Embroidery floss in the colors needed for your pattern
- Cross stitch needle
- Embroidery scissors
- Hoop (optional but recommended)
- Pattern (either printed or digital)
Selecting a Pattern
The first step in cross-stitching is to select a pattern. There are countless designs available, from simple geometric shapes to intricate scenes.
You can find patterns online, in craft stores, or in books. When selecting a pattern, consider your skill level, the size of the finished piece, and the colors you’ll need.
Preparing Your Fabric
Once you have your pattern, it’s time to prepare your fabric. Aida cloth is the most commonly used fabric for cross-stitching.
It comes in various counts, which refers to the number of stitches per inch. To prepare your fabric, cut it to the desired size and fray the edges to prevent unraveling.
Choosing Your Floss
Embroidery floss comes in hundreds of colors and is made of six strands that can be separated to create thinner threads.
When selecting floss for your project, refer to your pattern for the colors needed. You can purchase floss in individual skeins or in pre-made sets.
Preparing Your Floss
Before you start stitching, you’ll need to prepare your floss. To do this, separate the six strands and choose the number needed for your pattern. Thread your needle and knot the end.
Starting Your Stitch
To start your stitch, bring your needle up through the back of the fabric and pull the thread through until the knot catches.
Your first stitch will be a diagonal stitch from the upper left corner of the square to the lower right corner. Repeat this stitch in the opposite direction to create a cross.
Stitching Techniques
There are two main stitching techniques used in cross stitching: the full cross stitch and the backstitch. The full cross stitch is the most basic stitch and is used to fill in the design. The backstitch is used to outline the design and create details.
Related Post: Tips For How To Backstitch By Hand
Finishing Your Piece
Once you’ve finished stitching, it’s time to finish your piece. Trim any excess floss and tie off the threads on the back of the fabric.
You can wash your finished piece to remove any markings or dirt, but be sure to follow the care instructions for your fabric and floss.
Framing Your Finished Work
To display your finished piece, you can frame it in a hoop or a picture frame. Make sure to choose a frame that complements the colors and style of your piece.
If you’re using a hoop, stretch your fabric over the hoop and tighten the screw until it’s taut. Trim any excess fabric and glue it to the back of the hoop. If you’re using a picture frame, remove the backing and insert your piece, then replace the backing.
How to Cross Stitch Faster:
- Always use a hoop or frame to keep your fabric taut and in place.
- Stitch in batches, completing multiple stitches of the same color at once.
- Use a needle with a larger eye to make threading easier.
- Practice your stitching technique to become more efficient.
How to Start to Cross Stitch with a Loop
To start cross-stitching with a loop, you can follow these steps:
- Cut a piece of embroidery floss to the desired length. It’s recommended to use no more than 18 inches of floss at a time to prevent tangling.
- Thread your needle with the floss and tie a knot at the end.
- Bring the needle up from the back of the fabric at the starting point of your design.
- Hold the floss with your non-dominant hand and use your dominant hand to create a small loop with the floss.
- Insert the needle through the loop and pull the floss through the fabric until the knot is flush against the back.
- Continue stitching over the loop and the tail of the floss to secure it in place.
- When you reach the end of your floss, secure it by taking a small stitch over the tail on the back of the fabric.
- Repeat the process to add more stitches.
Remember to keep your stitches consistent in size and direction to achieve a clean and polished look. Happy stitching!
How to Start Cross Stitch without a Knot
Starting cross-stitch without a knot is called the “loop start” method, and it’s a popular technique among stitchers as it produces a neater and cleaner look. Here’s how you can do it:
- Cut a piece of embroidery floss that you want.
- Fold the floss in half, and thread the needle with both ends of the floss.
- Hold the needle with both ends of the floss with your non-dominant hand. With your dominant hand, create a small loop with the floss near the folded end.
- Insert the needle through the fabric at the starting point of your design, coming up from the back of the fabric.
- Bring the needle down through the loop, pulling gently until the loop is snug against the fabric.
- Continue stitching over the loop and the tail of the floss to secure it in place.
- When you reach the end of the floss, secure it by taking a small stitch over the tail on the back of the fabric.
- Repeat the process to add more stitches.
By using this method, you can avoid bulky knots on the back of your work, which can make it more difficult to achieve a smooth finish. It may take a bit of practice, but it’s worth it for a more professional-looking result.
How to Start Cross Stitch with One Strand
To start cross stitching with one strand:
- Cut a length of embroidery floss (usually about 18 inches or 45 cm) and separate one strand from the six strands of floss.
- Thread the single strand of floss through the needle and tie a knot at the end of the floss.
- Choose the starting point on your fabric and bring the needle up from the back of the fabric at the first hole of the pattern.
- Bring the needle back down through the next hole in the pattern, creating a diagonal stitch.
- Continue stitching in this manner, following the pattern until you have completed the design.
How to Start to Cross Stitch with 2 Strands
To start cross-stitching with 2 strands of embroidery floss, follow these steps:
- Cut a length of embroidery floss about 18-24 inches long.
- Separate the floss into 2 strands by pulling gently at one end until it separates from the others. Repeat this with the other end of the floss.
- Thread one of the strands through the eye of your needle, and tie a knot at the end of the other strand.
- Find the center of your cross-stitch pattern, and begin stitching from there.
- Bring your needle up from the back of the fabric at the bottom left corner of the first square you want to stitch.
- Bring the needle back down through the top right corner of the same square.
- Continue stitching in this way, working from left to right and then top to bottom, until you have completed all the stitches in the first color.
- When you are ready to switch colors, tie off the end of the floss, and repeat steps 1-3 with the new color.
With these steps, you should be able to start cross-stitching with 2 strands of embroidery floss.
How to Prepare Your Cross Stitch Floss:
- Cut your embroidery floss to the desired length, typically 18-24 inches.
- Separate the strands of floss most patterns call for 2 strands, but this can vary.
- Smooth out any kinks in the floss by running it between your fingers.
How to do the Loop Method in Cross Stitch:
- Thread your needle with the desired number of strands of floss.
- Fold the floss in half, so that the ends meet.
- Thread the folded end through the needle, creating a loop.
- Begin stitching as usual, inserting the needle through the fabric from the back and pulling it up through the loop.
- Continue stitching, pulling the loop taut each time you make a stitch.
How to Untangle Embroidery Floss:
- Gently pull the tangled strands apart.
- Use a needle or pin to pick apart any stubborn knots.
- If the tangle is too difficult to untangle, cut the floss and start with a fresh length.
What is Counted Cross Stitch?
Counted cross stitch is a form of embroidery where the design is created by making stitches over a pre-printed pattern on fabric.
Unlike other forms of embroidery, where the design is pre-printed or traced onto the fabric, in counted cross stitch, the design is not printed on the fabric.
Instead, the design is created by counting the threads of the fabric and making stitches over specific threads to create the desired pattern.
The stitcher uses a chart or pattern to determine which stitches to make, and the pattern indicates the number of stitches needed and the color of floss to use for each area of the design.
Counted cross stitch is a popular craft that can be used to create a wide variety of designs, from simple patterns to intricate, detailed works of art. It is enjoyed by people of all ages and skill levels and is often used to create home decor, gifts, and personalized items.
The Beginners Guide to Cross Stitching:
- Start with a simple pattern and a small project.
- Familiarize yourself with the basic stitches and techniques.
- Always use a hoop or frame to keep your fabric taut and in place.
- Take breaks often to avoid eye strain and hand fatigue.
- Don’t worry about making mistakes they can be easily corrected.
How to Find a Cross Stitch Pattern:
- Look online there are many websites and forums dedicated to cross-stitching and pattern sharing.
- Check your local craft store for pattern books and magazines.
- Create your own pattern using graph paper and colored pencils.
- Look for vintage or antique patterns at thrift stores or flea markets.
How to Read a Cross Stitch Pattern:
- The pattern/chart will show the design and color placement.
- Each symbol on the chart represents a different color of embroidery floss.
- The chart will also indicate the number of strands of floss to use and the type of stitch required.
How to Change Colors in Cross Stitch
To change colors in cross stitch, simply finish your last stitch with the old color and cut the thread. Thread your needle with the new color and start stitching with the new color.
You can either knot the two threads together on the back of your work or weave the ends under several stitches to secure them.
How to Complete a Cross Stitch
To complete a cross stitch, simply follow the pattern, stitching each square with the designated color.
When you’ve finished stitching, tie off the thread on the back of your work and trim any excess thread.
Best Way to End a Thread in Cross Stitch
To end a thread in cross stitch, weave the end of the thread under several stitches on the back of your work to secure it.
Then, trim the excess thread. Do not knot the thread, as this can create bumps and distort your work.
Troubleshooting Common Problems
If you’re having trouble with your stitching, don’t worry! Here are the most common problems and solutions:
- Uneven stitches: Make sure to keep your tension consistent and use the same number of strands for each stitch.
- Knots and tangles: Be sure to separate your floss strands carefully and avoid twisting the thread.
- Running out of floss: When starting a new thread, tie a small knot and weave the end under your previous stitches to secure it.
- Miscounting: Double-check your pattern and count your stitches carefully before starting to avoid mistakes.
- Knots on the back of the fabric: If you’re using knots to start your thread, make sure they are small and tight to avoid creating a bulky mess on the back of your work.
- Using too many strands of floss: Using too many strands of floss can make your stitches look bulky and uneven. Follow the pattern’s instructions for the correct number of strands.
- Not securing your floss: Always make sure to secure your floss at the end of each length by taking a small stitch over the tail on the back of the fabric. This will prevent your work from unraveling over time.
Conclusion
I hope now you are well aware of How to Start Cross Stitching? In conclusion, cross-stitching is a wonderful and rewarding hobby that can be enjoyed by anyone.
With the right materials, tools, and techniques, you can create beautiful works of art that will be treasured for years to come.
We hope that this guide has provided you with the information and inspiration you need to get started on your own cross-stitching journey.
Do I need a pattern to start cross stitching?
No, you can freehand your design or use a simple pattern to get started.
Can I wash my cross-stitched project?
Yes, but make sure to use cold water and a gentle detergent.

2 Comments